Alright, people. Let’s talk about a life-changing combo that’s about to rock your taste buds: chocolate cake with cookie butter frosting. Yes, you read that right. It’s like someone took your two guilty pleasures, threw them in a culinary blender, and created pure magic. If you’ve never experienced cookie butter (where have you been hiding?), prepare for your dessert world to be turned upside down.
Why This Recipe is Awesome
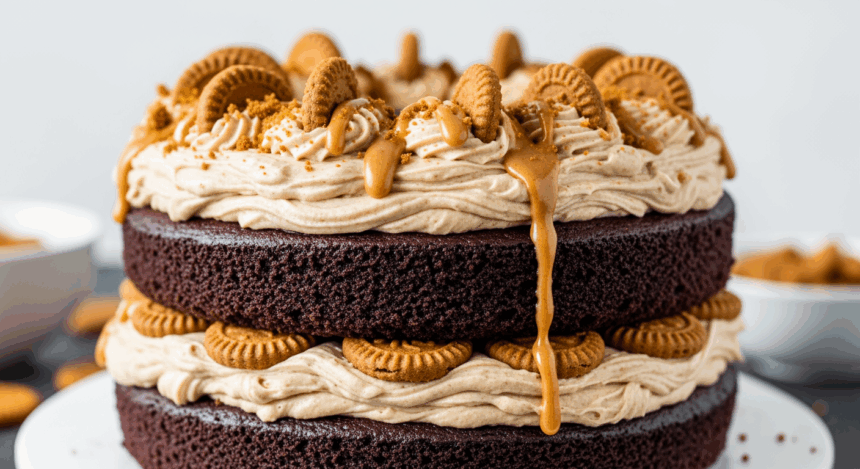
First off, this isn’t just any chocolate cake. This is the kind of cake that makes you cancel plans just so you can stay home with it. The kind that has you scraping the plate with your finger when nobody’s looking. What makes it exceptional? The contrast between the rich, moist chocolate cake and the spiced, caramelized flavor of cookie butter frosting is basically a religious experience.
Plus, it’s weirdly impressive to people when you mention cookie butter frosting. They’ll think you’re some kind of pastry genius when really, you just followed these instructions and didn’t burn your kitchen down. Win-win.
Ingredients You’ll Need
For the chocolate cake:
- 2 cups all-purpose flour (the regular stuff, not that fancy artisanal nonsense)
- 2 cups granulated sugar (yes, that much—this isn’t a diet cake)
- ¾ cup unsweetened cocoa powder (the darker, the better for your chocolate-loving soul)
- 2 teaspoons baking soda (not baking powder—they’re different, trust me on this one)
- 1 teaspoon salt (to make the sweet stuff taste even sweeter)
- 2 large eggs (from happy chickens if you’re fancy)
- 1 cup buttermilk (or regular milk with a splash of vinegar if you forgot to buy buttermilk…again)
- ½ cup vegetable oil (keeps it moist for days—if it lasts that long)
- 2 teaspoons vanilla extract (the real stuff, not that imitation garbage)
- 1 cup hot coffee (makes the chocolate flavor pop, and no, you can’t taste the coffee)
For the cookie butter frosting:
- 1 cup unsalted butter, softened (patience, young Padawan—truly softened, not microwaved)
- 1 cup cookie butter (Speculoos, Biscoff, whatever brand your grocery store stocks)
- 4 cups powdered sugar (yes, it’s a lot, but we’re not making a salad here)
- ¼ cup heavy cream (makes it fluffy and dreamy)
- 1 teaspoon vanilla extract (always a good idea)
- Pinch of salt (cuts the sweetness just enough)
Step-by-Step Instructions
For the chocolate cake:
- Preheat your oven to 350°F (175°C). Grease and flour two 9-inch round cake pans. Or use parchment paper if you’re smart and hate cleaning.
- In a large bowl, whisk together flour, sugar, cocoa, baking soda, and salt. Make a well in the center like you’re creating a tiny flour volcano.
- Add eggs, buttermilk, oil, and vanilla to your dry-ingredient volcano. Mix until just combined. It’ll look weird and lumpy—that’s normal.
- Pour in the hot coffee and mix again. The batter will be very thin, almost concerning. Don’t panic. This is correct.
- Pour the batter evenly between your prepared pans. Gently tap the pans on the counter to release air bubbles (and for dramatic effect).
- Bake for 30-35 minutes, or until a toothpick inserted in the center comes out clean. If you’re like me and forget to set a timer, the smell of chocolate will remind you.
- Cool in pans for 10 minutes, then flip onto wire racks to cool completely. Seriously, wait until they’re COMPLETELY cool before frosting. I know it’s hard.
For the cookie butter frosting:
- In a large bowl, beat the softened butter and cookie butter until smooth and creamy. If your arm gets tired, consider this your workout for the day.
- Gradually add powdered sugar, one cup at a time, mixing on low speed. Unless you enjoy wearing powdered sugar, in which case, crank that mixer to high.
- Pour in heavy cream and vanilla, then beat on medium-high speed for about 3 minutes until the frosting is light and fluffy. It should hold a soft peak when you lift the beater.
- Add a pinch of salt and mix again. Taste test (obviously). Adjust consistency with more cream or powdered sugar if needed.
Assembly:
- Place one cake layer on your serving plate. Plop a generous amount of frosting on top and spread it evenly, leaving a small border around the edge.
- Top with the second cake layer, then frost the top and sides. Get creative—or don’t. Rustic frosting jobs are trendy now (thank goodness for lazy people everywhere).
- For extra fanciness, crumble some speculoos cookies on top. Or don’t and eat those cookies separately. I’m not judging.
Common Mistakes to Avoid
Let me save you from yourself with these tips:
- Overmixing the batter – You’re making cake, not bread. Don’t beat it like it owes you money.
- Skipping the coffee – “But I don’t like coffee!” I hear you cry. Relax. You won’t taste it, but it makes the chocolate flavor deeper. Trust the process.
- Frosting a warm cake – Unless you enjoy frosting soup, wait until that cake is completely cool. I’m talking room temperature, people.
- Being stingy with the cookie butter – This isn’t the time to hold back. The cookie butter is the star of this show.
- Forgetting the salt – A tiny pinch in both the cake and frosting makes everything taste better. It’s science. Or magic. Whatever.
Alternatives & Substitutions
Life happens. Ingredients get forgotten. Here’s how to pivot:
- No cookie butter? First, I’m sorry for your loss. Second, you could use peanut butter, but TBH it won’t be the same. Make a grocery store run. It’s worth it.
- Buttermilk substitute: Mix 1 cup of regular milk with 1 tablespoon of lemon juice or vinegar. Let it sit for 5 minutes until slightly curdled. Voilà! Fake buttermilk.
- Coffee alternatives: Use hot water if you must, but adding 1-2 teaspoons of instant espresso powder will give you that same flavor boost.
- Gluten-free version: Substitute a good quality 1:1 gluten-free flour blend. The texture might be slightly different, but it’ll still be delicious.
- Make it boozy: Add a splash of Baileys to the frosting. Because why not? You’re an adult. You make the rules.
FAQ (Frequently Asked Questions)
Can I make this cake ahead of time?
Absolutely! The cake actually tastes better on day two when the flavors have had time to mingle and get to know each other. Store it covered at room temperature for 2-3 days, or refrigerate for up to a week. (As if it’ll last that long.)
Will this work as cupcakes?
You bet your sweet spatula it will! Fill cupcake liners about 2/3 full and bake for approximately 18-20 minutes. This recipe should make about 24 cupcakes. Pro tip: use an ice cream scoop for even portioning.
Can I freeze this cake?
Freezing the unfrosted cake layers works great! Wrap them well in plastic wrap, then aluminum foil, and freeze for up to 2 months. The frosting… not so much. Make that fresh.
Is cookie butter the same as Biscoff spread?
Essentially, yes. Biscoff is a brand name of cookie butter made from speculoos cookies. Trader Joe’s calls theirs “Cookie Butter.” They’re all delicious, spreadable cookie heaven.
Can I use a different frosting if I must?
I mean… technically yes, but WHY? The cookie butter frosting is what makes this recipe special. But if you insist, cream cheese frosting or vanilla buttercream works fine. Just know that I’m silently judging you.
Why is my cake dry?
You probably overbaked it. Chocolate cake can be tricky—it continues cooking slightly after you take it out of the oven. Pull it out when a few moist crumbs still cling to your toothpick.
Final Thoughts
Look, I’m not saying this cake will solve all your problems, but it will definitely make you forget about them for a while. The combination of moist chocolate cake with that spiced, caramelized cookie butter frosting is basically therapy in dessert form.
Next time someone asks what your love language is, just show them this cake. No words needed. And remember: calories consumed while baking don’t count (that’s also science). Now go preheat that oven and create some magic—your taste buds deserve this!
