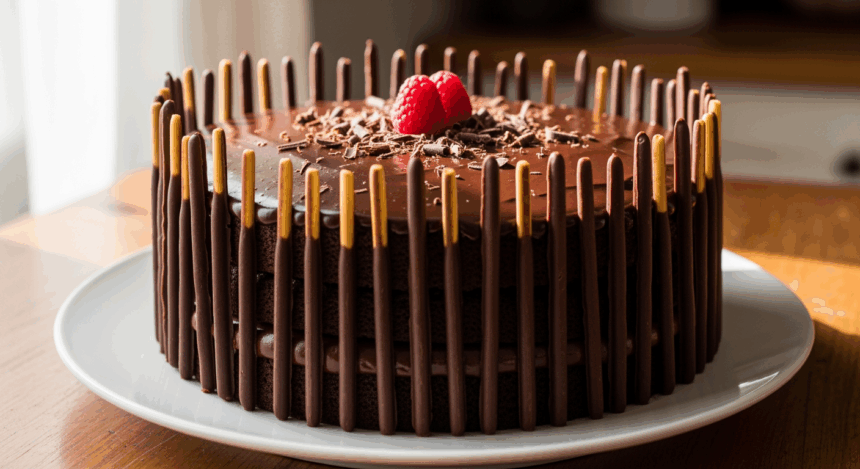
Ever had one of those days when you need chocolate like you need oxygen? Yeah, me too. That’s why this chocolate cake with chocolate sticks recipe is basically my version of CPR for a rough day. It’s like chocolate inception – cake stuffed with more chocolate because… why the heck not? When one form of chocolate just isn’t enough, this is your answer.
Why This Recipe is Awesome
Let’s be real here – this cake is basically showing off without actually requiring any skill. It looks fancy enough to make people think you spent hours crafting a masterpiece, when really you just stuck some chocolate sticks into a cake. It’s the ultimate baking illusion. Plus, it satisfies that “I need ALL the chocolate” craving that hits around… oh, I don’t know, Tuesday afternoons? Monday mornings? Random 2 AM moments? You get me.
Ingredients You’ll Need
For the cake:
- 2 cups all-purpose flour (the regular boring stuff, nothing fancy)
- 2 cups granulated sugar (because adulting is hard enough without measuring different sugars)
- ¾ cup unsweetened cocoa powder (the good stuff, not that chalky nonsense)
- 2 teaspoons baking powder (it’s what makes the magic happen)
- 1½ teaspoons baking soda (different from powder, don’t mix them up or things get weird)
- 1 teaspoon salt (just trust me)
- 2 large eggs (room temperature, because cold eggs are party poopers)
- 1 cup whole milk (or whatever milk-adjacent liquid you have)
- ½ cup vegetable oil (keeps things moist – sorry if you hate that word)
- 2 teaspoons vanilla extract (the real kind, not the fake stuff that tastes like chemicals)
- 1 cup hot coffee (or hot water if you’re not a coffee person, but honestly, coffee makes chocolate more chocolatey)
For the frosting and decoration:
- 1 cup unsalted butter, softened (patience, grasshopper – actually soft butter matters)
- 3½ cups powdered sugar (also called confectioners’ sugar for the fancy folks)
- ½ cup cocoa powder (more chocolate, because duh)
- ¼ cup milk (approximately – we’re not making rocket fuel here)
- 1 teaspoon vanilla extract (again, the good stuff)
- Pinch of salt (trust me, part two)
- About 20-30 chocolate sticks (Pocky sticks work great, or those Mikado things, or even chocolate-covered pretzel sticks if you’re feeling rebellious)
Step-by-Step Instructions
- Prep your battlefield. Preheat oven to 350°F (175°C). Grease and flour two 9-inch round cake pans. If you skip this step, you’ll be chiseling cake out later. Not fun.
- Mix the dry squad. In a large bowl, whisk together flour, sugar, cocoa, baking powder, baking soda, and salt. Make it look like one of those aesthetic sand art projects.
- Add the wet team. Throw in eggs, milk, oil, and vanilla. Beat with mixer on medium for about 2 minutes. It’ll look like chocolatey mud. That’s perfect.
- Coffee time. Stir in the hot coffee. Don’t freak out – the batter will be thin. This is correct! Thin batter = moist cake. (Sorry, said it again.)
- Bake it up. Pour batter into prepared pans and bake for 30-35 minutes, or until a toothpick comes out with just a few crumbs. Clean toothpick = overdone cake. Nobody wants that.
- Cool your jets. Let cakes cool in pans for 10 minutes, then flip onto wire racks to cool completely. Patience is a virtue or whatever.
- Frosting magic time. Beat butter until creamy. Gradually add powdered sugar, cocoa, milk, vanilla, and salt, beating until smooth and spreadable. If too thick, add more milk. If too thin, add more sugar. It’s not rocket science.
- Stack and frost. Place one cake layer on your plate. Slather with frosting. Top with second layer. Frost the whole thing like you’re painting a masterpiece (even if it looks more Jackson Pollock than Monet).
- The grand finale. Press chocolate sticks around the sides of the cake, spacing them evenly. They should stick up above the top edge for that “I totally planned this artistic look” vibe.
- Chill out. Refrigerate for 30 minutes to set everything. This prevents a chocolate stick avalanche when you cut into it.
Common Mistakes to Avoid
Let’s talk about ways to not sabotage yourself:
- Rushing the cooling process. Hot cake + frosting = sad, melty mess. Have some patience, for Pete’s sake.
- Skimping on the frosting between layers. This isn’t the time for your diet. Go big or go home.
- Using cold ingredients. Room temperature eggs and butter mix better. Science doesn’t care about your hurry.
- Overcooking the cake. Dry cake is just sad. Better slightly underdone than overdone.
- Putting chocolate sticks on too early. If your frosting is still too soft, you’ll have the Great Chocolate Stick Landslide of 2023.
Alternatives & Substitutions
Life happens. Pantries aren’t always fully stocked. Here’s how to roll with it:
- No coffee? Use hot water. You’ll lose some depth of flavor, but the cake police won’t arrest you.
- Dairy-free needs? Substitute almond or oat milk and use plant-based butter. The cake will never know the difference.
- No chocolate sticks? Break up chocolate bars into rectangles, or use Kit Kats, or even those fancy Pirouette cookies. IMO, anything stick-shaped and chocolate-adjacent works.
- Gluten issues? Use a cup-for-cup gluten-free flour blend. Just don’t use almond flour alone unless you want a pancake, not a cake.
- Feeling extra? Add a tablespoon of espresso powder to the frosting. Coffee and chocolate are BFFs.
FAQ (Frequently Asked Questions)
Can I make this cake ahead of time?
Absolutely! The cake layers can be made a day ahead, wrapped in plastic wrap, and stored at room temperature. I wouldn’t assemble with the chocolate sticks more than a few hours before serving though, unless you want them to get soft.
How do I store leftovers? As if there will be any…
In the unlikely event you don’t demolish this in one sitting, store it in the refrigerator in a covered container. Let it come to room temperature before serving again, or don’t – some weirdos like cold cake.
Can I use a boxed cake mix if I’m feeling supremely lazy?
Look, I’m not the cake police. Use a box mix if you want. Just doctor it up with an extra egg and swap the water for milk. Your secret is safe with me.
Do the chocolate sticks get soft and gross?
They will start to soften after several hours, which is why this is more of an “assemble shortly before serving” situation. Unless you like soggy sticks, which… no judgment. Well, maybe a little judgment.
Can I make this into cupcakes?
You magnificent genius, yes you can! Bake for about 18-22 minutes and stick just a couple chocolate sticks in each one. Cute overload.
Is this kid-friendly to make?
Kids can definitely help with the decorating part. Just be prepared for half your chocolate sticks to mysteriously disappear during the process. And maybe have wet wipes handy. So. Many. Wet wipes.
Final Thoughts
Congratulations! You’ve just created a chocolate masterpiece that’s basically a monument to your excellent life choices. This cake isn’t just dessert—it’s therapy without the hourly rate. Take a picture for the ‘gram before you demolish it (we all do it, don’t pretend you’re above that). And remember, calories consumed while standing at the counter, eating cake straight from the plate with a fork, technically don’t count. That’s not science, that’s just me enabling you. You’re welcome. Now go share your chocolate creation with someone you like—or don’t. I won’t tell if you eat it all yourself.
