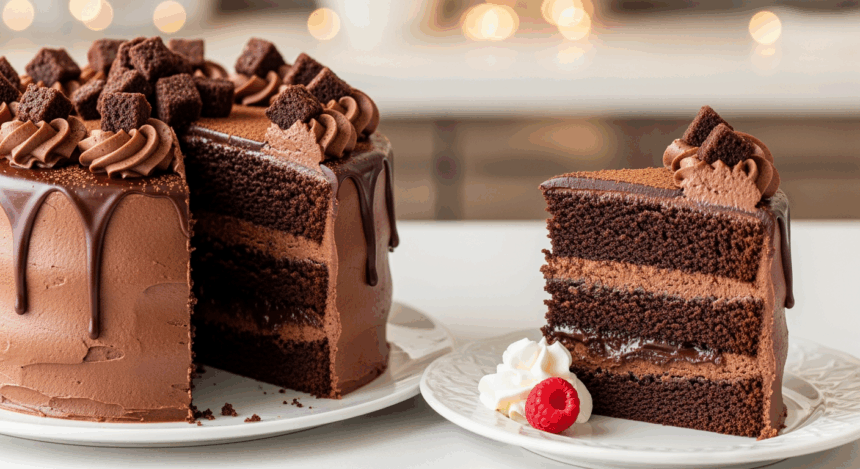
Look, let’s be real. There are chocolate cakes, and then there are chocolate cakes. This one? It’s basically what would happen if a chocolate cake and a brownie had a beautiful, delicious baby. It’s the kind of dessert that makes people dramatically clutch their chests and say things like “I can’t even” while reaching for seconds. Ready to become the hero at your next gathering? Let’s do this.
Why This Recipe is Awesome
First off, this isn’t just some regular chocolate cake with frosting. This is a chocolate cake with an actual brownie layer inside. It’s like dessert inception. You bite into what seems like a normal (albeit amazing) chocolate cake only to discover there’s a fudgy brownie surprise waiting inside. It’s the mullet of desserts – cake in the front, brownie in the middle, and pure joy all around.
Plus, despite looking like something that would take professional pastry chef skills, it’s actually pretty straightforward. The “wow” to “effort” ratio is off the charts here. Your Instagram will thank you.
Ingredients You’ll Need
For the Chocolate Cake:
- 2 cups all-purpose flour (the regular stuff, nothing fancy)
- 2 cups granulated sugar (aka the good stuff)
- ¾ cup unsweetened cocoa powder (not the hot chocolate mix, people!)
- 2 teaspoons baking soda (the small box in the back of your pantry)
- 1 teaspoon salt (just a pinch to make everything else pop)
- 2 large eggs (from actual chickens, preferably)
- 1 cup buttermilk (or regular milk with a splash of vinegar if you’re not a buttermilk-keeping kind of person)
- ½ cup vegetable oil (keeps it moist – sorry if you hate that word)
- 2 teaspoons vanilla extract (the real deal, not the imitation stuff)
- 1 cup hot coffee (or hot water if caffeine makes you twitchy)
For the Brownie Filling:
- 1 box brownie mix (I won’t tell anyone you didn’t make it from scratch)
- Eggs, oil, and water as directed on the box (follow their rules, not mine)
- ½ cup chocolate chips (because more chocolate is always the answer)
For the Chocolate Frosting:
- 1 cup unsalted butter, softened (patience, grasshopper – truly softened, not just slightly warm)
- 3½ cups powdered sugar (yes, that much)
- ½ cup cocoa powder (the good kind, if possible)
- ¼ cup heavy cream (diet culture has no place in frosting)
- 2 teaspoons vanilla extract (again, the real stuff)
- Pinch of salt (trust me on this one)
Step-by-Step Instructions
Let’s tackle this beast one delicious layer at a time:
- Prep work: Preheat your oven to 350°F (175°C). Grease and line two 9-inch cake pans with parchment paper. Also, prepare a 9-inch square pan for the brownie layer. Yes, three pans. I believe in your dishwashing abilities.
- Make the brownie layer first: Prepare the boxed brownie mix according to package directions, but add in those extra chocolate chips. Pour into your square pan and bake according to the box instructions. We want it slightly underbaked – about 5 minutes less than recommended. The center should be set but still fudgy. Let it cool completely.
- Cake time: In a large bowl, whisk together flour, sugar, cocoa powder, baking soda, and salt. In another bowl, beat the eggs, then add buttermilk, oil, and vanilla. Pour the wet ingredients into the dry ingredients and mix until just combined. Slowly add the hot coffee, mixing on low speed. The batter will be thin – that’s normal!
- Bake the cake: Divide the cake batter evenly between your two prepared round pans. Bake for 25-30 minutes or until a toothpick inserted comes out with a few moist crumbs. Let cool in pans for 10 minutes, then transfer to wire racks to cool completely.
- Make the frosting: Beat butter until creamy. Gradually add powdered sugar and cocoa powder, alternating with heavy cream. Add vanilla and salt. Beat until fluffy. If it’s too thick, add more cream. If it’s too thin, add more powdered sugar. It should be spreadable but not sliding off your spatula.
- Assembly time: Place one cake layer on your serving plate. Spread a thin layer of frosting on top. Cut your brownie layer to fit (it’s fine if you snack on the trimmings – that’s chef’s privilege). Place the brownie layer on top of the frosted cake layer. Add another thin layer of frosting on top of the brownie, then place the second cake layer on top.
- Frost that beauty: Cover the entire cake with the remaining frosting. Get creative with swirls or keep it smooth – whatever matches your skill level and patience threshold.
- Garnish (optional): Sprinkle with chocolate shavings, mini chocolate chips, or dust with cocoa powder if you’re feeling fancy. Or leave it as is – it’s already spectacular.
Common Mistakes to Avoid
Even the best bakers sometimes make rookie mistakes. Here’s how to avoid cake catastrophes:
- Overbaking the brownie layer: We want fudgy, not crumbly. Underbake slightly for maximum gooeyness.
- Using hot ingredients for frosting: Warm butter = sad, melty frosting. Make sure everything’s room temp before you start.
- Trying to frost a warm cake: I know you’re excited, but patience yields better results. A warm cake will turn your frosting into chocolate soup.
- Skipping the parchment paper: Unless you enjoy cake permanently fused to pans, use parchment. Future you will be grateful.
- Rushing the cooling process: “It seems cool enough” is the beginning of many dessert disasters. If it feels even slightly warm, give it more time.
Alternatives & Substitutions
Because we all forget ingredients or have dietary restrictions:
Gluten concerns? Use your favorite gluten-free flour blend for the cake and a gluten-free brownie mix. The texture might be slightly different, but the deliciousness remains.
No buttermilk? Add a tablespoon of white vinegar or lemon juice to regular milk and let it sit for 5 minutes. Boom – buttermilk substitute.
No coffee or don’t want caffeine? Use hot water instead. You’ll lose a bit of depth, but the cake will still be amazing. You could add a teaspoon of espresso powder to hot water for the flavor without as much caffeine.
Want to switch up the filling? Try a layer of cheesecake filling, cookie dough (eggless!), or even a layer of peanut butter cups. IMO, the brownie is perfect, but you do you.
Frosting alternatives: Cream cheese frosting works beautifully here, as does a simple ganache if you’re feeling lazy or sophisticated (they sometimes look the same).
FAQ (Frequently Asked Questions)
Can I make this ahead of time?
Absolutely! The cake actually gets better after a day in the fridge. The flavors meld and the brownie layer gets even fudgier. Make it up to two days ahead and store in the refrigerator.
How do I store leftovers? (As if there will be any…)
Cover and refrigerate for up to 5 days. Let it come to room temperature before serving for best flavor. Or eat it cold from the fridge at midnight like a normal person.
Can I freeze this masterpiece?
Yes! Wrap individual slices tightly in plastic wrap, then foil, and freeze for up to 3 months. Thaw in the refrigerator overnight.
Do I really need three different pans?
You could bake the brownie first, then use the same square pan to bake one half of the cake batter, but you’ll be extending your baking time significantly. If you have the pans, use them.
My frosting is too thick/thin. Help!
Too thick? Add a splash more heavy cream. Too thin? Add more powdered sugar. Frosting is forgiving – just keep adjusting until it reaches spreading consistency.
Can I use a different size pan?
Sure, but you’ll need to adjust baking times. Smaller pans = taller layers = longer baking time. Larger pans = thinner layers = shorter baking time. Watch carefully!
Final Thoughts
This chocolate cake with brownie filling isn’t just a dessert – it’s a statement. It says, “I might look like I have my life together enough to make a multi-layered chocolate masterpiece, and you’ll never know if that’s actually true.” It’s perfect for birthdays, bad days, good days, or just because it’s Tuesday.
The beauty of this recipe is that despite its showstopper appearance, it’s actually pretty forgiving. Layers not perfectly even? Call it “rustic.” Frosting job a bit messy? That’s now “artisanal.” The taste will make everyone forget any aesthetic imperfections anyway.
Now go forth and bake something that would make chocolate lovers weep with joy. And if anyone asks for the recipe, feel free to mumble something about “family secrets” while sending them this link. You’ve earned those bragging rights!
