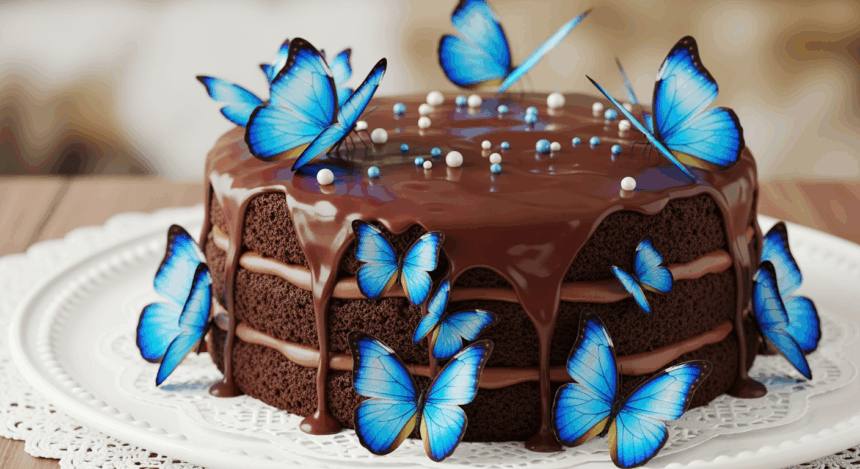
Oh my gosh, you guys! Remember when we were kids and thought blue food was somehow magical? Well, guess what—it still is! I’ve been obsessing over this Chocolate Cake With Blue Butterflies recipe that literally makes people gasp when you bring it to the table. It’s like regular chocolate cake decided to put on its fancy pants and go to the ball. Let’s make some edible magic, shall we?
Why This Recipe is Awesome
First of all, this cake is basically wearing a disguise. From the outside, it looks like you spent hours painstakingly decorating it (spoiler alert: you didn’t). The chocolate is rich enough to make your eyes roll back, but those blue butterflies? They’re the conversation starter that’ll have everyone thinking you’re some kind of pastry genius.
The best part? You can be a complete baking disaster in every other aspect of life and still nail this. It’s basically the confidence boost we all need right now. Plus, who doesn’t want to eat something that looks like it flew straight out of a fairy tale?
Ingredients You’ll Need
For the cake:
- 2 cups all-purpose flour (the regular boring stuff, nothing fancy)
- 2 cups granulated sugar (because we’re not playing games with our sweetness level)
- ¾ cup unsweetened cocoa powder (the good kind, not the sad dusty one from the back of your pantry)
- 2 teaspoons baking powder
- 1½ teaspoons baking soda
- 1 teaspoon salt
- 2 large eggs (room temperature, because cold eggs are just rude to your batter)
- 1 cup buttermilk (or regular milk with a splash of vinegar if you’re not that prepared)
- ½ cup vegetable oil (keeps it moist, sorry if you hate that word)
- 2 teaspoons vanilla extract (the real stuff, not that imitation nonsense)
- 1 cup hot coffee (yes, COFFEE—trust me on this one)
For the blue butterflies:
- White chocolate (about 8 oz)
- Blue food coloring (gel works best, unless you want Smurf-colored fingers for days)
- Butterfly template or a steady hand and wild imagination
- Parchment paper (your new best friend)
For the frosting:
- 1 cup unsalted butter, softened (patience, grasshopper—truly soft butter matters)
- 4 cups powdered sugar (yes, FOUR—we’re not making health food here)
- ½ cup cocoa powder
- ¼ cup heavy cream
- 2 teaspoons vanilla extract
- Pinch of salt (the secret weapon of sweet things)
Step-by-Step Instructions
- Prep your canvas. Preheat oven to 350°F (175°C). Grease and line two 9-inch cake pans with parchment paper. The parchment isn’t optional unless you enjoy chiseling cake from pans.
- Mix the dry squad. In a large bowl, whisk together flour, sugar, cocoa powder, baking powder, baking soda, and salt. Create a well in the center like you’re making a cocoa volcano.
- Get wet. In another bowl, beat the eggs, buttermilk, oil, and vanilla. Pour this mixture into your dry ingredient volcano.
- Add the secret weapon. Slowly stir in the hot coffee. Yes, the batter will be thin—don’t panic! It’s supposed to look like that.
- Bake it up. Pour the batter evenly into your prepared pans and bake for 30-35 minutes, or until a toothpick comes out mostly clean. Moist crumbs are fine, wet batter is not.
- Cool your jets. Let the cakes cool in their pans for 10 minutes, then flip onto a wire rack to cool completely. Seriously, COMPLETELY—impatience leads to frosting avalanches.
- Butterfly time! Melt your white chocolate in the microwave in 30-second bursts. Add blue food coloring and mix until you reach your desired shade of blue. Transfer to a piping bag or zip-top bag with the corner snipped.
- Become an artist. Place your butterfly template under a sheet of parchment paper. Trace the butterflies with your blue chocolate. Get creative with different sizes and patterns! Let them harden completely.
- Make it fluffy. Beat the butter for your frosting until creamy. Gradually add powdered sugar, cocoa powder, heavy cream, vanilla, and salt. Beat until you achieve cloud-like consistency.
- Stack and frost. Place one cake layer on your serving plate, spread a generous layer of frosting, top with the second cake, and frost the entire exterior.
- Grand finale! Carefully peel your hardened blue butterflies from the parchment and arrange them on the cake. Place some flat against the frosting, others with wings bent slightly upward for a 3D effect. Position them like they’ve just landed or are in mid-flight.
Common Mistakes to Avoid
Rushing the cooling process. Hot or warm cakes + frosting = sad, melty disaster. I’ve learned this the hard way so you don’t have to.
Making butterflies too thin. If your chocolate butterflies are thinner than your patience on Monday morning, they’ll break when you try to place them. Aim for at least 1/8 inch thickness.
Forgetting the coffee. “But I don’t like coffee!” I hear you cry. Trust me, it doesn’t make the cake taste like coffee—it intensifies the chocolate flavor. Science is cool like that.
Overworking the batter. This isn’t your stress-relief punching bag. Mix just until combined—otherwise, you’ll end up with a tough cake that’s more suitable as a frisbee.
Alternatives & Substitutions
Not feeling blue? Go wild with different colored butterflies! Purple for mystical vibes, pink for princess energy, or go rainbow if you’re feeling extra.
No buttermilk? No problem. Mix 1 cup of regular milk with 1 tablespoon of lemon juice or white vinegar. Let it sit for 5 minutes until it looks slightly curdled. Voilà—fake buttermilk!
Can’t do coffee? Use hot water instead. Your chocolate flavor won’t be quite as deep, but it’ll still be delicious.
Gluten issues? Substitute a good quality 1:1 gluten-free flour blend. Just be warned that the texture might be slightly different—but hey, those gorgeous butterflies will distract everyone anyway.
FAQ (Frequently Asked Questions)
How far in advance can I make the butterflies?
These little beauties can be made up to a week ahead! Store them in a cool, dry place in a single layer. For the love of all things holy, don’t stack them unless you want butterfly shards instead.
Will the food coloring stain my guests’ mouths?
Unless you’re using industrial-strength dye, probably not. But maybe don’t serve this at a wedding right before photos… just saying.
Can I use box cake mix instead?
Are you even serious right now? Fine, yes, you can. Doctor it up with an extra egg and substitute milk for the water. I’ll only judge you a little bit.
How do I store leftovers?
Leftovers? What leftovers? If by some miracle you have some, store at room temperature in a covered container for up to 3 days. The fridge will dry it out faster than the Sahara.
Can I freeze this masterpiece?
You can freeze the cake layers before frosting them. Wrap them well in plastic wrap and freeze for up to a month. But once you’ve added those butterflies? It’s showtime—no freezing allowed.
Do I really need special food coloring gel?
If you want vibrant blue that doesn’t turn your chocolate into a watery mess, then yeah. Regular food coloring has too much water and will make your chocolate seize up faster than my bank account after rent day.
Final Thoughts
Remember when you started reading this and thought, “There’s no way I can make something that fancy”? Well, look at you now, standing in front of a chocolate cake that looks like it could be in a fairy garden photoshoot. The chocolate-coffee combo is going to blow minds, and those blue butterflies? Pure magic.
This cake isn’t just dessert—it’s a whole vibe. It says, “Yes, I’m an adult who still believes in a little whimsy with my chocolate.” And honestly, couldn’t we all use more of that?
Now go forth and create your butterfly-adorned masterpiece! Send me pictures, brag about it on social media, or just sit in front of it alone making “nom nom” sounds. You’ve earned it!

