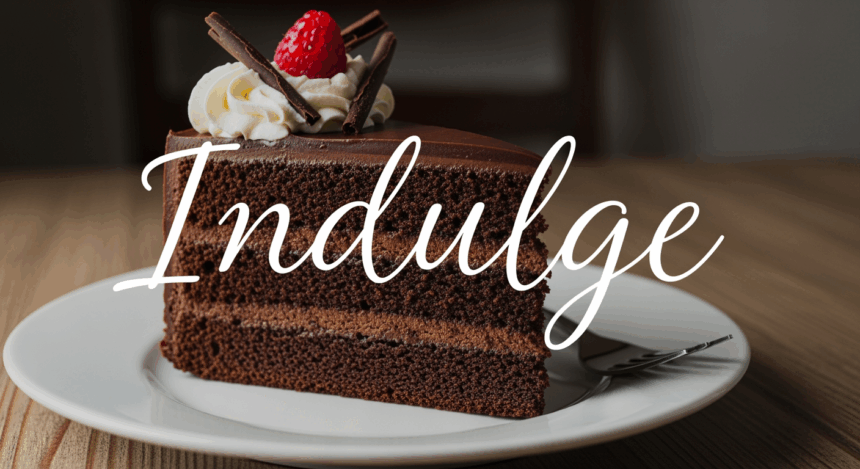
Ever stared at those perfect slices of chocolate cake on Instagram with fancy text overlay saying things like “indulge” or “treat yourself” and thought, “I need that in my life right now”? Well, grab your apron because today we’re making not just any chocolate cake, but one worthy of its own inspirational quote! #CakeGoals
Why This Recipe is Awesome
Let me count the ways this cake recipe rocks. First, it’s ridiculously moist (sorry if you hate that word, but there’s no better description). Second, it’s the perfect balance between “I made this from scratch” impressive and “I didn’t spend my entire weekend in the kitchen” practical. And third, it photographs like a dream—meaning your social media game is about to level up dramatically. Your followers won’t know what hit them.
Oh, and did I mention it tastes like chocolate heaven? Because it does. This is the kind of cake that makes people close their eyes when they take the first bite. Yeah, THAT good.
Ingredients You’ll Need
For the cake:
- 2 cups all-purpose flour (the regular stuff, nothing fancy)
- 2 cups granulated sugar (because life is short)
- 3/4 cup unsweetened cocoa powder (the darker, the better)
- 2 teaspoons baking soda (not baking powder—they’re different, trust me)
- 1 teaspoon salt (to make the sweet sweeter, it’s science or something)
- 2 large eggs (room temperature, please—cold eggs are party poopers)
- 1 cup buttermilk (or regular milk with a splash of vinegar if you forgot to buy buttermilk… again)
- 1/2 cup vegetable oil (keeps it moist—there’s that word again)
- 2 teaspoons vanilla extract (the real stuff, not the fake stuff)
- 1 cup hot coffee (don’t worry, it won’t taste like coffee, it just makes the chocolate more chocolate-y)
For the frosting:
- 1/2 cup unsalted butter (the real deal, not margarine)
- 2/3 cup unsweetened cocoa powder (more chocolate, more happiness)
- 3 cups powdered sugar (measured then sifted if you’re not a monster)
- 1/3 cup milk (approximately—we’re not NASA engineers here)
- 1 teaspoon vanilla extract (again, the good stuff)
Step-by-Step Instructions
- Prep your workspace. Preheat oven to 350°F (175°C). Grease and flour a 9×13 inch pan. Pro tip: put your phone in another room so you don’t get chocolate fingerprints all over it… yet.
- Mix the dry ingredients. In a large bowl, whisk together flour, sugar, cocoa, baking soda, and salt. Make a little well in the center like you’re preparing for a tiny chocolate lake.
- Add the wet team. Pour in eggs, buttermilk, oil, and vanilla. Mix until just combined—it’ll look like mud. Delicious, delicious mud.
- Coffee time! Stir in the hot coffee. The batter will be thin. This is normal. Resist the urge to thicken it—trust the process.
- Bake it. Pour into your prepared pan and bake for 30-35 minutes, or until a toothpick comes out with a few moist crumbs (not wet batter).
- Be patient. Let it cool completely. I know it’s torture, but frosting a warm cake is like trying to put makeup on while running—messy and disappointing.
- Make the frosting. Beat butter until creamy, add cocoa powder, then gradually add powdered sugar, milk, and vanilla until you reach spreadable consistency.
- Frost that beauty. Spread frosting evenly over the cooled cake.
- The Instagram moment. Cut a perfect slice, place it on your prettiest plate, and get creative with your text overlay. “Chocolate therapy” is always a crowd-pleaser.
Common Mistakes to Avoid
Let’s talk about how not to sabotage your chocolate masterpiece:
- Overmixing the batter. This isn’t a workout session—mix until combined and then step away from the spoon.
- Opening the oven door too early. Your cake needs privacy during its first 20 minutes. No peeking!
- Using cold ingredients. Room temperature eggs and buttermilk blend better. Science stuff, people.
- Skipping the coffee. “But I don’t like coffee!” I hear you say. Trust me, you can’t taste it—it just makes the chocolate flavor deeper. If you must, use hot water instead, but know that I’m judging you a little.
- Rushing the cooling process. Patience is a virtue, especially in baking. Hot cakes + frosting = sad, melty disaster.
Alternatives & Substitutions
Not everyone’s pantry is perfect, so here are some swaps that won’t ruin your cake:
Buttermilk alternative: Mix 1 cup milk with 1 tablespoon lemon juice or vinegar. Let it sit for 5 minutes until it looks slightly curdled. Gross but effective.
Coffee alternatives: Hot water works if you must, or hot chai tea for a spicy twist. But seriously, the coffee makes it better, and I will die on this hill.
Oil options: Melted butter can replace vegetable oil for a slightly different flavor, or applesauce for a lower-fat version (though it won’t be quite as moist—sorry).
Frosting variations: Add a tablespoon of espresso powder to the frosting for mocha vibes, or a pinch of cinnamon for a Mexican chocolate feel. Or go wild and use cream cheese frosting instead. It’s your cake journey.
Gluten concerns? A good quality 1:1 gluten-free flour blend usually works well in this recipe. The texture might be slightly different, but chocolate covers a multitude of sins.
FAQ (Frequently Asked Questions)
Can I make this cake ahead of time?
Absolutely! This cake actually tastes even better the next day. Store it covered at room temperature for up to 3 days, if it lasts that long (it won’t).
Do I really need to use hot coffee?
I mean, you don’t “need” to do anything in life except pay taxes and eventually die, but the hot coffee enhances the chocolate flavor without making it taste like coffee. It’s cake magic.
Can I turn this into cupcakes?
You betcha! Fill cupcake liners about 2/3 full and bake for approximately 20-22 minutes. You’ll get about 24 cupcakes.
How do I get that perfect slice for photos?
The secret is a hot, clean knife. Run your knife under hot water, wipe it dry, then slice. Clean and reheat the knife between cuts. Also, refrigerating the cake for 30 minutes before slicing helps.
What’s the best text overlay for my cake pics?
Classics like “Treat Yourself” or “Chocolate O’Clock” never fail. For extra sass, try “Diet Starts Tomorrow” or “Worth Every Calorie.” Just keep it in a font that doesn’t make people’s eyes bleed.
Can I freeze this cake?
Yes! Wrap unfrosted cake layers well and freeze for up to 2 months. Thaw overnight in the fridge before frosting. Frosted cake can also be frozen in slices—great for portion control (or midnight snacking).
I messed it up. Should I cry?
Nah. Even ugly cake is still cake! Crumble it up, layer it with some whipped cream, and call it a “deconstructed trifle.” Culinary genius status: achieved.
Final Thoughts
Congratulations! You’ve now got a chocolate cake that’s not only delicious but photogenic enough to make your friends question if you bought it from a fancy bakery. Whether you’re making this for a special occasion or just because it’s Tuesday (totally valid reason), this cake delivers on all fronts.
Remember, the key to good food photography isn’t just the food—it’s the story you tell with it. So slice it up, add your inspirational (or sarcastic) text overlay, and watch those likes roll in. Or just eat it straight from the pan while standing in front of the open fridge at midnight. I won’t tell anyone.
Now go forth and bake! Your chocolate destiny awaits.
