Ever scrolled through Instagram and just *gasped* at those perfect, almost impossibly neat slices of chocolate cake? The ones that look like they were carved by tiny, aesthetically-inclined kitchen elves? Yeah, me too. For a long time, my cake slices looked like they’d been in a wrestling match and lost – badly. But fear not, my friend, because I’ve cracked the code to making your chocolate cake slices look like they belong on a magazine cover, not just on your plate (though they’ll definitely belong there too!).
Why This Recipe is Awesome
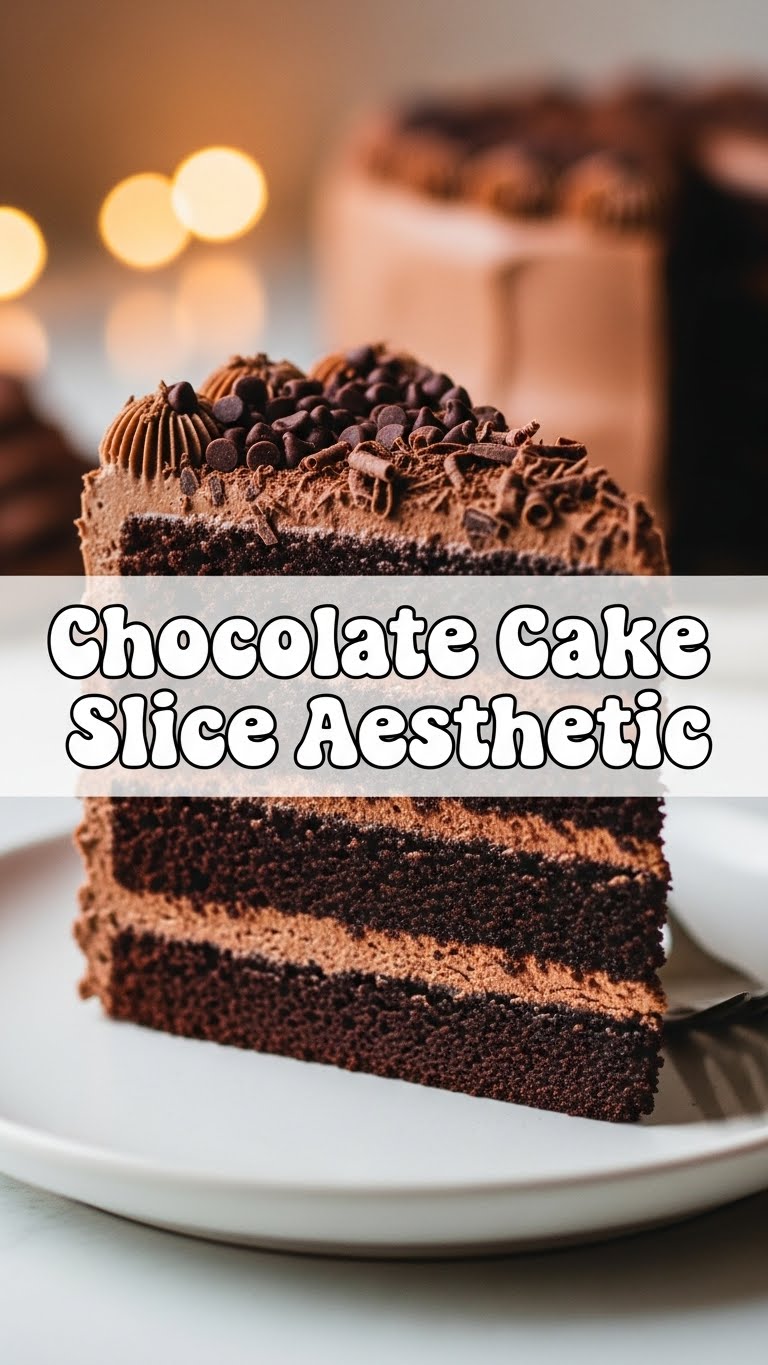
Okay, so this isn’t just *any* chocolate cake recipe. This is the recipe that will make your friends wonder if you secretly went to pastry school. It’s dense yet moist, intensely chocolatey, and most importantly, it’s built for slicing perfection. Plus, it’s pretty much **idiot-proof** – even I, who once mistook salt for sugar (don’t ask), manage to make this look amazing every single time. It bakes up with a relatively flat top (less leveling trauma for us mere mortals!) and holds its structure beautifully, which is key for those sharp, envy-inducing edges. Think of it as the supermodel of chocolate cakes. It just *knows* how to pose.
Ingredients You’ll Need
- 1 ½ cups All-Purpose Flour: The basic builder. Don’t overthink it.
- 1 ½ cups Granulated Sugar: For sweetness, duh.
- ¾ cup Unsweetened Cocoa Powder: And I mean *good quality* cocoa. Life’s too short for bland chocolate, IMO.
- 1 ½ teaspoons Baking Soda: Our lift-off specialist.
- 1 teaspoon Salt: Balances everything out and makes the chocolate sing.
- 2 Large Eggs: Room temp, please. They mix better, trust me.
- ¾ cup Milk (whole or 2%): Also room temp!
- ½ cup Vegetable Oil: Keeps things super moist. You could use melted butter, but oil is my secret for that long-lasting moistness.
- 2 teaspoons Vanilla Extract: The unsung hero of all baking. Don’t skimp!
- 1 cup Hot Water or Hot Brewed Coffee: This is where the magic happens. Coffee actually amplifies the chocolate flavor without making it taste like coffee. Shhh, don’t tell anyone.
- Your Favorite Chocolate Frosting: A good sturdy buttercream or ganache is ideal here for that clean aesthetic.
Step-by-Step Instructions
- Get Prepped: Preheat your oven to 350°F (175°C). Grease and flour two 8-inch round cake pans. Or, if you’re like me and prefer less mess, line the bottoms with parchment paper and just grease the sides.
- Mix the Dry: In a large bowl, whisk together the flour, sugar, cocoa powder, baking soda, and salt. Make sure there are no lumps, because nobody likes surprise flour bombs in their cake.
- Add the Wet (Mostly): In a separate bowl, whisk together the eggs, milk, oil, and vanilla extract until well combined.
- Combine & Conquer: Pour the wet ingredients into the dry ingredients. Mix on low speed with an electric mixer (or by hand with a whisk) until just combined. **Don’t overmix!** Overmixing develops the gluten too much, leading to a tough cake.
- The Hot Liquid Boost: Carefully pour in the hot water or coffee. Mix on low speed until the batter is smooth. It will be thin, and that’s okay.
- Bake Time: Divide the batter evenly between your prepared cake pans. Bake for 30-35 minutes, or until a wooden skewer inserted into the center comes out clean.
- Cool Down: Let the cakes cool in the pans for about 10-15 minutes before inverting them onto a wire rack to cool completely. **This is crucial for good slicing!** A warm cake will crumble and fall apart.
- Frost Like a Pro: Once completely cool, level your cake layers if needed (a serrated knife works wonders). Frost your cake. For the best aesthetic, aim for smooth, even frosting. Use an offset spatula or bench scraper for sharp edges on the outside.
- Chill Out (Again!): Pop the frosted cake into the fridge for at least 30 minutes, or even an hour. A slightly firm cake makes for much cleaner slices.
- The Big Slice! This is the secret weapon: **heat your knife.** Fill a tall glass with hot water. Dip a long, sharp, thin-bladed knife into the hot water, wipe it clean and dry, then make your first slice. Repeat this heating/wiping process for *every single slice*. Trust me, it’s a game-changer for those photo-ready edges.
Common Mistakes to Avoid
- Cutting a Warm Cake: Rookie mistake! Your gorgeous layers will smush, tear, and generally revolt. Patience, young padawan.
- Not Heating Your Knife: You’ll get jagged, frosting-smeared edges. And we’re going for “chef’s kiss,” not “oops, my cake exploded.”
- Overmixing the Batter: Leads to a dense, tough cake. Mix until *just* combined, then stop. Walk away from the mixer.
- Guessing with Measurements: Baking is a science, not an art (mostly). Use proper measuring cups and spoons.
- Skipping the Cooling Step: Seriously, don’t. Your frosting will melt, your cake will slide, and your dreams of cake perfection will crumble faster than a stale biscuit.
Alternatives & Substitutions
Feeling adventurous? Or just out of milk? No worries!
- Dairy-Free? Swap the milk for almond, soy, or oat milk. The oil already makes it pretty dairy-friendly.
- No Coffee? Hot water works absolutely fine. But if you have coffee, use it! It deepens the chocolate flavor like magic.
- Gluten-Free? You can try a 1:1 gluten-free flour blend, but baking GF can be a bit finicky, so results may vary.
- Frosting Flavors: While classic chocolate buttercream is divine, feel free to switch it up! A raspberry cream cheese frosting or a salted caramel buttercream would also be epic. Just make sure it’s sturdy enough to give you those clean slice lines.
FAQ (Frequently Asked Questions)
Got questions? I got answers!
Can I use margarine instead of butter in the cake? Well, technically yes, but why hurt your soul like that? Stick to oil in this recipe for the best moisture and texture. For frosting, butter is usually best for structure!
How do I get my cake layers super flat? Good question! This recipe bakes pretty flat already, but if you want extra assurance, you can use baking strips (wet strips wrapped around your pans) or simply level them with a serrated knife once cooled. FYI, a domed top means the edges cooked faster than the center.
Why is my cake dry? Usually, it’s either overbaked (keep an eye on that timer!) or you didn’t measure your ingredients precisely. Sometimes, not enough fat (oil/butter) can also be the culprit. Follow the recipe, don’t freestyle too much!
Can I make this cake ahead of time? Absolutely! Unfrosted cake layers can be wrapped tightly in plastic wrap and stored at room temperature for a day or two, or frozen for up to a month. Frosted cake keeps well in an airtight container at room temperature for 2-3 days, or in the fridge for up to 5 days.
My frosting keeps tearing the cake when I spread it. Help! Your cake might not be fully cooled, or your frosting might be too cold/stiff. Let the cake cool completely, and if your frosting is too stiff, add a tiny bit of milk or cream (half a teaspoon at a time) and mix until it’s spreadable.
Final Thoughts
So there you have it, folks. The secret sauce (or should I say, secret slice?) to achieving chocolate cake slice nirvana. It’s all about patience, the right tools, and a little bit of technique. Now go forth, bake this beauty, and unleash your inner cake artist. Your Instagram feed (and your taste buds) will thank you. Now go impress someone—or yourself—with your new culinary skills. You’ve earned it!


