So, your sweet tooth is screaming and your brain is buzzing with chocolatey dreams, but your motivation is currently on PTO, huh? I totally get it. We’re about to make chocolate cake layers so ridiculously good, you’ll wonder why you ever considered a sad, dry store-bought cake. And guess what? It’s easier than deciding what to binge-watch next!
Why This Recipe is Awesome
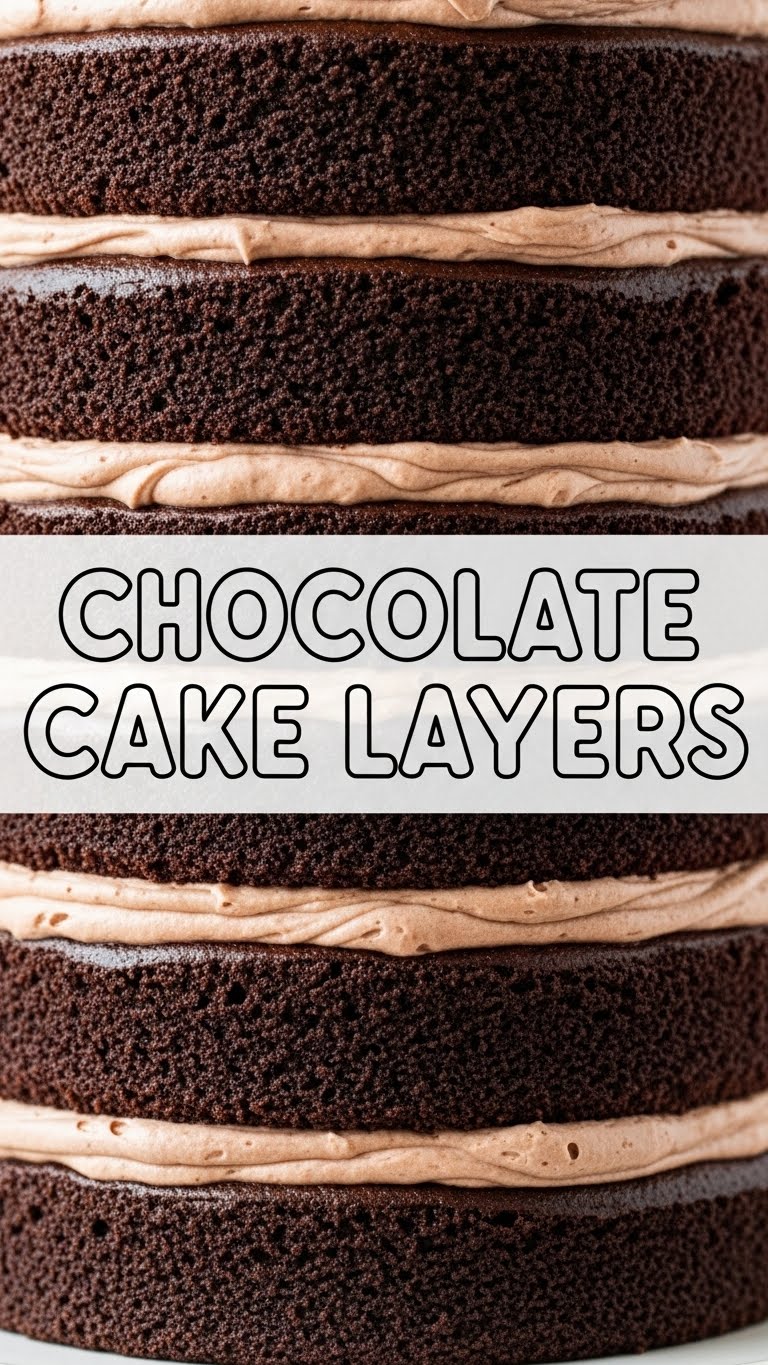
Listen, this isn’t just a recipe; it’s a superpower. You’re about to churn out moist, chocolatey cake layers that are the perfect foundation for any celebration (or just a Tuesday night, no judgment here!). It’s practically idiot-proof – even I haven’t messed it up, and my kitchen sometimes looks like a culinary crime scene. These layers are moist, fluffy, and have that deep chocolate flavor that makes you close your eyes and do a happy dance. Plus, they stack like a dream, making you look like a pro baker with minimal effort. Win-win!
Ingredients You’ll Need
Gather your troops, folks! Here’s what you need to conquer these cake layers:
- All-Purpose Flour: 1 ½ cups. The backbone of our cakey dreams.
- Granulated Sugar: 1 ½ cups. Because life’s better with a little sweetness.
- Unsweetened Cocoa Powder: ½ cup. The star of the show! Go for good quality – it makes a difference.
- Baking Soda: 1 ½ teaspoons. For that lovely lift.
- Baking Powder: 1 teaspoon. Double the leavening power!
- Salt: 1 teaspoon. Don’t skip it; it brings out all the flavors.
- Large Eggs: 2, at room temperature. Happy eggs bake better cakes, IMO.
- Whole Milk: 1 cup, at room temperature. Or buttermilk, if you’re feeling extra fancy and want even more moisture!
- Vegetable Oil: ½ cup. Keeps things super moist. Canola or another neutral oil works great.
- Vanilla Extract: 2 teaspoons. Liquid gold for flavor.
- Hot Water (or Coffee!): 1 cup. The secret weapon for deep chocolatey goodness. Coffee enhances chocolate like nobody’s business!
Step-by-Step Instructions
Alright, apron on, good tunes playing, let’s get baking!
- Preheat & Prep: Crank that oven to 350°F (175°C). Seriously, preheat it! Grease and flour two 8-inch round cake pans. Or, line them with parchment paper circles on the bottom for an extra safety net. Trust me on this one.
- Whisk the Dry Stuff: In a large bowl, whisk together the flour, sugar, cocoa powder, baking soda, baking powder, and salt. Make sure there are no lumps hiding.
- Combine Wet Ingredients: In a separate medium bowl, whisk together the eggs, milk, vegetable oil, and vanilla extract until well combined.
- Mix it Up: Pour the wet ingredients into the dry ingredients. Mix on low speed with an electric mixer (or by hand with a whisk) until just combined. Do not overmix! A few tiny lumps are okay.
- Add the Hot Liquid: Carefully pour the hot water (or coffee!) into the batter. Mix on low speed until just smooth. The batter will be thin, and that’s exactly what we want.
- Fill Your Pans: Divide the batter evenly between your two prepared cake pans. You can eyeball it, or use a kitchen scale for ultimate precision (if you’re feeling fancy).
- Bake It Up: Pop them in the preheated oven and bake for 30-35 minutes, or until a wooden skewer inserted into the center comes out clean.
- Cool Down: Let the cakes cool in their pans on a wire rack for about 10-15 minutes. Then, carefully invert them onto the wire rack to cool completely. Don’t rush this part; warm cake crumbles easily!
Common Mistakes to Avoid
Nobody’s perfect, but we can avoid some classic blunders that’ll mess with your cake goals:
- Not Preheating Your Oven: Rookie mistake! Your cakes need that consistent heat from the get-go to rise properly.
- Overmixing the Batter: This is a biggie! Overmixing develops gluten, leading to a tough, dry cake. Mix until *just* combined, then stop.
- Opening the Oven Door Too Early: Patience, young grasshopper! Opening the door before the cake is mostly set can make it sink in the middle. Resist the urge for at least the first 20 minutes.
- Not Greasing/Flouring Properly: Ever had a cake stick? It’s soul-crushing. Take your time with this step, or use parchment paper for peace of mind.
- Not Letting Them Cool: Trying to frost warm cakes is like trying to ice a melting snowman. It’s a mess. Let them cool completely, even if it means staring at them longingly for an hour.
Alternatives & Substitutions
Feeling adventurous or just missing an ingredient? No worries, we’ve got options!
- Milk Swap: Don’t have whole milk? Skim milk works, but whole milk or even buttermilk will give you a richer, more tender crumb. If you use buttermilk, you might get an even more delightful tang and moisture.
- Oil for Butter: This recipe uses oil for maximum moisture, but if you’re a butter purist, you can absolutely use melted unsalted butter. Just make sure it’s cooled a bit before adding to the wet ingredients.
- Gluten-Free Flour: For your gluten-averse pals, a 1:1 gluten-free baking blend (the kind with xanthan gum) usually works beautifully. Follow the package instructions, as some brands can be a bit thirstier.
- Coffee vs. Water: Seriously, try the hot coffee if you haven’t. It doesn’t make your cake taste like coffee, but it intensifies the chocolate flavor in an almost magical way. If you don’t have coffee, hot water is perfectly fine.
- Veganize It: Swap eggs for flax eggs (1 tbsp ground flaxseed + 3 tbsp water per egg, let sit 5 mins), milk for plant-based milk (almond or soy work well), and ensure your chocolate isn’t processed with dairy.
FAQ (Frequently Asked Questions)
Got questions? I’ve got (casual) answers!
- Can I use margarine instead of vegetable oil? Well, technically yes, but why hurt your soul like that? Vegetable oil provides consistent moisture and a neutral flavor. Margarine can sometimes give a weird texture or taste.
- My cake sank in the middle! What happened? Oh no! This often happens from opening the oven door too early, overmixing, or too much leavening. Next time, try to resist peeking until closer to the end, and be gentle with that mixing!
- Can I make these layers ahead of time? Absolutely! Once completely cooled, wrap each layer tightly in plastic wrap (and then foil if you’re feeling extra) and store at room temperature for up to 2 days, or freeze for up to 2 months. Thaw in the fridge before decorating.
- What if I only have one cake pan? You can bake one layer at a time, but be sure to keep the remaining batter covered and resting while the first one bakes. It might affect the rise slightly, but it’s totally doable.
- My cakes are dry. Help! Did you overbake them? That’s the most common culprit. Next time, start checking for doneness a few minutes earlier than the recipe suggests. An internal thermometer reading 200-210°F (93-99°C) is ideal!
- Can I use a different size pan? Sure, but you’ll need to adjust baking times. If using 9-inch pans, they might bake a bit faster. For smaller pans, they’ll take longer. Just keep an eye on them and use the skewer test!
Final Thoughts
So there you have it, folks! Your new favorite chocolate cake layer recipe. These beauties are going to be the foundation for some seriously epic desserts, whether you’re topping them with simple buttercream, a rich ganache, or just eating them plain with a fork (my personal favorite method, FYI). Now go impress someone – or just yourself – with your new culinary skills. You’ve earned it!


