So you’ve slaved over a hot oven (or, let’s be real, you bought a killer cake from the bakery, no judgment here!), and now it’s sitting there, looking all… naked. It needs a glow-up, right? We’re talking about taking that chocolatey masterpiece from “meh” to “OMG, did you *make* this?!” with some ridiculously easy garnish ideas. Get ready to elevate your cake game without actually doing more baking!
Why This Garnish Game Is Awesome
Listen, anyone can bake a cake (well, almost anyone). But elevating it to a showstopper without breaking a sweat? That’s where the real magic happens. This isn’t about making more mess; it’s about making it look like you *intended* to win a baking competition. It’s **instant fancy**, minimal effort. Plus, it’s a great excuse to buy more sprinkles. You’re welcome.
Goodies You’ll Need for Your Garnish Arsenal
- Chocolate (duh!): Shavings, curls, mini chips, or even a bar for melting and drizzling. Because more chocolate is always the answer.
- Fresh Berries: Strawberries, raspberries, blueberries. They add color, tartness, and make it look “healthy” (ish).
- Nuts: Toasted pecans, walnuts, almonds. For that sophisticated crunch factor.
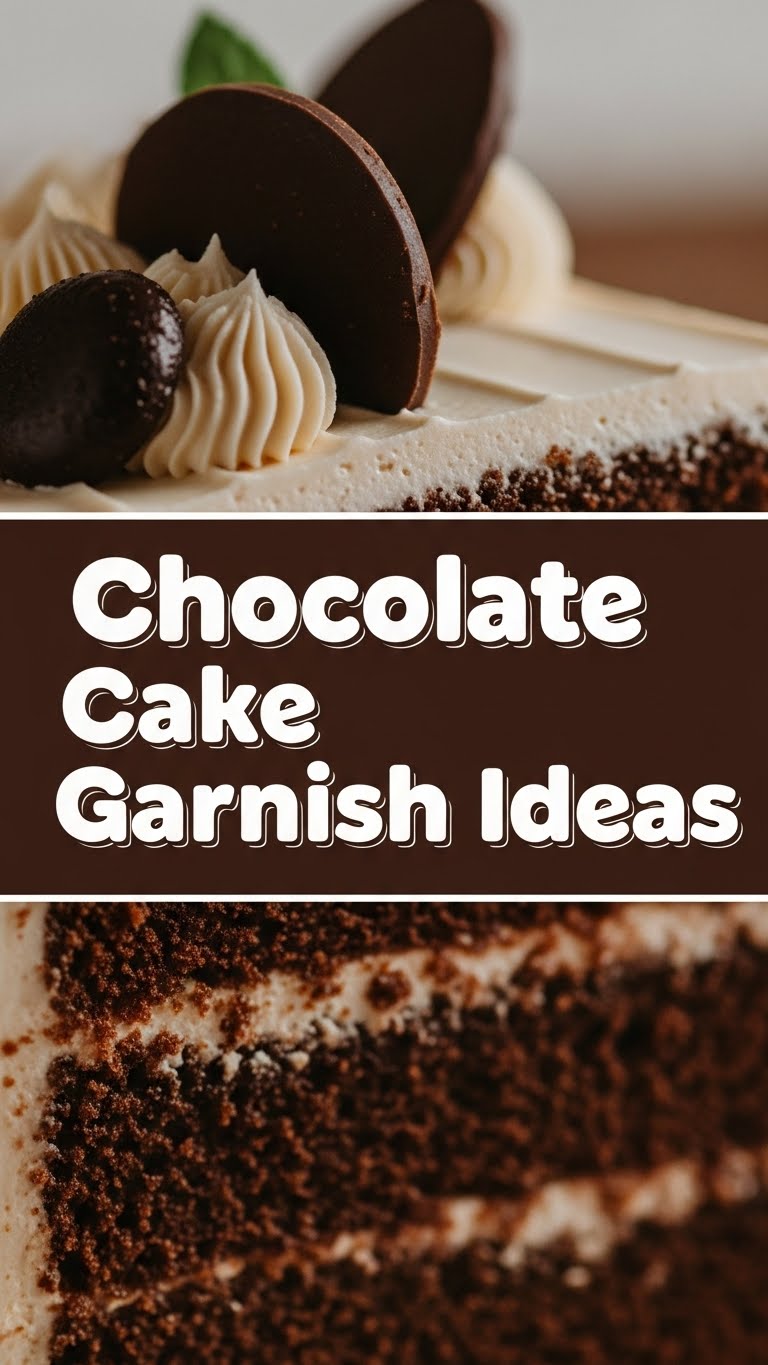
- Whipped Cream or Extra Frosting: A dollop here, a swirl there. Instant cloud nine.
- Sprinkles: Any color, any shape! This is where your inner child gets to play.
- Powdered Sugar: For that delicate, snow-kissed finish. Makes everything look elegant.
- Mint Leaves: A tiny splash of green for contrast. Looks super professional, IMO.
Your Masterclass in Cake Bling: Step-by-Step
Ready to make that cake sparkle? Here’s how you turn a simple cake into a masterpiece, one delicious detail at a time.
The Classic Chocolate Shavings & Curls
Grab a bar of cold chocolate (the colder, the better for neat shavings, or slightly warmer for bigger curls). Use a vegetable peeler or a sharp knife to gently scrape along the edge. You’ll get lovely curls or delicate shavings.
Pro Tip: For really impressive curls, let the chocolate warm up *just a tiny bit* at room temp before peeling. Sprinkle liberally over your cake or arrange artfully on top.
Fresh Fruit Fiesta
Wash and gently pat dry your berries. Arrange them artfully around the edge of the cake, or pile them high in the center. Strawberries cut in half often look fantastic. For extra shine, you can even glaze them lightly with a tiny bit of melted apricot jam!
Nutty Professor Vibes
If using raw nuts, quickly toast them in a dry pan over medium heat until fragrant. This seriously enhances their flavor! Let them cool completely before using. Chop them roughly or leave them whole.
Press them gently onto the sides of a frosted cake, or sprinkle them generously over the top.
Sprinkle Some Joy (and Sugar!)
Simply scatter your chosen sprinkles over the top of the cake. Don’t be shy! For powdered sugar, use a small sieve and gently dust over the entire cake. Want to get fancy? Place a doily or a cutout stencil on top first, dust, then carefully remove for a cool pattern!
Whipped Cream Dream
Pipe swirls or dollops of whipped cream (homemade or store-bought from a can – no judgment!) around the edges or in the center. Top each dollop with a single berry, a tiny chocolate curl, or a mini sprinkle for that extra “chef’s kiss” moment.
Rookie Mistakes to Avoid (Unless You’re Going for Abstract Art)
- Over-garnish Overload: You want a cake, not a garnish mountain. Less is often more, letting the cake’s beauty shine through.
- Hot Mess Chocolate Drizzles: Trying to put melted chocolate on a *warm* cake. It will just slide right off into a puddle. **Chill the cake first!**
- Wet Berries Syndrome: Plonking un-dried berries onto your cake. Hello, soggy frosting and potential color bleed! Always pat them dry.
- Dusting Powdered Sugar Too Early: If you’re transporting the cake or making it hours in advance, the sugar might absorb moisture and disappear. Dust right before serving for maximum impact.
- Ignoring Color Contrast: A dark chocolate cake with dark chocolate shavings is fine, but a pop of red from a raspberry or green from mint can make it truly sing and look more professional.
Mix & Match Magic: Alternatives & Substitutions
Don’t have exactly what I listed? No worries, get creative!
- Chocolate: Instead of shavings, try mini chocolate chips, cocoa nibs for crunch, or even finely grated white chocolate for a beautiful contrast. FYI, a fine grater works wonders for super delicate chocolate dust!
- Fruits: Cherries, orange segments, even thinly sliced kiwi can look amazing. Dried cranberries or cherries also work for a different texture and longer shelf life.
- Nuts: Feeling adventurous? Try pistachios for a vibrant green, or candied pecans for extra sweetness and crunch.
- Sprinkles: Go wild! Edible glitter, custom colored sprinkles for themed parties, even crushed hard candies for texture. The world is your sprinkle jar.
- Other Ideas: Toasted coconut flakes, mini marshmallows, crushed candy canes (seasonal, obviously!), or even a light dusting of cocoa powder.
FAQ: Because Even Garnish Gurus Have Questions
- Q: Can I really just use store-bought cake for this?
- A: Um, YES! That’s the beauty of it! This is about making *any* cake look gourmet. No one needs to know you didn’t bake for hours. Your secret is safe with me. 😉
- Q: How long will these garnishes last on the cake?
- A: Depends! Fresh berries are best added a few hours before serving. Chocolate, nuts, and sprinkles can last a day or two in the fridge. **Moisture is the enemy of fresh garnishes!**
- Q: What’s the easiest garnish for a total beginner?
- A: Powdered sugar dust, hands down. Or a handful of sprinkles. Can’t mess that up, seriously. It’s foolproof!
- Q: My chocolate drizzles always look messy. Help!
- A: Melt chocolate gently (microwave in 20-second bursts, stirring, or a double boiler). Let it cool slightly but still pourable. Use a spoon or a piping bag with a tiny snipped corner. **Practice on parchment paper first!** It makes a huge difference.
- Q: Can I use frozen berries?
- A: Technically, you could, but they tend to get very watery when they thaw and can bleed color onto your frosting. Stick to fresh for the best, most vibrant look!
- Q: Should I put garnishes on the sides or just the top?
- A: Both! For a truly professional look, pressing nuts or sprinkles onto the sides of a frosted cake adds amazing texture and coverage. Just roll the cake gently on its side in a tray of your chosen garnish – works like a charm!
Final Thoughts: Go Forth and Garnish!
See? No stress, all deliciousness. You’ve just unlocked a whole new level of cake artistry without ever turning on the oven again (unless you want to, of course!). Go ahead, take that plain chocolate cake and give it the makeover it deserves. Your taste buds—and your Instagram feed—will thank you. Now go impress someone—or yourself—with your new culinary swagger. You’ve earned it!


