So, you’ve decided to unleash your inner baking beast, but also, like, want it to look *amazing* without requiring a culinary degree or a team of professional decorators? Same, friend, same. We’re talking about a chocolate cake that’s not just a delight to eat, but also a blank canvas for your wildest (or laziest, no judgment!) design dreams. Let’s make some magic that’s totally Instagram-worthy, or at least impressive enough for your own sweet tooth!
Why This Cake is Awesome (Beyond Just Being Chocolate)
This isn’t just *any* chocolate cake; it’s THE chocolate cake. Why? Because it’s moist, rich, and frankly, pretty darn hard to mess up. It’s the kind of cake that holds its shape beautifully, making it perfect for stacking, sculpting (if you’re feeling ambitious), or just slathering with frosting like a boss. Plus, it’s a one-bowl wonder, meaning less cleanup and more time for you to ponder important things, like what sprinkles to use. It’s idiot-proof, even I didn’t mess it up, and trust me, that’s saying something.
Ingredients You’ll Need (The Good Stuff)
- All-Purpose Flour: 1 ½ cups. The backbone of our cake. Don’t substitute with almond flour unless you want a whole different vibe, FYI.
- Granulated Sugar: 1 ½ cups. Because sweet dreams are made of sugar.
- Unsweetened Cocoa Powder: ¾ cup. Make sure it’s good quality; it makes a HUGE difference in flavor. This is where the “chocolate” in “chocolate cake” comes from, shocker!
- Baking Soda: 1 ½ teaspoons. Our magic leavener. Don’t skip it unless you want a chocolate brick.
- Salt: 1 teaspoon. Enhances all those lovely chocolate notes. It’s like the unsung hero.
- Eggs: 2 large. Room temperature, please! They mix better.
- Milk: 1 cup. Again, room temp for optimal blending. Whole milk is best, but whatever you’ve got in the fridge works in a pinch.
- Vegetable Oil: ½ cup. Keeps it super moist. Canola or sunflower oil are fine too.
- Vanilla Extract: 2 teaspoons. The secret weapon for making everything taste like happiness.
- Boiling Water (or hot coffee): 1 cup. This is key for activating the cocoa and baking soda, making the cake extra fluffy and chocolatey. Hot coffee amplifies the chocolate flavor like crazy, IMO!
Step-by-Step Instructions (Let’s Get Baking!)
- Preheat & Prep: Preheat your oven to 350°F (175°C). Grease and flour two 8-inch or 9-inch round cake pans. Or, line them with parchment paper if you’re feeling fancy (and want easy release). This step is non-negotiable, unless you like your cake glued to the pan.
- Combine Dry Ingredients: In a large bowl, whisk together the flour, sugar, cocoa powder, baking soda, and salt. Make sure there are no lumps of cocoa lurking!
- Add Wet Ingredients (Except the Hot Liquid): Add the eggs, milk, vegetable oil, and vanilla extract to the dry ingredients. Beat with an electric mixer on medium speed for about 2 minutes, until everything is just combined and smooth. Don’t overmix; we’re making cake, not bread!
- Pour in the Hot Liquid: Carefully pour the boiling water (or hot coffee) into the batter. Mix on low speed until just combined. The batter will be thin—don’t panic, that’s how it should be! This is where the magic happens for moisture and richness.
- Bake It Up: Divide the batter evenly between your prepared cake pans. Bake for 30-35 minutes, or until a wooden skewer inserted into the center comes out clean. Don’t open the oven door too early!
- Cool Down: Let the cakes cool in the pans for about 10-15 minutes before inverting them onto a wire rack to cool completely. Patience, young padawan. A warm cake crumbles when frosted, and nobody wants that kind of drama.
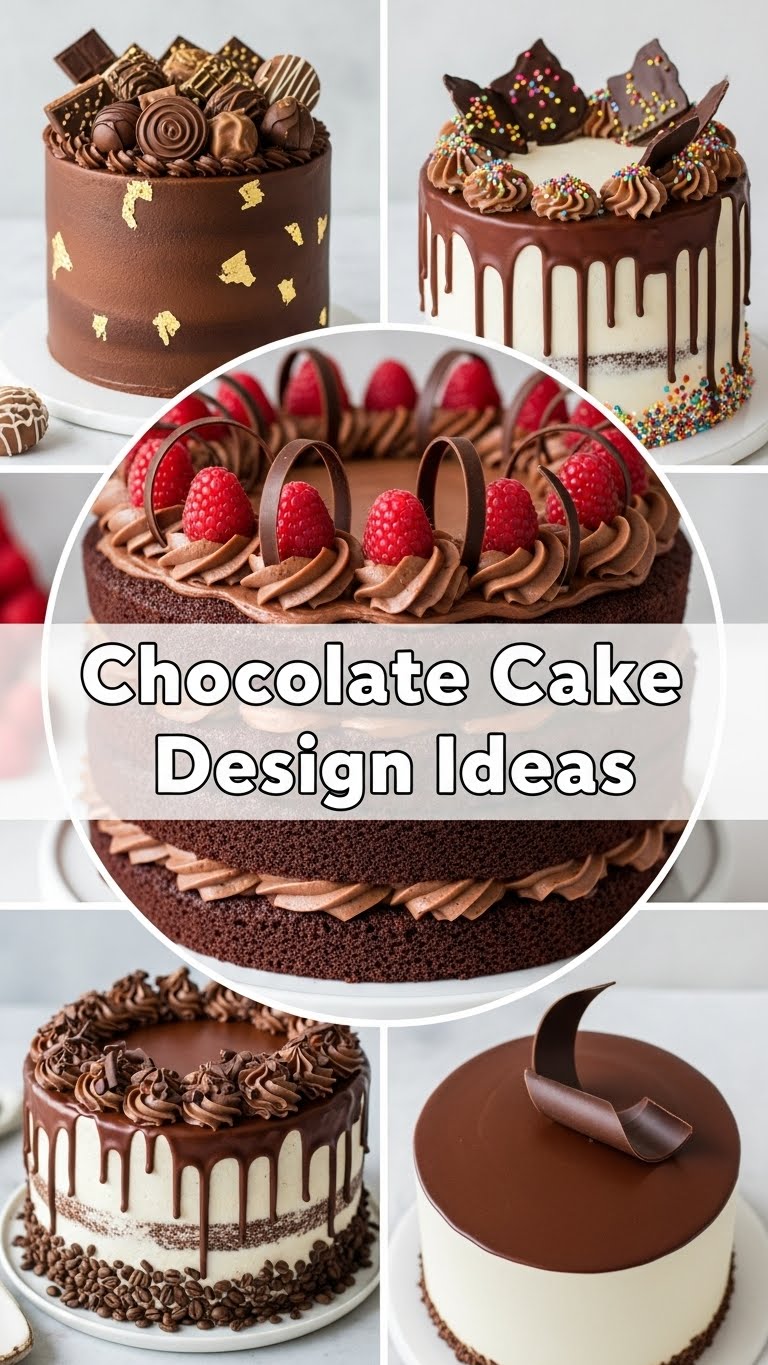
- Frost & Design: Once completely cool, stack and frost your cake with your favorite chocolate buttercream, ganache, or cream cheese frosting. This is YOUR moment to shine! Smooth it out for a minimalist look, or create swirls and peaks for texture. Now, this is your canvas – maybe pipe some simple rosettes, scatter some colorful sprinkles, or drizzle with more ganache for a chic drip effect.
Common Mistakes to Avoid (Learn From My Fails)
- Not preheating the oven: Rookie mistake. Your cake won’t rise properly, and you’ll end up with a dense, sad disc.
- Overmixing the batter: You’ll develop the gluten too much, leading to a tough cake. We want tender, not chewy!
- Not using room temperature ingredients: Cold ingredients don’t emulsify as well, leading to a less smooth and consistent batter. Plan ahead, people!
- Opening the oven door constantly: This drops the temperature and can make your cake sink. Resist the urge to peek until at least the 25-minute mark.
- Frosting a warm cake: Seriously, don’t. The frosting will melt into a gooey mess, and your beautiful design dreams will vanish faster than a free cookie.
Alternatives & Substitutions (Get Creative!)
This cake is super versatile, so feel free to play around!
- No milk? No problem: You can use buttermilk for an even tangier, more tender crumb. Just swap it 1:1. Or, if you’re dairy-free, almond or soy milk works great too.
- Coffee vs. Water: If you’re not a coffee fan, just use boiling water. But honestly, the coffee just makes the chocolate sing louder without adding a coffee flavor itself. Give it a try!
- Frosting Fun: This is where your “design ideas” really come into play!
- Classic Buttercream: Easy to spread, pipe, and color. Perfect for intricate designs or smooth finishes.
- Rich Ganache: For a super decadent, shiny finish. Pour it over the cooled cake for a sleek look, or whip it for a lighter, fluffier frosting. Great for drip cakes!
- Cream Cheese Frosting: Adds a lovely tangy contrast to the rich chocolate. A bit softer, but still holds simple designs well.
- Embellishments: Think beyond sprinkles! Crushed Oreos, chocolate shavings, fresh berries, edible flowers, mini chocolate chips, or even a dusting of cocoa powder or powdered sugar can elevate your cake design with minimal effort. Go wild, it’s your cake!
FAQ (Frequently Asked Questions… Kinda)
- Can I make this into cupcakes? Absolutely! Fill cupcake liners about two-thirds full and bake for 18-22 minutes. Voila, instant mini design canvases!
- What if I only have one cake pan? You can bake one layer at a time. Just make sure the pan is cooled and re-prepped before the second batch. Patience is a virtue, my friend.
- My cake always sinks in the middle, what gives? You might be overmixing, opening the oven door too early, or your baking soda/powder might be old. Check those dates, baking ingredients do expire!
- Can I use margarine instead of butter in the frosting? Well, technically yes, but why hurt your soul like that? Butter tastes better, trust me. For the cake itself, this recipe uses oil, so you’re good there!
- How long does this cake last? Covered at room temperature, it’s delicious for 2-3 days. In the fridge, up to 5 days. But let’s be real, it won’t last that long.
- Is this cake easy to decorate? Yes! Because it’s sturdy and moist, it’s very forgiving. Start with a simple crumb coat, chill, then apply your final layer. Smooth or swirled, it’s all good. The possibilities for design are endless, even with just a spatula!
Final Thoughts (Go Forth & Conquer!)
So there you have it – a phenomenal chocolate cake recipe that’s not just a treat for your taste buds, but also a playground for your creative side. Don’t overthink the decorating; sometimes the simplest designs are the most elegant. Or, pile on every sprinkle you own – it’s your cake, your rules! Now go impress someone—or yourself—with your new culinary (and design!) skills. You’ve earned it!


