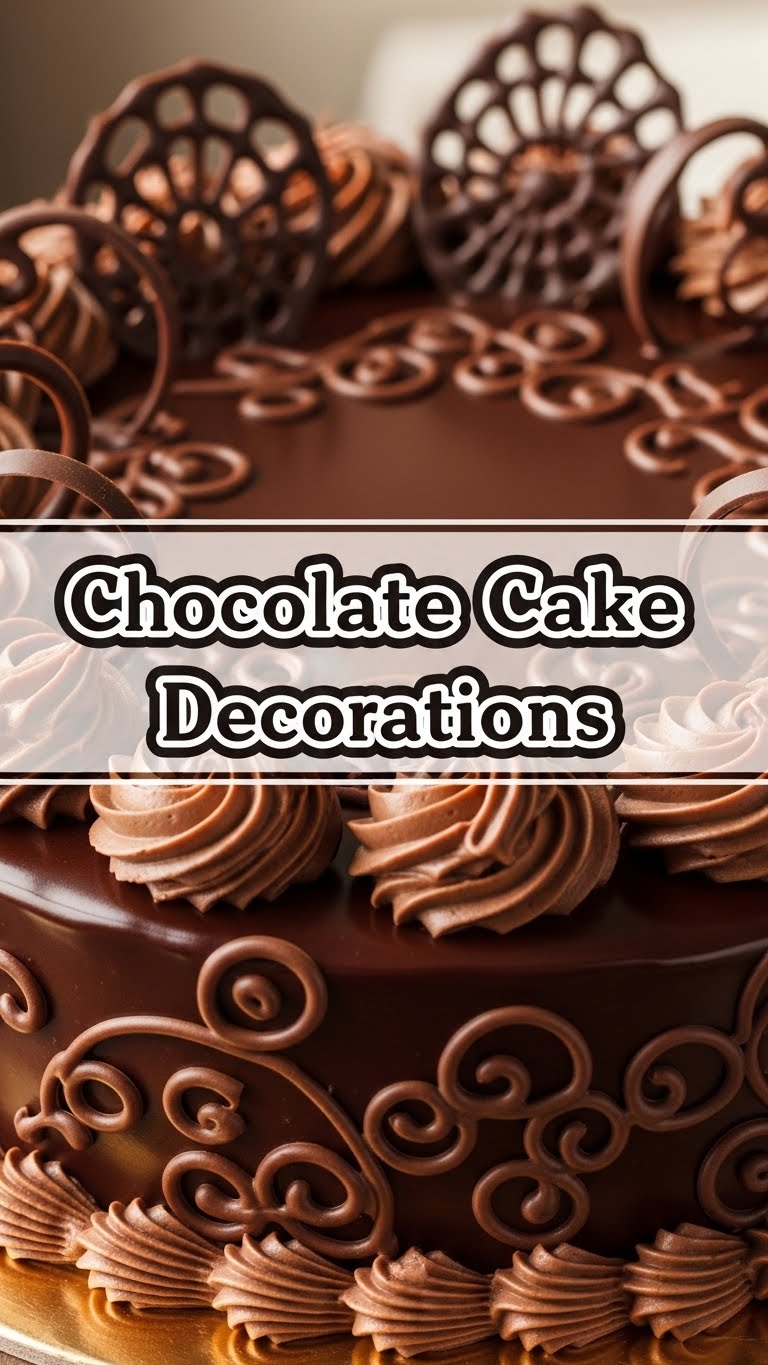
Okay, so you’ve just baked the most gloriously moist, rich, fudgy chocolate cake known to humankind. Congrats! You’ve conquered the oven, braved the batter, and now it’s sitting there, smelling divine, but looking… well, a little naked. It’s like showing up to a party in your PJs after everyone else is in black tie. No worries, bestie, we’re about to turn that plain Jane into a dazzling diva without breaking a sweat (or a perfectly good chocolate chip).
Why These Decorations Are Awesome
Because let’s be real, baking is an art, but decorating can feel like rocket science. Not today, my friend! These chocolate cake decoration ideas are so ridiculously easy, you’ll wonder why you ever bought those overpriced, slightly-sad-looking bakery cakes. They’re idiot-proof, even for those of us who think a piping bag is just a fancy Ziploc. Plus, the goal here isn’t perfection, it’s pure, unadulterated chocolatey joy that screams, “I made this!” (Even if you just assembled it beautifully, no judgment).
Ingredients You’ll Need
Think of these less as “ingredients” and more as “playthings for your cake masterpiece.”
- Your Pre-Baked Chocolate Cake: The star of the show!
- Your Favorite Frosting (Chocolate, Vanilla, Cream Cheese – You Do You!): About 2-3 cups. Store-bought is 100% acceptable. Don’t let anyone tell you otherwise.
- Chocolate, glorious Chocolate: A bar or a handful of chips (milk, dark, white – whatever tickles your cocoa fancy) for melting and drizzling.
- Sprinkles, Sprinkles, Everywhere: The more colorful, the better. Jimmies, nonpareils, confetti – go wild.
- Fresh Fruit: Strawberries, raspberries, cherries. They add a pop of color and make you feel slightly virtuous.
- Optional Fun Stuff: Crushed Oreos, chocolate shavings, mini chocolate chips, edible glitter (because why not?), pretzels for a salty crunch, or even some mini marshmallows.
Step-by-Step Instructions
Alright, let’s get that cake dressed to impress!
- The Base Coat: First things first, make sure your cake is completely cool. Like, no warmth whatsoever. Otherwise, your frosting will melt into a sad, soupy mess. Grab your frosting and a spatula (or the back of a spoon if you’re feeling rustic). Spread an even layer over the top and sides of your cake. Don’t stress about making it perfectly smooth; a little texture adds character, FYI.
- The Rustic Swirl: Once your cake is frosted, take that spatula and gently create some lovely swirls or peaks on the top of the cake. It makes it look fancy without any actual skill required. Instant bakery vibes!
-
The Chocolate Drizzle (Our Secret Weapon): Melt your chocolate. You can do this in a microwave-safe bowl in 30-second bursts, stirring in between, or over a double boiler. Once it’s smooth and glossy, let it cool for a minute or two (you want it slightly warm, not scorching hot).
Now, for the fun part! You can either use a spoon to drizzle it haphazardly over the top, letting some drip enticingly down the sides, or if you’re feeling fancy, put it in a piping bag (or a Ziploc with a tiny corner snipped off) for more controlled lines.
- Sprinkle Party Time: While the chocolate drizzle is still slightly wet (but not hot!), grab your sprinkles. Go ahead and rain them down! You can cover the whole top, just the edges, or create a specific pattern. There are no rules in sprinkle town, only joy.
- Fruity & Fabulous: Arrange your fresh fruit on top. Strawberries sliced in half, raspberries artfully placed, or a pile of cherries in the center. The bright colors against the chocolate are just *chef’s kiss*.
- The Finishing Flourish: Want to go next level? Sprinkle some crushed Oreos around the base for an extra layer of crunch and visual appeal. Or press chocolate shavings into the sides of the cake. Small additions make a big impact!
Common Mistakes to Avoid
- Frosting a Warm Cake: We already covered this, but it bears repeating. Unless you’re going for a “chocolate soup” look, chill out. The cake, not you.
- Overdoing It: Sometimes less is more. Don’t feel like you need to use ALL the decorations you have. A few well-placed elements can be more striking than a chaotic free-for-all.
- Panicking About Perfection: This isn’t a baking competition, darling. It’s about enjoying the process and creating something delicious and beautiful *to you*. Embrace the imperfections!
- Not Cleaning Up Edges: A quick wipe around the cake stand or plate with a damp paper towel before serving makes all the difference in presentation. It’s like putting on clean shoes with a fancy outfit.
Alternatives & Substitutions
Got cravings or a half-empty pantry? No stress!
- Chocolate Drizzle Swap: No melting chocolate? Grab a chocolate syrup from the store! It’s not quite the same texture, but it gets the job done for a quick drizzle. Or skip it entirely and let the sprinkles and fruit shine.
- Fruit-Free Zone: Not a fruit fan? Crushed nuts (pecans, walnuts), candied ginger, or even just more sprinkles are great alternatives. Or how about some chopped candy bars? Snickers bits? Yes, please!
- Frosting Flavor: If chocolate frosting feels too heavy, a classic vanilla buttercream provides a beautiful contrast. Cream cheese frosting is also a fantastic choice, adding a tangy sweetness. IMO, you can never go wrong with cream cheese.
- Edible Flowers: Feeling extra fancy? A few edible flowers (like pansies or violets) can elevate your cake to a whole new level of chic. Just make sure they’re actually edible!
FAQ (Frequently Asked Questions)
Got questions swirling in your head faster than sprinkles on a cake? Let’s tackle ’em!
- Do I need fancy piping bags and tips? Absolutely not! A good spatula or even a butter knife will get you a beautiful, rustic look. For drizzling, a Ziploc bag with the corner snipped is your best friend.
- My chocolate drizzle got too thick/thin! What do I do? If it’s too thick, add a tiny bit of neutral oil (like vegetable or canola) or a splash of milk and stir until it loosens up. If it’s too thin, let it cool for a minute or two more, stirring occasionally, and it should thicken as it cools.
- How far in advance can I decorate my cake? Generally, you can decorate a cake a day in advance. If using fresh fruit, add it closer to serving time (a few hours before) so it stays fresh and doesn’t weep.
- What if my cake isn’t perfectly even? Who cares?! A slightly lopsided cake has character. Embrace the charm! A generous layer of frosting can hide a multitude of sins, trust me.
- Can I just use powdered sugar? Yes! A simple dusting of powdered sugar through a sieve can be incredibly elegant, especially on a very dark chocolate cake. It’s the “less is more” approach that always works.
Final Thoughts
So there you have it, folks! No more bare, boring chocolate cakes on your watch. You’ve got the tools, the tips, and the confidence to turn that delicious baked good into a visual masterpiece that tastes as good as it looks. Remember, baking and decorating should be fun, a little messy, and always end with a treat. Now go impress someone—or yourself—with your new culinary swagger. You’ve earned it!


