So, you’ve baked a magnificent chocolate cake. It smells divine, tastes even better (you totally taste-tested it, admit it!), but now it’s just… brown. A delicious brown brick. You want it to look like it leaped out of a fancy bakery window, but the thought of piping delicate roses makes your hands cramp before you even start, right? Same, friend, same. Don’t sweat it. We’re about to turn that humble cake into a showstopper without needing a culinary degree or a steady hand.
Why This Decoration “Recipe” is Awesome
Because it’s basically magic for lazy people! This isn’t about intricate piping bags or edible glitter (unless you want it, you do you). This is about making your chocolate cake look like a million bucks with minimal effort and maximum “wow” factor. It’s **idiot-proof**, I swear. Even I, who once mistook salt for sugar in a cookie recipe (don’t ask), can nail this. Plus, it focuses on chocolate on chocolate, which is scientifically proven to be the best combination ever. You’ll impress everyone, including your highly critical Aunt Mildred, without breaking a sweat. Trust me on this one.
Ingredients You’ll Need
Alright, let’s gather our edible art supplies. These are suggestions, feel free to get creative!
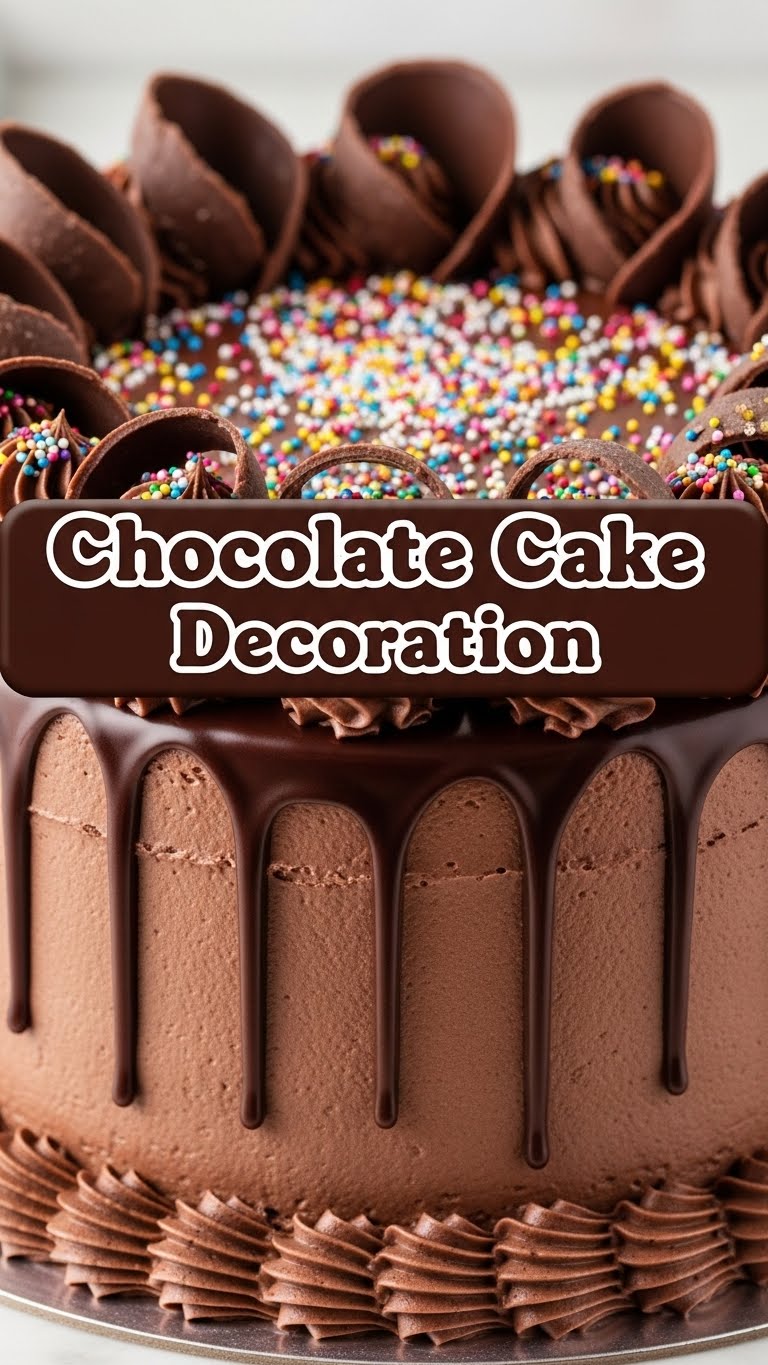
- **Your glorious Chocolate Cake:** Preferably cooled, or things will get melty.
- **Chocolate Buttercream Frosting:** Store-bought is perfectly acceptable, no judgment here. Or whip up your fave recipe if you’re feeling ambitious. About 2-3 cups.
- **Dark Chocolate for Ganache/Drizzle:** Good quality stuff, roughly 100g (about 3.5 oz). Think Ghirardelli or Lindt – something that melts nicely.
- **Heavy Cream:** About 100ml (just under half a cup) for that silky ganache.
- **Sprinkles, Chocolate Shavings, or Mini Chocolate Chips:** Your choice! A handful of whatever makes your heart sing.
- **Optional Fun Stuff:** Fresh berries (raspberries or strawberries look amazing with chocolate), a dusting of cocoa powder, edible gold dust (if you’re feeling extra fancy).
Step-by-Step Instructions
- **Frost Your Cake Like a Boss:** First things first, get that buttercream on there. Use an offset spatula or even a regular butter knife. Don’t aim for perfection; rustic swirls and peaks are *in*. Cover the top and sides evenly, or as evenly as your patience allows. This is your canvas.
- **Chill Out (The Cake, Not You):** Pop your frosted cake into the fridge for about 15-20 minutes. This helps the frosting firm up slightly, making the next step a breeze and preventing accidental chocolate avalanches. **Don’t skip this step!**
- **Whip Up That Ganache Magic:** While your cake chills, finely chop your dark chocolate and place it in a heatproof bowl. Heat the heavy cream in a small saucepan until it just starts to simmer (you’ll see tiny bubbles around the edges). Pour the hot cream over the chocolate. Let it sit undisturbed for 5 minutes.
- **Stir Until Silky Smooth:** After 5 minutes, gently stir the chocolate and cream together until you have a smooth, glossy, liquid ganache. If it’s too thick, pop it in the microwave for 10-15 seconds and stir again. Let it cool for a few minutes until it’s warm but not hot (test with your finger – shouldn’t burn!).
- **Drip, Drip, Hooray!:** Now for the fun part! Gently spoon the slightly cooled ganache around the edge of your cake. Let it drip down the sides in beautiful, messy rivulets. You can use the back of a spoon to nudge it slightly if it needs encouragement. Once the edges are done, pour the remaining ganache over the top and spread it gently to fill the center.
- **Sprinkle Some Joy:** While the ganache is still wet and shiny, unleash the sprinkles! Or chocolate shavings! Or berries! This is where you get to be an artist. Don’t overthink it. Just scatter them with abandon.
- **Final Chill & Admire:** Back into the fridge for another 15-30 minutes to let that ganache set. Then, pull it out, stand back, and admire your masterpiece. Seriously, you did that!
Common Mistakes to Avoid
- **Hot Ganache on Cold Cake:** No, no, no! Hot ganache will melt your buttercream. Make sure it’s cooled to lukewarm. Patience is key here.
- **Too Much Ganache Too Fast:** Don’t just dump it all on. Start with the drips around the edge, then fill the top. Control is your friend.
- **Over-Mixing Frosting:** If you’re making your own buttercream, don’t whip it to death. You want it smooth, not airy and full of bubbles, which makes frosting a pain.
- **Skipping the Chill Step:** Thinking you don’t need to chill your cake between frosting and ganache? **Rookie mistake!** It’s crucial for a neat finish.
- **Trying Too Hard:** Seriously, don’t overthink it. Some of the most beautiful cakes are a little imperfect. Embrace the rustic charm!
Alternatives & Substitutions
Feeling adventurous or missing an ingredient? No worries, we’ve got options!
- **Buttercream Flavor:** Not a fan of chocolate buttercream? Use vanilla, espresso, or even a cream cheese frosting as your base. Just make sure it pairs well with that dark chocolate ganache.
- **Ganache Type:** Instead of dark chocolate, you could use milk chocolate for a sweeter ganache, or even white chocolate (though it’s a bit trickier to work with for drips).
- **Toppings Galore:** Beyond sprinkles, think toasted nuts (pecans, walnuts), coconut flakes, mini marshmallows, crushed candy bars, or even edible flowers for a super elegant touch.
- **No Heavy Cream? No Problem!** For a simpler, slightly less glossy drizzle, you can melt chocolate with a tiny bit of coconut oil or butter. It won’t be true ganache, but it’ll still look good!
FAQ (Frequently Asked Questions)
Got questions? I’ve got (casual) answers!
- **Can I use any chocolate for the ganache?** Well, technically yes, but why hurt your soul like that? Use good quality chocolate, not chocolate chips (they have stabilizers that prevent smooth melting). You’ll thank me.
- **My ganache is too thick/thin! Help!** Too thick? Add a teaspoon more warm cream and stir. Too thin? Let it cool longer, or add a tiny bit more chopped chocolate and let it sit before stirring.
- **How far in advance can I decorate my cake?** You can decorate it a day ahead. Store it in the fridge, uncovered if possible, or very loosely covered, so the ganache doesn’t get squished. Take it out 30-60 minutes before serving to let it come to room temp.
- **Do I *have* to chill the cake?** Okay, you don’t *have* to, but if you want neat drips that don’t melt into your buttercream, it’s highly, highly recommended. **FYI**, cold frosting + warm ganache = perfection.
- **What if my drips aren’t perfect?** Who cares?! It’s homemade! Imperfect drips have character. Seriously, no one is inspecting your cake with a ruler. It adds to the charm!
- **Can I add alcohol to the ganache?** Ooh, fancy! Yes, a tablespoon of Kahlua, rum, or Grand Marnier would be a delicious addition. Just subtract that amount from the heavy cream.
Final Thoughts
See? That wasn’t so scary, was it? You just took a humble cake and elevated it to bakery-level gorgeousness with a few simple steps. You’ve now unlocked the secret to impressive desserts without the stress. So, go on, show off your creation! Take a picture, brag a little, and then slice into that beauty. You’ve earned every single delicious bite. Now go impress someone – or yourself – with your new culinary skills. You’ve totally earned it!


