So, you’ve baked a chocolate cake, huh? Or, let’s be real, you snagged one from the bakery because adulting is hard, and sometimes you just need dessert without the flour-covered battleground. No judgment! But now it’s sitting there, a beautiful, delicious blank canvas, looking a little… naked. It’s like showing up to a party in your PJs. We can do better! And by ‘we,’ I mean ‘you,’ with a little nudge from me. Time to make that cake a showstopper without turning your kitchen into a disaster zone or your brain into a pretzel. Let’s get this party started!
Why This Decorating Adventure is Awesome
Because who needs a pastry chef degree when you have imagination and a spatula? This isn’t about perfection; it’s about having fun and making something that looks way more impressive than the effort it took. Seriously, your friends will think you secretly went to culinary school. It’s also **idiot-proof**, and trust me, I’ve given it a good test run. Plus, it’s a fantastic excuse to play with sprinkles. You’re basically a professional artist now, just with a sweeter medium.
Ingredients You’ll Need
Think of these as your art supplies. Get ready to raid your pantry (or the dessert aisle).
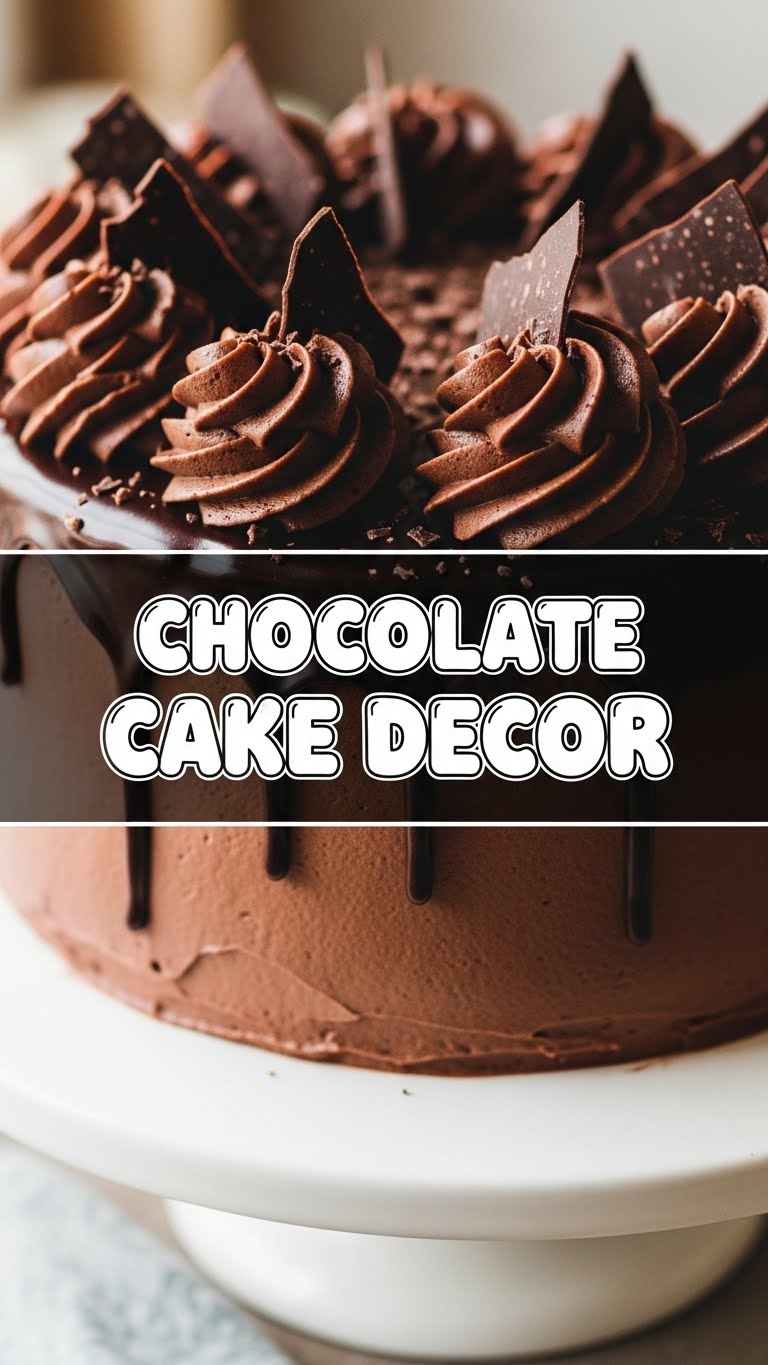
- **A cooled chocolate cake:** Your masterpiece-to-be. Layered, sheet, bundt – whatever your heart desires. Just make sure it’s completely chill.
- **Your favorite frosting (about 2 cups):** Chocolate, vanilla, cream cheese – whatever tickles your fancy. Store-bought is 100% acceptable, no shame in the convenience game.
- **Sprinkles (!!!!):** Because who doesn’t love a party on a cake? Rainbow, chocolate, metallic, jimmies, nonpareils… Go wild! The more, the merrier, IMO.
- **Chocolate things:** Chips, shavings, curls, mini candy bars, chopped up chocolate bars. More chocolate is always the answer, period.
- **Fresh berries:** Strawberries, raspberries, blueberries. They add a pop of color and make it look like you’re fancy AF.
- **Powdered sugar:** For that delicate, “snow-kissed” look. Or, you know, to subtly hide any frosting mishaps. We won’t tell.
- **Optional fun stuff:** Edible glitter, mini cookies, nuts, a few fresh mint leaves for a pop of green.
Step-by-Step Instructions
Get ready to transform that humble cake into a work of art. No pressure, just fun!
- **Prep Your Canvas:** Make sure your cake is completely cool. Like, not even a tiny bit warm. Place it on your serving plate or cake stand. If it’s a two-layer cake, make sure those layers are sitting pretty.
- **The Crumb Coat (Your Secret Weapon):** Scoop about a quarter of your frosting onto the top of the cake. Spread a very thin layer over the top and sides. This traps all those pesky crumbs, so your final coat is smooth. **Don’t skip this step!** Pop the cake in the fridge for 15-20 minutes to let this coat firm up.
- **Main Frosting Event:** Once the crumb coat is firm, apply the rest of your frosting. Start on top, then work your way down the sides. Don’t stress too much about getting it perfectly smooth; rustic swirls are totally in! Use an offset spatula or the back of a spoon to create pretty peaks and valleys.
- **Sprinkle Attack!** While the frosting is still wet, grab those sprinkles. Hold the cake over a baking sheet (to catch the excess) and go nuts! Roll the sides in sprinkles, or just shower them generously over the top. It’s your cake, your rules.
- **Chocolate Extravaganza:** Now, time for more chocolate. Arrange your chocolate chips, shavings, or mini candy bars around the edge, in the center, or sprinkle them randomly. You really can’t go wrong here.
- **Berry Bliss:** Carefully place your fresh berries. Create a crown around the edge, a cluster in the middle, or scatter them artfully. The bright red of strawberries or deep blue of blueberries looks amazing against chocolate.
- **The Powdered Sugar Finale:** For that elegant, professional touch, grab a small sieve and lightly dust the entire top of the cake with powdered sugar. It’s like a magical snow flurry for your dessert.
- **Admire Your Handiwork:** Step back and gaze upon your glorious creation. You did that! Take a pic for the ‘gram, because it’s definitely worthy.
Common Mistakes to Avoid
Learning from others’ oopsies is always smarter (and less messy) than making your own, right?
- **Decorating a Warm Cake:** This is a one-way ticket to a soupy, sliding mess. Your frosting will melt, your crumbs will mingle, and you’ll end up with a chocolate puddle. Patience, young Padawan.
- **Not Doing a Crumb Coat:** Thinking you don’t need to preheat the oven… err, I mean, thinking you don’t need a crumb coat is a rookie mistake. Trust me, it’s worth the extra 15 minutes in the fridge for a smooth, crumb-free finish.
- **Over-handling Your Frosting:** The more you play with frosting, especially buttercream, the warmer it gets and the harder it is to work with. Get it on, spread it, decorate, and chill!
- **Being Too Neat:** Honestly, sometimes the most beautiful cakes are the ones that look a little “undone” or “rustic.” Embrace the imperfect swirls and happy accidents. It shows character!
- **Running Out of Decor:** Always have more sprinkles/chocolate/berries than you think you’ll need. It’s better to have leftovers than to stare at a half-decorated cake with sad eyes.
Alternatives & Substitutions
Feeling creative? Here are some ways to switch things up!
- **Frosting Flavors:** Instead of classic chocolate, try peanut butter frosting, espresso buttercream, or a tangy cream cheese frosting. They all pair beautifully with chocolate cake!
- **Candy Bar Heaven:** Chop up your favorite candy bars (Snickers, Kit Kat, Reese’s) and use them as toppings. Instant candy bar explosion cake!
- **Cookies & Cream Dream:** Crush up Oreos or your favorite chocolate cookies and sprinkle them over the top. You can even stick whole cookies around the edge.
- **DIY Chocolate Ganache:** Feeling fancy? Instead of frosting, make a simple chocolate ganache (equal parts hot cream and chopped chocolate, stir until smooth, then cool slightly). Pour it over the cooled cake for a glossy, decadent finish.
- **Edible Flowers:** For a super elegant touch, arrange a few food-safe edible flowers (like pansies or violas) on top. So pretty!
FAQ (Frequently Asked Questions)
Got questions? I’ve got answers (mostly humorous ones).
- **Q: Do I really need a crumb coat?** A: Yes, yes, a thousand times yes! Unless you *like* crumbs in your final frosting, which, no judging, but also… why?
- **Q: What if my frosting is too stiff or too runny?** A: Too stiff? Add a tiny bit of milk or cream, a teaspoon at a time, until it’s spreadable. Too runny? Pop it in the fridge for 15-20 minutes to firm up. You’re welcome.
- **Q: Can I use non-chocolate decorations?** A: Absolutely! Get wild with crushed peppermints for a festive touch, salted caramel drizzle, or even colorful candies. Your cake, your rules!
- **Q: How do I make it look professional without a piping bag?** A: Embrace the rustic look! Use the back of a spoon to create swirls and peaks. For edges, gently push frosting towards the edge with a spatula and create a little “lip.” It’s charming!
- **Q: How long will my decorated cake last?** A: Covered and at room temperature (if not too warm), most decorated cakes are good for 2-3 days. If it has perishable fillings or cream cheese frosting, store it in the fridge and it’ll last up to 5 days.
- **Q: Is it okay to eat the cake immediately after decorating?** A: Well, technically yes, but if you let it chill in the fridge for 30 minutes to an hour, the frosting will firm up a bit, making for cleaner slices. But if the craving is real, go for it!
Final Thoughts
Look at you, culinary wizard! You’ve taken a humble chocolate cake and turned it into a masterpiece. See? I told you it wasn’t that hard. Now go impress someone—or yourself—with your new decorating skills. You’ve earned every single bite of that beautiful, delicious creation. Don’t forget to grab a slice (or three) for yourself before it magically disappears! Happy feasting!

