Ever stood in your kitchen at 10 PM with a chocolate craving that won’t quit? There you are, staring at your pantry thinking, “I could make a cake… but is it worth the hassle?” Let me tell you right now—yes, yes it is. Especially when we’re talking about this ridiculously simple chocolate cake batter that you’ll be whisking together faster than you can say “midnight snack attack.”
Why This Recipe is Awesome
First off, this isn’t just any chocolate cake batter. This is the “I can’t believe I made something this delicious while half-watching Netflix” chocolate cake batter. It’s practically foolproof—I once made it during a power outage with nothing but a flashlight and pure determination.
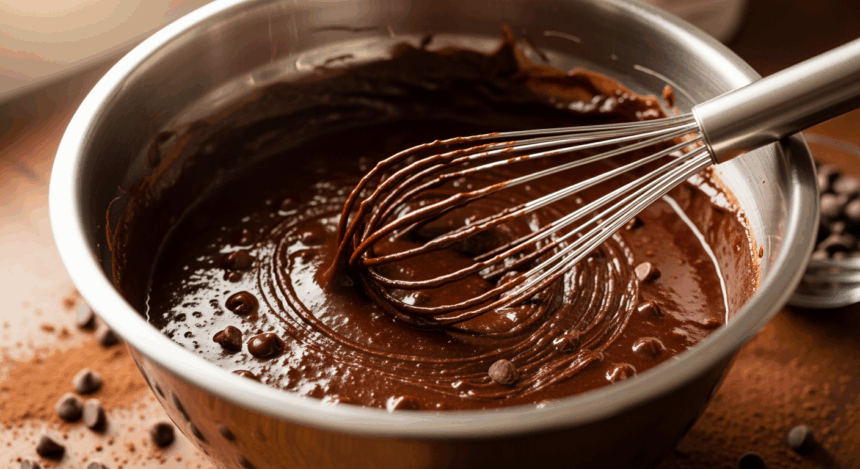
Plus, the whole whisking method means fewer dishes (you’re welcome), and something magical happens when you whisk by hand. The batter gets this silky texture that just screams, “I’m going to be the best cake you’ve ever had.” No electric mixer required—just you, a whisk, and your soon-to-be-impressive bicep.
Ingredients You’ll Need
- 2 cups all-purpose flour (the regular stuff, nothing fancy)
- 2 cups granulated sugar (because, duh, it’s cake)
- ¾ cup unsweetened cocoa powder (the darker, the better for your chocolate soul)
- 2 teaspoons baking powder (the stuff that makes magic happen)
- 1½ teaspoons baking soda (not to be confused with the box in your fridge)
- 1 teaspoon salt (trust me on this one)
- 2 large eggs (room temperature—important!)
- 1 cup milk (cow, almond, oat—pick your fighter)
- ½ cup vegetable oil (keeps it moist for days)
- 2 teaspoons vanilla extract (the real kind, if possible)
- 1 cup hot coffee OR hot water (coffee brings out the chocolate flavor, but water works too)
- Your favorite whisk (preferably one that hasn’t been used to mix paint or something)
Step-by-Step Instructions
- Prep your workspace. Preheat your oven to 350°F (175°C) and grease two 9-inch round cake pans. Or one 9×13 pan if you’re not feeling fancy.
- Mix the dry ingredients. Grab a large bowl and whisk together the flour, sugar, cocoa, baking powder, baking soda, and salt. Create a little well in the center—like you’re making a flour volcano.
- Add the wet team. Pour in the eggs, milk, oil, and vanilla. Start whisking slowly (unless you enjoy wearing your ingredients). Gradually increase your whisking speed as things come together.
- Bring the heat. Add the hot coffee or water very slowly while whisking. The batter will be thin—don’t panic! This is how it’s supposed to look.
- Whisk like you mean it. Now’s the time to channel your inner chef. Whisk that batter for about 2 minutes until it’s smooth and shiny. Work those arms! Who needs the gym when you have cake?
- Pour and bake. Divide the batter between your prepared pans. Tap them gently on the counter to remove air bubbles (also weirdly satisfying).
- Bake until perfect. That’s 30-35 minutes or until a toothpick inserted in the center comes out with just a few moist crumbs attached. Not clean—we’re not savages who like dry cake.
Common Mistakes to Avoid
Overmixing after the flour is added: Yes, I just told you to whisk like your cake depends on it—but once you add flour, don’t go crazy. You’ll end up with a tough cake that could double as a frisbee.
Using cold eggs: Taking eggs straight from the fridge is like showing up to a pool party in a turtleneck. Let them come to room temperature first.
Skipping the hot liquid: “Do I really need to add hot coffee?” Yes, you really do. The heat activates the baking soda and powder, and dissolves the cocoa properly. Science, friends!
Opening the oven too early: I know you’re excited, but peeking before 25 minutes will make your cake sink faster than your heart when someone eats the last cookie.
Alternatives & Substitutions
Gluten-free? Swap the all-purpose flour with a 1:1 gluten-free flour blend. Most work pretty well, though the texture might be slightly different. IMO, Bob’s Red Mill makes a decent one.
No coffee, please! Use hot water with a teaspoon of espresso powder. Or just hot water if you’re adamantly anti-coffee (though you’re missing out on depth of flavor).
Vegan version? Replace eggs with flax eggs (1 tablespoon ground flax + 3 tablespoons water per egg) and use plant milk. The cake will be slightly denser but still delicious.
Fancy it up: Add a teaspoon of cinnamon or a pinch of cayenne for a Mexican chocolate vibe. Or fold in some chocolate chips if you’re feeling particularly hedonistic.
FAQ (Frequently Asked Questions)
Why is my batter so thin? Did I mess up?
Nope! This batter is supposed to be on the thinner side. It’s what gives the cake that perfect moist crumb. If your batter is thick enough to stand a spoon in, something’s definitely wrong.
Can I make this without a whisk?
Do you also ask if you can make a sandwich without bread? The whisk is kinda the point here. But fine—a fork will work in a pinch, just be prepared for an arm workout.
How do I know when it’s done?
The toothpick test is your friend. Insert it in the center—if it comes out with wet batter, keep baking. If it has a few moist crumbs, it’s perfect. If it’s completely clean, you’ve gone too far (moment of silence).
Can I make this ahead of time?
Absolutely! The cake layers actually taste better the next day. Wrap them in plastic wrap and let them hang out on the counter overnight. Or freeze them for up to a month.
Does it matter what kind of cocoa powder I use?
Natural or Dutch-processed will both work, but they give slightly different results. Dutch-processed gives you a deeper color and smoother flavor. Natural cocoa makes it a bit more acidic and reddish. Choose your chocolate adventure!
Final Thoughts
There you have it—chocolate cake batter that’ll make you look like a baking genius with nothing but a whisk and some basic ingredients. The best part? You’ve just worked your arm muscles while making dessert. That’s basically like going to the gym, right?
So the next time that chocolate craving hits, skip the store-bought stuff and whip this up instead. Your taste buds will thank you, your friends will be impressed (if you decide to share), and you’ll have officially earned your whisking bragging rights. Now go lick that bowl—I won’t tell anyone.
