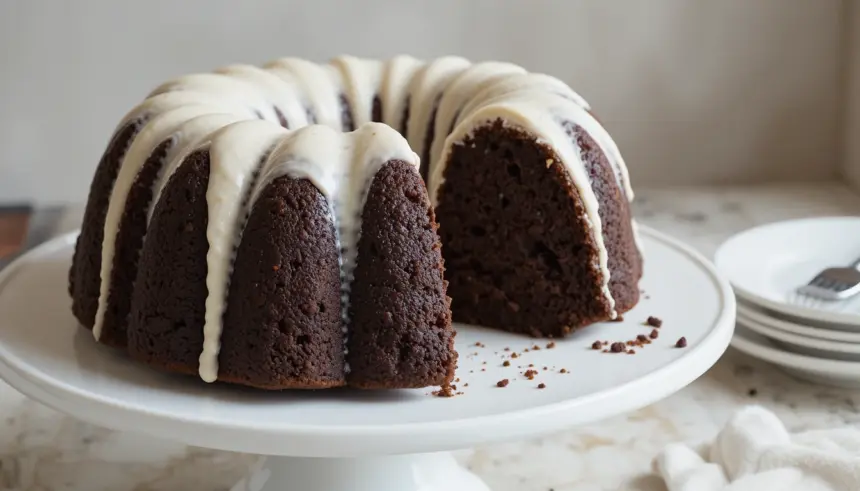
Welcome, fellow dessert adventurers and chocolate aficionados! Ever gazed upon a beautifully sculpted cake, its deep chocolate hues peeking through a pristine white drizzle, and thought, “I need that in my life!”? Well, you’ve landed in just the right spot. Today, we’re diving headfirst into the glorious world of the Chocolate Bundt Cake With White Frosting – a showstopper that’s not just a feast for the eyes but a veritable symphony for your taste buds. Forget bland, forget boring; we’re talking about a cake that brings joy, sophistication, and a generous dose of “wow!” to any table. So, roll up your sleeves, put on your metaphorical chef’s hat, and let’s unravel the secrets to baking this magnificent creation with a fun, playful spirit and expert precision!
There’s something inherently charming about a Bundt cake. Its distinctive fluted shape effortlessly elevates a simple cake into a work of art, no fancy piping skills required! And when that cake is a rich, moist chocolate dream crowned with a sweet, snowy white frosting? Pure magic. This isn’t just a recipe; it’s a journey into baking bliss, where every bite of your Chocolate Bundt Cake With White Frosting is a testament to your newfound (or honed!) baking prowess.
Why the Bundt Pan is Our Best Friend (and Yours!)
Let’s talk Bundt pans for a second. These aren’t just pretty bakeware; they’re engineering marvels! The central tube and fluted design aren’t merely for aesthetics; they provide more surface area for the cake to bake evenly, ensuring that moist, tender crumb we all crave. Plus, unmolding a perfectly shaped Bundt cake feels like winning a culinary lottery. It’s the ultimate hack for making your desserts look professionally done with minimal effort. Think of it as your secret weapon in the quest for Instagram-worthy treats!
Crafting the Perfect Chocolate Bundt Cake: A Symphony of Flavor
The foundation of our masterpiece is, of course, the chocolate cake itself. We’re aiming for a cake that’s intensely chocolatey, incredibly moist, and tender enough to practically melt in your mouth. This isn’t a dry, crumbly affair; this is pure, unadulterated indulgence.
The Secret to Deep Chocolate Goodness
Achieving that deep, rich chocolate flavor isn’t just about throwing in some cocoa. It’s about strategy! We’ll often combine different types of chocolate or cocoa powders to build layers of flavor. For instance, Dutch-processed cocoa powder offers a darker color and milder, less acidic chocolate flavor, while natural cocoa powder (like Hershey’s unsweetened) provides a more intense, slightly bitter, classic chocolate kick. A mix can be divine!
- High-Quality Cocoa Powder: Opt for a good quality Dutch-processed cocoa for a dark, rich, and smooth chocolate flavor.
- Melted Chocolate (Optional but Recommended): Adding some melted bittersweet or semi-sweet chocolate alongside cocoa powder amps up the depth and richness, giving your Chocolate Bundt Cake an incredible luxurious texture.
- Coffee (Our Secret Weapon!): A dash of hot coffee (or espresso powder dissolved in hot water) doesn’t make your cake taste like coffee; it magically enhances the chocolate flavor, making it sing!
Ingredient Power-Up: What You Need
Quality ingredients are the backbone of any great bake. Here’s a look at some key players for our perfect chocolate Bundt cake:
| Ingredient Category | Purpose in Cake | Expert Tip |
|---|---|---|
| Flour | Structure | Use all-purpose flour; accurate measurement (spoon and level) is crucial. |
| Fats (Butter/Oil) | Moisture, Tenderness | Butter for flavor, oil for moisture. Many recipes use a combo for the best of both worlds! |
| Sugar | Sweetness, Moisture, Browning | Granulated sugar for sweetness, brown sugar for added moisture and caramel notes. |
| Eggs | Binding, Leavening, Moisture | Room temperature eggs emulsify better, leading to a smoother batter. |
| Leavening (Baking Soda/Powder) | Rise, Lightness | Ensure they are fresh! Baking soda needs an acid (like buttermilk or natural cocoa) to activate. |
| Dairy (Buttermilk/Milk) | Moisture, Tenderness, Reacts with Leavening | Buttermilk adds a tangy depth and reacts beautifully with baking soda for a tender crumb. |
Mixing Like a Master: Steps to Success
- Preheat & Prep: Preheat your oven and generously grease and flour your Bundt pan. Don’t skimp here; it’s the key to a clean release! Cocoa powder can be used instead of flour for a “flourless” look.
- Dry Ingredients Unite: Whisk together your flour, cocoa powder, baking soda, baking powder, and salt in a medium bowl. Set aside.
- Wet Ingredients Cream: In a large bowl, cream together your butter and sugars until light and fluffy. This incorporates air, making your cake tender.
- Egg-cellent Addition: Add eggs one at a time, beating well after each addition. Scrape down the sides of the bowl.
- Alternating Magic: Gradually add the dry ingredients to the wet ingredients, alternating with your buttermilk or milk mixture. Begin and end with the dry ingredients. Mix until *just* combined; overmixing develops gluten and can lead to a tough cake.
- Coffee Infusion: Stir in the hot coffee (or dissolved espresso powder). The batter will be thin, and that’s perfectly normal – it’s part of the magic!
- Pour & Bake: Pour the batter evenly into your prepared Bundt pan and bake according to your recipe’s instructions.
Baking Brilliance: Tips for a Flawless Finish
- Don’t Peek Too Soon: Resist the urge to open the oven door during the first 2/3 of baking time. Temperature fluctuations can cause your cake to sink.
- The Toothpick Test: Insert a toothpick into the center of the cake. If it comes out with moist crumbs, it’s done. If it’s wet batter, give it a few more minutes.
- Cooling Cadence: Let the cake cool in the pan on a wire rack for 10-15 minutes. This allows it to firm up before you attempt to invert it. Then, invert it onto the rack to cool completely before frosting. Patience, young padawan!
- The “Tap” Trick: If your cake is stuck, gently tap the bottom of the pan a few times. Sometimes a little jiggle is all it takes!
The Dazzling Finale: White Frosting That Steals the Show
Now for the crowning glory: that pristine, snowy white frosting! It’s the perfect counterpoint to the rich chocolate, adding a touch of sweetness, a creamy texture, and, let’s be honest, making our Chocolate Bundt Cake With White Frosting look absolutely irresistible. There are a few routes you can take here, each with its own charm.
Buttercream Bliss vs. Glaze Greatness
- Classic Buttercream: A fluffy, rich, and creamy frosting made with butter, powdered sugar, milk/cream, and vanilla. It’s luscious, holds its shape well, and offers a beautiful opaque finish. Perfect for those who love a generous layer of sweetness!
- Simple Glaze: Often just powdered sugar, milk/water, and vanilla. This creates a thinner, drizzly coating that cascades down the fluted sides of the Bundt cake. It’s less sweet than buttercream but provides a lovely sheen and subtle flavor. This is often the traditional choice for Bundt cakes due to its ease and visual appeal.
- Cream Cheese Frosting: If you’re feeling a little tangy, a classic cream cheese frosting offers a delightful zest that cuts through the richness of the chocolate. Just make sure it’s not too soft for drizzling.
For our Chocolate Bundt Cake With White Frosting, we’ll focus on a delightful simple vanilla glaze that’s easy to make and looks absolutely stunning.
Whipping Up Your Frosting: Recipe & Technique (Simple Vanilla Glaze)
This glaze is famously simple, yet incredibly effective. It sets beautifully and provides that quintessential look for a Bundt cake.
- Gather Your Goods: You’ll need about 2 cups of powdered sugar (confectioners’ sugar), 3-4 tablespoons of milk (or cream for richness), and 1 teaspoon of vanilla extract.
- Sift for Smoothness: Sift your powdered sugar into a medium bowl. This step is non-negotiable if you want a lump-free glaze!
- Mix & Mingle: Add the vanilla extract to the sifted sugar.
- Slowly Add Liquid: Begin adding the milk, one tablespoon at a time, whisking vigorously after each addition. You’re aiming for a consistency that is thick enough to coat the back of a spoon but thin enough to pour and drizzle easily.
- Adjust as Needed: If it’s too thick, add a tiny bit more milk. If it’s too thin, whisk in a tablespoon or two more sifted powdered sugar. Consistency is key!
- Drizzle Away: Once your cake is completely cool, place it on a wire rack set over a baking sheet (to catch drips). Pour or spoon the glaze over the top, letting it naturally flow down the fluted sides. For a truly professional look, apply half the glaze, let it set slightly, then apply the rest.
Expert Tips & Tricks for Your Chocolate Bundt Cake With White Frosting
- Room Temperature Ingredients: Always, always use room temperature butter, eggs, and dairy for the cake. They emulsify better, leading to a smoother batter and a more tender crumb.
- Don’t Overmix: Overmixing develops gluten, making your cake tough. Mix until just combined when adding dry ingredients.
- Grease & Flour Like a Pro: For Bundt cakes, truly go all out with greasing and flouring (or using baking spray with flour). Get into every nook and cranny! Some swear by butter and then sprinkling cocoa powder for chocolate cakes to avoid white flour streaks.
- Cool Completely: Your cake MUST be completely cool before frosting. Frosting a warm cake will lead to a melty, messy disaster (though still delicious, probably!).
- Get Creative with Garnish: Want to add extra flair? Sprinkle some chocolate shavings, mini chocolate chips, or even a few fresh berries on top of the frosting while it’s still wet.
- Storage Savvy: Store your Chocolate Bundt Cake With White Frosting at room temperature, covered, for up to 3 days, or in the refrigerator for up to 5 days. Let it come to room temperature before serving for the best texture and flavor.
- Variations on a Theme: Feeling adventurous? Add some chocolate chips to the batter, a swirl of raspberry jam, or even a hint of mint extract to your frosting for seasonal twists!
FAQ: Your Burning Questions Answered!
We know you might have a few lingering thoughts about perfecting your Chocolate Bundt Cake With White Frosting. Here are some of the most common questions we hear:
Q1: Why did my Bundt cake stick to the pan?
A1: Ah, the age-old Bundt cake conundrum! The most common culprit is insufficient greasing and flouring. Ensure you use a generous amount of butter or baking spray with flour, getting into all the crevices. Also, letting it cool in the pan for *just* 10-15 minutes (no more!) before inverting is crucial. Too hot, and it’s fragile; too cold, and it glues itself down.
Q2: My cake is dry! What went wrong?
A2: A dry cake usually points to overbaking or too much flour. Always measure your flour accurately (spoon it into your measuring cup and level it off), and don’t bake past the point where a toothpick comes out with moist crumbs. High-quality fats (like butter and oil) and moistening agents (like buttermilk) also contribute to a tender crumb.
Q3: Can I make this cake ahead of time?
A3: Absolutely! The unfrosted chocolate Bundt cake can be baked a day or two in advance and stored tightly wrapped at room temperature. You can even freeze it for up to a month (wrap well!). Frost it the day you plan to serve for the freshest look.
Q4: My white frosting is too runny/too thick. How do I fix it?
A4: Easy fix! If it’s too runny, whisk in more sifted powdered sugar, one tablespoon at a time, until you reach your desired consistency. If it’s too thick, add more milk (or water), half a teaspoon at a time, until it thins out. Always add slowly and mix thoroughly to avoid over-correcting.
Q5: What’s the best way to drizzle the frosting evenly?
A5: For a perfectly even drizzle, make sure your cake is completely cool. Place the cake on a wire rack set over a baking sheet. You can use a spoon to drizzle, or for more control, transfer the glaze to a piping bag (or a Ziploc bag with a corner snipped off) and pipe thin lines across the cake. Let the first layer set slightly before adding more if you want a thicker coating.
Ready to Bake Your Masterpiece?
And there you have it, folks! The complete guide to creating a show-stopping, mouth-watering Chocolate Bundt Cake With White Frosting. This isn’t just a dessert; it’s an experience, a delightful combination of rich chocolate and sweet, creamy frosting that will undoubtedly become a favorite in your baking repertoire. From understanding the magic of the Bundt pan to mastering the art of the perfect glaze, you now possess the knowledge to bake with confidence and flair.
So, what are you waiting for? Grab your ingredients, preheat that oven, and get ready to impress. Your journey to baking the most delicious and beautiful Chocolate Bundt Cake With White Frosting starts now! Share your creations with us – we can’t wait to see your bundt-iful results!
