So you’ve just whipped up a glorious chocolate bundt cake, huh? Congrats! You’ve conquered the oven, wrestled with a bundt pan (and hopefully won the release battle!), and now you have this magnificent, ridged beauty sitting on your counter. But let’s be real, it’s looking a *little* naked, isn’t it? We can’t have that! We’re here to turn that delicious-but-plain bundt into a showstopping masterpiece with minimal fuss and maximum fun. Because life’s too short for boring cake, right?
Why Decorating a Bundt Cake is Awesome
Okay, let’s talk about why we’re even bothering with this “decorating” business. Bundt cakes are already showstoppers, designed with those fancy flutes and swirls, so decorating them is practically cheating! You’ve done the hard part (baking that chocolatey goodness!), now let’s make it sparkle without breaking a sweat. It’s like putting a tiny crown on royalty – it just feels right. Plus, it’s a fantastic way to make an already impressive cake look even more ‘gram-worthy with very little effort. Seriously, even I, a notorious overthinker, can handle these ideas. They’re pretty much idiot-proof, **your secret weapon for looking fancy without the actual work!**
Ingredients You’ll Need (for Decorating, of Course!)
Alright, gather your goodies! We’re not making another cake, we’re just jazzing this one up. Think of these as your cake’s accessories budget.
- Powdered Sugar: Your magic fairy dust for a quick, elegant snowdrift look.
- Unsweetened Cocoa Powder: For a more sophisticated, slightly bitter dusting.
- Heavy Cream (or Milk): The base for most drizzles and glazes.
- Chocolate Chips (Semi-sweet, Dark, or Milk): To melt down into glorious ganache or glazes.
- Vanilla Extract: Just a dash to make things smell and taste divine.
- Confectioners’ Sugar: The MVP for any simple glaze.
- Your Favorite Chocolate Bar: Because sometimes you just need fancy shavings, and why not?
- Optional Toppings:
- Sprinkles: Rainbow, chocolate, metallic – choose your adventure!
- Chopped Nuts: Pecans, walnuts, almonds – for that satisfying crunch.
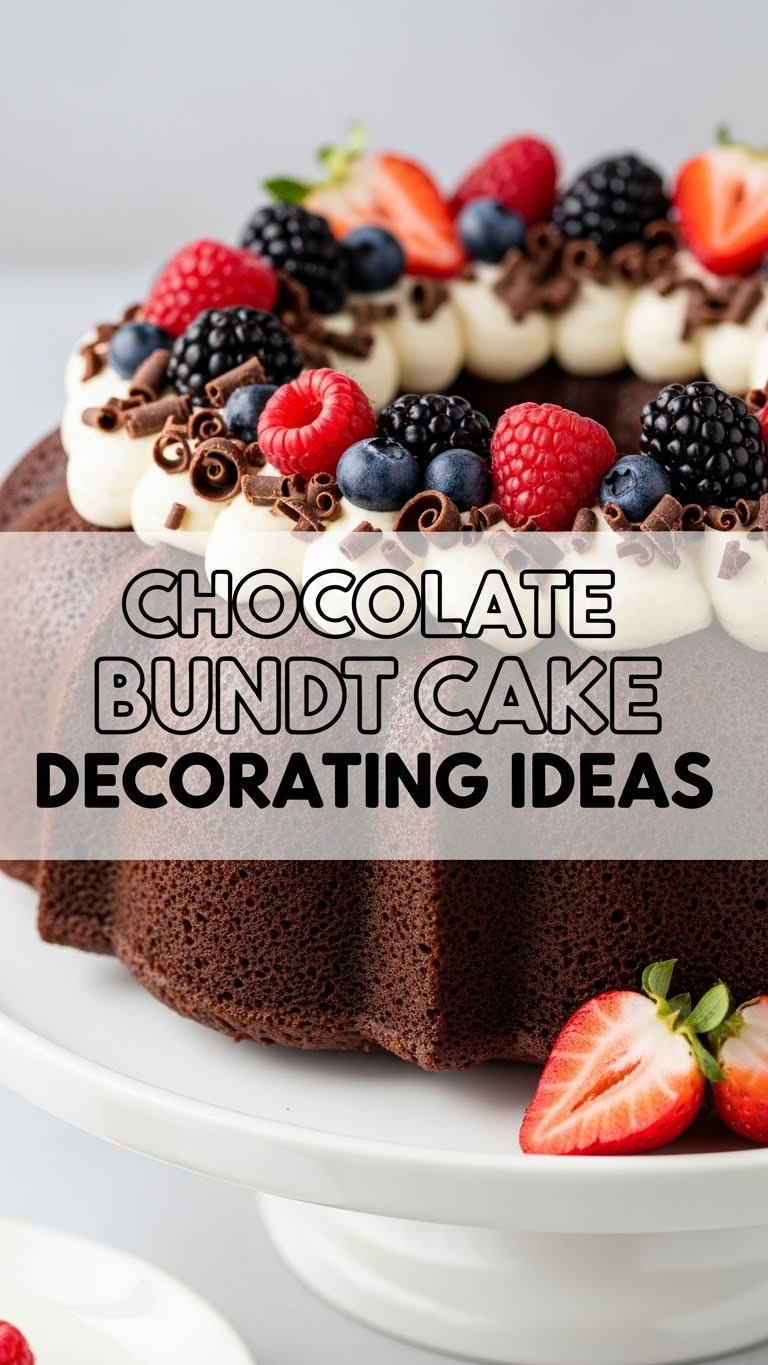
- Fresh Berries: Strawberries, raspberries, blueberries – adds a pop of color and freshness.
- Mini Chocolate Chips: Always a good idea.
- Shredded Coconut: Toasted or plain, for a tropical vibe.
Step-by-Step Decorating Instructions
Your cake is cool, you’re armed with ingredients. Let’s get to the fun part! Remember, you don’t have to do all of these. Pick one, pick two, go wild!
The “I Woke Up Like This” Dusting:
This is the simplest, most elegant move. Place your fully cooled bundt cake on its serving plate. Lightly dust with powdered sugar or cocoa powder using a fine-mesh sieve. **Hold the sieve a little higher for a more even, ethereal dusting.** It looks sophisticated, and it’s practically zero effort. Win-win!
The Classic Drip Glaze:
For a basic vanilla or chocolate drizzle, whisk together 1 cup of confectioners’ sugar with 2-3 tablespoons of milk or cream (and a dash of vanilla extract for vanilla glaze). For chocolate, add 2 tablespoons of melted chocolate or cocoa powder. You want a consistency that’s thick enough to cling but thin enough to drip. Spoon or pour over the top of the cake, letting it naturally cascade down the sides. Oh, la la!
The Glorious Ganache Drip:
This sounds fancy, but it’s ridiculously easy. Heat ½ cup heavy cream until just simmering (don’t boil!). Pour it over 1 cup of chocolate chips in a heatproof bowl. Let it sit for 5 minutes, then whisk until smooth and glossy. Let it cool for about 10-15 minutes until it’s thick enough to drip slowly but not run everywhere. Pour over your bundt cake, focusing on the top and letting it naturally drip down the flutes. **This is your ultimate chocolate indulgence move.**
The “Accessorize Me!” Topping Session:
While your glaze or ganache is still wet (or just after dusting), sprinkle on your chosen toppings! Think chopped nuts, colorful sprinkles, mini chocolate chips, or even shredded coconut. If you’re using fresh berries, arrange them artfully on top or around the base of the cake. This adds texture, color, and another layer of deliciousness.
The Elegant Chocolate Shavings:
Take your favorite chocolate bar. Use a vegetable peeler or a sharp knife to create delicate chocolate curls or shavings. Sprinkle these over your glazed or dusted bundt. It instantly elevates the cake to gourmet status. Plus, you get to snack on the leftover chocolate bar. Bonus!
Common Mistakes to Avoid (Trust Me on These)
We’ve all been there, friend. Learn from my oopsies so you don’t have to make your own!
- Glazing a Hot Cake: Oh, honey, no! Your beautiful glaze will just melt and soak into the cake, turning it into a soggy mess instead of a pretty drizzle. **Always wait until your bundt is completely, 100% cool.** Patience is a virtue here.
- Over-Complicating It: Remember, it’s a bundt, not the Sistine Chapel! The shape itself is the star. Don’t feel like you need to pipe intricate designs unless you’re truly feeling it. A simple glaze and some sprinkles often look better than an over-decorated disaster.
- Not Testing Glaze Consistency: Too thick, and it won’t drip. Too thin, and it’ll disappear. Always test a tiny bit on the back of a spoon. Add more liquid for thin, more confectioners’ sugar for thick. It’s like a tiny science experiment!
- Forgetting to Let Your Glaze Set: You’ve drizzled it beautifully, now step away from the cake! Give your glaze/ganache at least 30 minutes (or more, depending on thickness) to set before slicing. Otherwise, hello, sticky mess!
Alternatives & Substitutions
Cooking is all about flexibility, right? Don’t stress if you don’t have exact ingredients.
- No Heavy Cream for Ganache? You can use whole milk, but **your ganache won’t be as rich or set quite as firmly.** It’ll still be delicious, just a slightly different vibe.
- Out of Powdered Sugar? If you have a powerful blender, you can make your own! Just blend granulated sugar until super fine. Add a tablespoon of cornstarch per cup of sugar to prevent clumping.
- Different Glaze Flavors: Instead of vanilla, try a little almond extract for a nutty twist, or a splash of orange zest for a citrusy kick. Coffee or espresso powder can also enhance chocolate beautifully.
- Topping Swaps: No fresh berries? Canned cherries (drained!) or even candied orange peel can be lovely. Don’t have nuts? Pretzels crushed on top add a fun salty-sweet crunch!
FAQ (Frequently Asked Questions)
Got questions? I’ve got (casual) answers!
Q: Can I decorate my cake right after it comes out of the oven?
A: Oh, honey, no! We just covered this. It’ll melt everything, create a steamy mess, and you’ll be sad. Be patient, let it chill. Literally.
Q: How do I get those perfect chocolate curls?
A: With a vegetable peeler and a block of chocolate, my friend! Hold the chocolate firmly and carefully drag the peeler across the long edge. Or, you know, just buy them. No judgment here!
Q: My glaze is too thick/thin, help!
A: It’s like a choose-your-own-adventure, but with sugar! Too thick? Add a tiny bit more liquid (milk, water, coffee). Too thin? Whisk in a spoonful of confectioners’ sugar. Keep adjusting until you hit that sweet spot.
Q: How long will my decorated bundt cake last?
A: Generally, a few days at room temperature, covered loosely. If you’ve used fresh berries or a cream cheese-based glaze, it’s best to refrigerate it and eat it within 2-3 days. But honestly, who lets a chocolate bundt last that long?
Q: Should I use a cake stand or a regular plate?
A: A cake stand always makes it look fancier, IMO. It elevates the cake (literally!) and makes it feel special. But a nice, simple plate works perfectly too. Presentation is key, but don’t stress over it.
Final Thoughts
And there you have it! A whole bunch of ideas to turn your delicious chocolate bundt cake into a decorated masterpiece without needing a culinary degree or a team of professional pastry chefs. Remember, the best decoration is the one that makes you smile. Don’t overthink it, have fun with it, and enjoy the process (and the eating!). Now go impress someone—or just yourself—with your new culinary skills. You’ve earned it!

