So you’re craving something ridiculously chocolatey, but the thought of turning on your oven feels like too much commitment right now? Preach, friend, preach! What if I told you there’s a magical cake that requires zero baking, minimal effort, and tastes like a hug from a chocolate wizard? Yup, we’re making Chocolate Biscuit Cake, and trust me, your future self will thank you. No fancy equipment, no complex techniques, just pure chocolatey bliss waiting to happen.
Why This Recipe is Awesome
Let’s be real, life’s too short for complicated recipes unless you’re a professional chef or a masochist. This Chocolate Biscuit Cake? It’s the culinary equivalent of a warm blanket on a rainy day – comforting, easy, and utterly delightful. Here’s why it’s about to become your new best friend:
- No Oven Required! That’s right, folks. If you can melt chocolate, you can make this cake. Your oven can stay gloriously off, saving you energy and decision fatigue.
- Idiot-Proof (Even I Didn’t Mess It Up): Seriously, this recipe is so straightforward, it practically makes itself. It’s perfect for beginners or those of us who occasionally burn water. No judgment here!
- Quick & Impressive: You can whip this bad boy up in about 20 minutes of active prep time, then let the fridge do the heavy lifting. The result? A stunning dessert that looks way more effortful than it actually was.
- Seriously Adaptable: Got different biscuits? No problem. Prefer milk chocolate? Go for it! This cake is your canvas.
Ingredients You’ll Need
Gather your troops! Here’s what you’ll need for your chocolatey adventure. Don’t worry, nothing too exotic here.
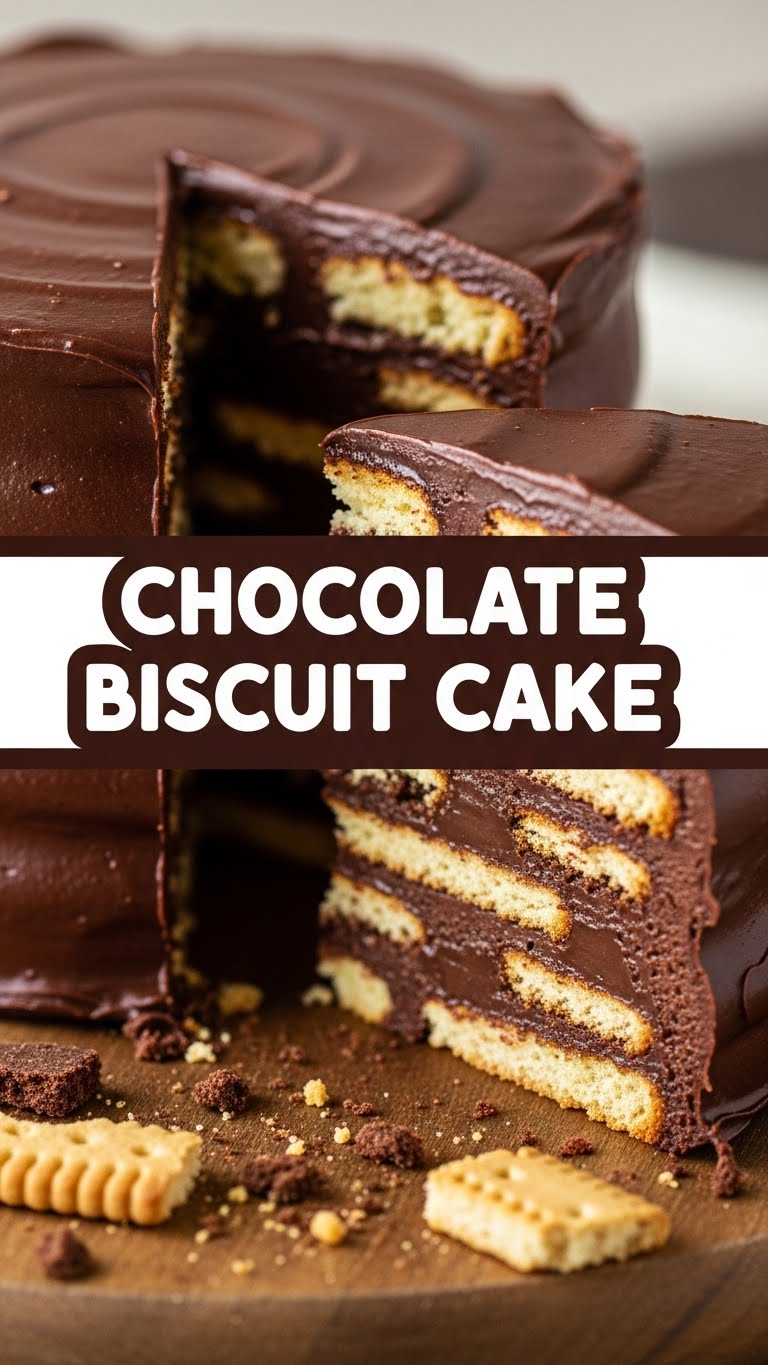
- 250g Digestive Biscuits: Or any similar plain, crunchy biscuit like Rich Tea, Hobnobs, or even Graham Crackers. They’re the humble heroes providing that satisfying crunch. Break ’em up, but don’t pulverize ’em – we want texture!
- 200g Good Quality Dark Chocolate: Please, for the love of all that is holy, don’t skimp here. Your taste buds (and your cake) deserve better than waxy, cheap stuff. A good 70% cocoa solid is ideal, but whatever you love will work!
- 100g Unsalted Butter: The unsung hero of richness. Don’t even think about margarine, unless you’re feeling particularly rebellious (and okay with slightly less luxurious results).
- 100g Golden Syrup: This is for that glorious chewiness and shine. If you can’t find it, corn syrup or even maple syrup will do, but golden syrup is the OG.
- 50g Sweetened Condensed Milk: Our secret weapon for extra creaminess and a touch of sweetness without being cloying.
- 2 Tablespoons Cocoa Powder: Because more chocolate is always the answer. Always.
- Optional Toppings: A handful of chocolate chips, sprinkles (go wild!), chopped nuts, desiccated coconut, or a drizzle of melted white chocolate. Get fancy, or don’t. It’s your cake!
Step-by-Step Instructions
Alright, apron on (or not, we’re not judging), let’s get this show on the road!
Crush Those Biscuits: Grab your biscuits and put them in a large bowl. Use your hands, a rolling pin, or even the bottom of a sturdy glass to break them into varied chunks. We’re going for rough pieces, not fine crumbs. Think “rustic,” not “flour.”
Melt the Magic: In a medium saucepan over very low heat, combine the chopped dark chocolate, butter, golden syrup, and sweetened condensed milk. Stir constantly until everything is gloriously melted and smooth. Don’t let it boil! We’re melting, not cooking. Remove from heat.
Stir in the Cocoa: Whisk in the cocoa powder until there are no lumps and the mixture is uniformly chocolatey. Take a moment to appreciate that rich, dark color. Mmm.
Combine and Conquer: Pour the warm chocolate mixture over your crushed biscuits. Grab a sturdy spoon or spatula and mix everything together really well, making sure every single biscuit piece is coated in that luscious chocolate goo. This is where the magic happens!
Press and Chill: Line an 8×8 inch (20×20 cm) square tin (or a similar size round one) with parchment paper, leaving an overhang on the sides for easy removal later. Spoon the biscuit mixture into the prepared tin and press it down firmly and evenly. The firmer, the better! This prevents crumbling later.
Decorate (Optional, But Fun!): If you’re using toppings, sprinkle them over the top now and gently press them down a little. Cover the tin with plastic wrap and pop it into the fridge for at least 3-4 hours, or even better, overnight. Patience, young padawan, it’s worth it!
Slice and Devour: Once fully chilled and set, use the parchment paper overhang to lift the cake out of the tin. Place it on a cutting board, slice into squares or wedges with a sharp knife (dip it in hot water first for clean cuts!), and prepare for chocolate nirvana. You’ve earned this!
Common Mistakes to Avoid
Even though this cake is ridiculously easy, there are a few banana peels you might slip on. Let’s steer clear, shall we?
- Over-Crushing the Biscuits: We want chunks, not powder! Too fine, and you lose that lovely biscuit texture. It’ll just be… chocolate fudge. Which isn’t bad, but it’s not the goal here.
- Overheating the Chocolate Mixture: Burnt chocolate smells like sadness and tastes worse. Keep that heat low and gentle. If it starts to look grainy, you’ve gone too far, friend.
- Not Lining Your Tin: “I’ll just grease it,” you think. No, no, no. Use parchment paper. Trust me, getting a sticky, chocolatey cake out of an unlined tin is a nightmare. Learn from my past mistakes (and scrubbing sessions).
- Not Pressing Firmly Enough: If your cake crumbles like a bad alibi, you probably didn’t press it down enough. Really lean into it when you put it in the tin!
- Skimping on Chill Time: Trying to slice it before it’s properly set is like trying to ice skate on jelly. Messy and disappointing. Give it the fridge time it deserves.
Alternatives & Substitutions
Feeling creative? Or just working with what you’ve got? This recipe is super forgiving. Here are some ideas:
- Biscuit Bonanza: Swap Digestive biscuits for Rich Tea, Hobnobs, Graham Crackers, shortbread, or even Biscoff for a spiced twist!
- Chocolate Choices: Use milk chocolate for a sweeter cake, or a mix of dark and milk. White chocolate can also be used, but you might need to adjust the cocoa powder for color/flavor.
- Syrup Swaps: No golden syrup? Maple syrup or corn syrup are decent stand-ins, though the texture might be slightly less chewy.
- Glorious Add-ins: Get wild! Stir in a handful of dried cranberries, chopped pecans, mini marshmallows, orange zest (chocolate orange, anyone?!), or even a good splash of Irish cream or rum into the warm chocolate mixture before combining with biscuits. FYI, the booze makes it extra festive!
- Vegan Version: Go dairy-free with vegan digestive biscuits, plant-based butter, a good quality dark chocolate (check ingredients for dairy), and a can of coconut condensed milk. Boom, vegan deliciousness!
FAQ (Frequently Asked Questions)
Got questions? I’ve got (casual) answers!
- Can I use margarine instead of butter?
- Well, technically yes, but why hurt your soul like that? Butter just gives a superior flavor and texture. If you must, use a high-quality baking margarine, but for optimal deliciousness, stick with butter!
- How long does this cake last?
- In a sealed container in the fridge, it’ll last up to a week. If it actually survives that long. Mine usually disappears within 2 days.
- Can I freeze Chocolate Biscuit Cake?
- You bet! Wrap individual slices or the whole cake (if you’re a superhero with self-control) tightly in plastic wrap and then foil. Freeze for up to a month. Thaw in the fridge before serving.
- My cake is too crumbly. What went wrong?
- Chances are, you either didn’t press it firmly enough into the tin, or there wasn’t quite enough of the melted chocolate mixture to bind everything. Next time, be a little more aggressive with that pressing!
- Do I really need golden syrup?
- For that classic, slightly chewy, glossy texture, yes, it’s pretty crucial. It adds a unique flavor too. If you can’t find it, alternatives work, but the end result might be a tiny bit different. IMO, it’s worth seeking out!
- Can I add booze to this cake?
- Oh, absolutely! A splash of rum, Kahlua, or Irish cream in the chocolate mixture is a fantastic idea for an adult version. Just don’t tell the kids, unless they’re particularly good at keeping secrets.
Final Thoughts
And there you have it! A Chocolate Biscuit Cake recipe that’s so easy, it feels like cheating. Whether you’re making it for a party, a quiet night in, or just because Tuesday deserves some chocolate, you’re in for a treat. So go forth, melt some chocolate, crush some biscuits, and bask in the glory of your no-bake masterpiece. Now go impress someone—or yourself—with your new culinary skills. You’ve earned it!


