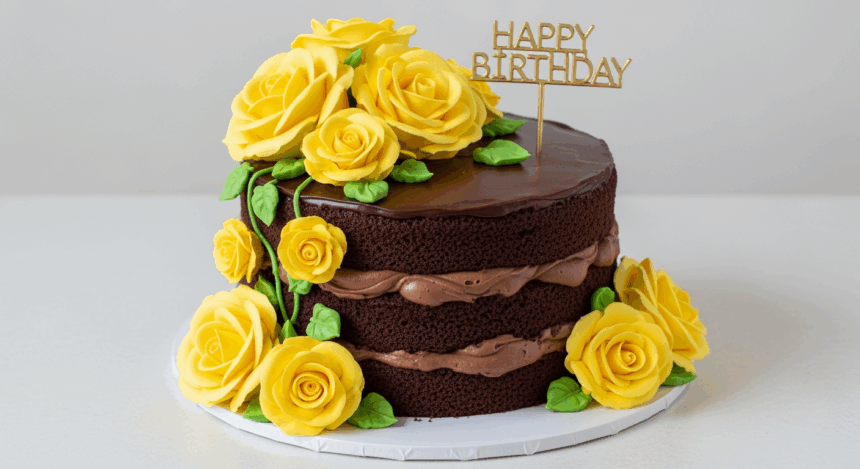
Ah, the birthday cake—that one dessert that screams “someone’s getting older whether they like it or not!” But honestly, is there anything more classic than a chocolate cake decked out with cheerful yellow roses? It’s like the little black dress of birthday cakes—timeless, elegant, but still says “I’m here to party!” Let’s dive into making this showstopper that’ll have everyone thinking you spent way more time on it than you actually did. (That’s our little secret.)
Why This Recipe is Awesome
First off, this cake is basically fool-proof. I once made it while simultaneously binge-watching an entire season of my favorite show and it still turned out Instagram-worthy. The chocolate cake is ridiculously moist (sorry if you hate that word, but there’s no better description), and the contrast with those sunny yellow buttercream roses is just *chef’s kiss*. Plus, yellow roses symbolize friendship and joy—so you’re not just making dessert, you’re making an edible greeting card. How efficient is that?
Ingredients You’ll Need
For the Chocolate Cake:
- 2 cups all-purpose flour (the regular stuff, nothing fancy)
- 2 cups granulated sugar (because it’s a birthday—calories don’t count)
- 3/4 cup unsweetened cocoa powder (the darker, the better)
- 2 teaspoons baking powder (this is what makes it rise, so don’t “forget” this one)
- 1 1/2 teaspoons baking soda (yes, it’s different from baking powder—don’t start that debate)
- 1 teaspoon salt (just regular salt, save your Himalayan pink stuff for when you’re feeling fancy)
- 2 large eggs (room temperature, because cold eggs are party poopers)
- 1 cup buttermilk (no buttermilk? Add 1 Tbsp lemon juice to regular milk and wait 5 minutes—boom, DIY buttermilk)
- 1/2 cup vegetable oil (makes it super moist—there’s that word again!)
- 2 teaspoons vanilla extract (real vanilla, not that imitation nonsense)
- 1 cup hot coffee (trust me on this one—you won’t taste coffee, just deeper chocolate)
For the Yellow Buttercream Roses:
- 1 cup unsalted butter, softened (leave it out for an hour—or microwave it for 10 seconds if you’re impatient like me)
- 4 cups powdered sugar (also called confectioners’ sugar, for you fancy folks)
- 2-3 tablespoons heavy cream (makes it silky smooth)
- 1 teaspoon vanilla extract (again, the real stuff)
- Yellow gel food coloring (liquid works too, but gel gives you that sunshine-y yellow without making your frosting runny)
- Piping bags and a 1M or 2D tip (for those gorgeous roses)
Step-by-Step Instructions
- Prep your workspace. Preheat your oven to 350°F (175°C). Grease and flour two 9-inch round cake pans. Pro tip: cut parchment paper circles for the bottom of your pans—future you will thank present you when the cakes release perfectly.
- Mix the dry ingredients. In a large bowl, whisk together flour, sugar, cocoa, baking powder, baking soda, and salt. Think of it as creating a sandbox for your wet ingredients to play in.
- Add the wet team. Add eggs, buttermilk, oil, and vanilla. Mix on medium speed for about 2 minutes. Your batter will look like a chocolate milkshake at this point—try not to drink it.
- Coffee time! Stir in the hot coffee. Yes, your batter will be thin—that’s normal! It’s not broken, I promise. The coffee enhances the chocolate flavor without making it taste like a mocha.
- Bake those babies. Pour batter evenly into your prepared pans and bake for 30-35 minutes, or until a toothpick inserted in the center comes out clean. The smell of chocolate will make your home smell like a bakery, and everyone will think you’re a domestic god/goddess.
- Cool your jets. Let the cakes cool in pans for 10 minutes, then remove to wire racks to cool completely. Rushing this step = frosting avalanche later, so be patient.
- Make the buttercream. Beat softened butter until creamy. Gradually add powdered sugar, cream, and vanilla, beating until fluffy. If it seems too thick, add more cream—if too thin, add more sugar. It should be stiff enough to hold a shape but soft enough to pipe.
- Create sunshine. Add yellow food coloring gradually until you reach your desired shade. Remember, you can always add more color, but you can’t take it away (kind of like those regrettable text messages at 2 AM).
- Assemble the cake. Place one layer on your cake stand, add a generous dollop of buttercream, spread evenly, top with the second layer. Cover the entire cake with a thin layer of frosting (this is your crumb coat—it traps all the crumbs so your final layer looks pristine).
- Chill out. Refrigerate the crumb-coated cake for 15-20 minutes. This firms up the frosting and makes the next step much easier.
- Final frosting. Apply a thicker, even layer of buttercream all over the cake. Use a bench scraper or spatula to smooth the sides. Leave some yellow buttercream for your roses!
- Rose magic time. Fill a piping bag fitted with a 1M or 2D tip with the remaining yellow buttercream. To make a rose, start in the center and pipe in a spiral outward. Place roses around the top edge of the cake and maybe a few on the sides for that “I totally went to pastry school” look.
Common Mistakes to Avoid
Let’s be real—even the best of us mess up sometimes. Here are some cake crimes to avoid:
- Opening the oven door too early. Your cake will sink faster than my motivation on Monday mornings.
- Using cold ingredients. Room temperature eggs and buttermilk mix better. Science says so.
- Skipping the parchment paper. Unless you enjoy scraping cake pieces off the pan and pretending they’re “chef’s samples.”
- Frosting a warm cake. This creates a “landslide effect” that no amount of emergency decorating can fix.
- Being stingy with food coloring. Buttercream darkens slightly as it sets, so go a shade brighter than you want the final result.
Alternatives & Substitutions
Not everyone’s pantry is stocked like a mini-supermarket, so here are some swaps that won’t ruin your masterpiece:
- No buttermilk? Use regular milk with a tablespoon of lemon juice or white vinegar. Let it sit for 5 minutes until it curdles slightly. Gross but effective.
- Coffee alternatives: Not a coffee person? Use hot water instead, but add an extra tablespoon of cocoa powder to maintain that rich chocolate flavor. Or use hot chocolate if you’re feeling rebellious.
- Gluten concerns? Swap in your favorite cup-for-cup gluten-free flour blend. The cake might be slightly denser, but hey—more fudgy goodness!
- Different colors? Yellow roses are classic, but pink, lavender, or even ombre roses look amazing too. Go wild—it’s your cake kingdom!
- Vegan needs? Replace eggs with flax eggs (1 Tbsp ground flaxseed + 3 Tbsp water per egg) and use plant-based milk with lemon juice instead of buttermilk. For the frosting, use vegan butter sticks (not the tub stuff—it’s too soft).
FAQ (Frequently Asked Questions)
Can I make this cake ahead of time?
Absolutely! The cake layers can be baked up to 2 days in advance, wrapped tightly in plastic wrap. The fully decorated cake holds up beautifully in the refrigerator for up to 24 hours. Just let it come to room temperature about an hour before serving for maximum flavor.
Do I really need to use coffee in the batter?
Listen, I don’t make the rules of chocolate enhancement. The coffee doesn’t make the cake taste like a latte—it actually deepens the chocolate flavor. But if you’re caffeine-phobic, decaf works just as well, or hot water in a pinch.
I’m terrible at piping roses! Help?
YouTube is your BFF here. But honestly, even “ugly” roses look charming in their own way. If all else fails, just pipe little swirls or dollops and call them “artistic interpretation.” No one will question you—they’ll be too busy eating cake.
Can I use canned frosting instead of making buttercream?
I mean, technically yes, in the same way you could wear pajamas to a wedding. Will it work? Sure. Will it be as good? Not even close. Homemade buttercream tastes approximately 1000% better and holds its shape for piping. But I won’t judge your shortcuts… much.
My cake sank in the middle—what went wrong?
Either you opened the oven too early (patience, grasshopper), your leavening agents were old, or your oven temperature is inaccurate. Get an oven thermometer—they’re cheap and will save you from many baking heartbreaks.
How do I transport this masterpiece without destroying it?
Chill the cake for about 30 minutes before transport to firm up the frosting. Use a cake carrier if you have one, or insert toothpicks around the top edge and loosely tent with foil (making sure it doesn’t touch the frosting). Then drive like you’re transporting nitroglycerin.
Final Thoughts
Congratulations! You’ve just created not just a cake, but a memory in the making. There’s something magical about presenting someone with a homemade birthday cake—especially one this gorgeous. Those yellow roses aren’t just decorations; they’re little edible symbols saying “I cared enough to learn how to pipe frosting for you.”
Remember, even if your roses look more like squished daisies (we’ve all been there), chocolate cake with buttercream is basically impossible to mess up taste-wise. And hey—if disaster truly strikes, crumble it all up, layer with frosting in glasses, call it a “deconstructed cake parfait,” and take credit for being avant-garde.
Now go forth and celebrate! And maybe save me a slice? Just asking for a friend… that friend is me. I’m not above begging for cake. Happy baking!
