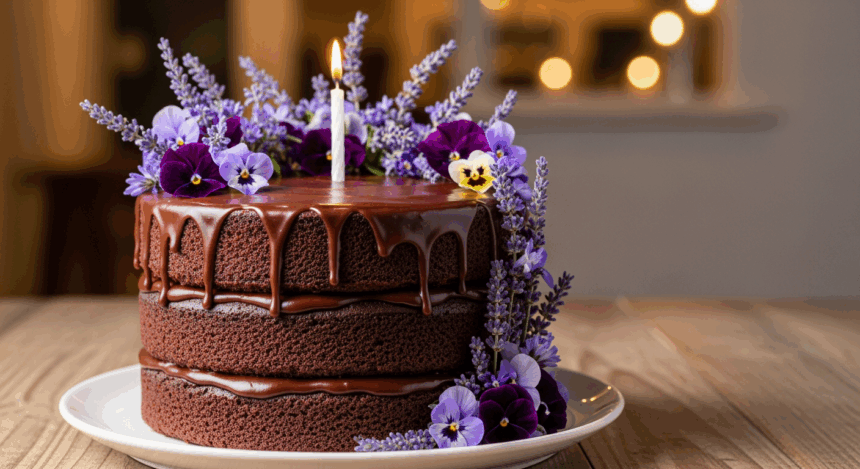
Alright, so your friend just asked you to bake a chocolate birthday cake with purple flowers and you’re thinking, “How hard can it be?” Famous last words, right? Don’t worry—I’ve got you covered with this foolproof recipe that’ll make you look like you graduated from pastry school (even if your previous baking experience maxes out at slice-and-bake cookies).
Why This Recipe is Awesome
Let’s be real—chocolate cake is already a crowd-pleaser, but add those gorgeous purple flowers and suddenly you’re not just bringing dessert, you’re making a statement. This recipe strikes the perfect balance between “impressive enough to post on Instagram” and “won’t have you crying on the kitchen floor at 2 AM.” The cake is moist (yes, I said that word, deal with it), the frosting is rich without being too sweet, and those purple flowers? They’ll have everyone thinking you’ve been taking secret decorating classes.
Ingredients You’ll Need
For the cake:
- 2 cups all-purpose flour (the regular stuff, nothing fancy)
- 2 cups granulated sugar (because it’s a birthday, duh)
- ¾ cup unsweetened cocoa powder (the good kind, not the sad dusty one from the back of your pantry)
- 2 teaspoons baking soda (not baking powder—they’re different, trust me)
- 1 teaspoon salt (to make the sweetness pop)
- 2 large eggs (room temperature, because cold eggs are party poopers)
- 1 cup buttermilk (no buttermilk? Check the substitutions section before panicking)
- ½ cup vegetable oil (makes it super moist without even trying)
- 2 teaspoons vanilla extract (the real stuff, not that imitation nonsense)
- 1 cup hot coffee (don’t skip this! It makes chocolate taste more…chocolatey)
For the frosting:
- 1 cup unsalted butter, softened (leave it out for an hour, folks)
- 4 cups powdered sugar (yes, that much—it’s a party)
- ½ cup cocoa powder (for that double chocolate action)
- ¼ cup heavy cream (makes it fluffy and dreamy)
- 2 teaspoons vanilla extract (again, the real deal)
- ¼ teaspoon salt (trust me on this one)
For the purple flowers:
- 1 cup white fondant (the edible play-doh of the baking world)
- Purple food coloring (gel works best, liquid is for amateurs)
- Small flower cookie cutters (or free-hand it if you’re feeling artsy)
- A tiny bit of edible pearl dust if you’re feeling fancy (optional but makes you look pro)
Step-by-Step Instructions
Prep Work (Don’t Skip This!)
- Preheat your oven to 350°F (175°C). I know you want to jump right in, but a cold oven is the enemy of good cake.
- Grease and line two 9-inch cake pans with parchment paper. This might seem extra, but you’ll thank me when your cakes don’t become permanent residents of the pan.
- Brew that cup of coffee. Not a coffee drinker? Doesn’t matter—you won’t taste it, but it makes the chocolate flavor pop like nobody’s business.
For the Cake:
- In a large bowl, whisk together flour, sugar, cocoa powder, baking soda, and salt. Get all those lumps out—nobody wants to bite into a cocoa pocket.
- In another bowl, mix the eggs, buttermilk, oil, and vanilla until they’re best friends.
- Slowly add the wet ingredients to the dry ingredients, mixing until just combined. Don’t beat it to death—we’re making cake, not punishing the batter.
- Add the hot coffee and mix gently. Yes, the batter will be thin. No, you didn’t mess up.
- Pour the batter evenly into your prepared pans and bake for 30-35 minutes or until a toothpick comes out clean-ish (a few moist crumbs are fine, wet batter is not).
- Let the cakes cool in the pans for 10 minutes, then flip them onto a wire rack to cool completely. Completely means completely—warm cakes + frosting = disaster.
For the Frosting:
- Beat the softened butter until it’s fluffy and questioning its life choices (about 3 minutes).
- Add the powdered sugar and cocoa powder gradually. Unless you enjoy wearing your ingredients, start the mixer on low.
- Pour in the heavy cream, vanilla, and salt, then beat on medium-high until the frosting is fluffy and spreadable (about 2 minutes).
- If it’s too thick, add a splash more cream. Too thin? A bit more powdered sugar. You’re the boss here.
For the Purple Flowers:
- Knead a tiny drop of purple food coloring into your fondant. Start small—you can always add more, but you can’t take it away.
- Roll the fondant out to about ⅛ inch thickness on a surface dusted with powdered sugar.
- Use your flower cutters to cut out shapes, or hand-cut them if you’re channeling your inner artist.
- Let the flowers dry slightly (about 30 minutes) so they hold their shape better.
- If using pearl dust, lightly brush it on with a small, clean paintbrush for that fancy-pants finish.
Assembly (The Fun Part!):
- Place one cake layer on your serving plate. Plop a generous dollop of frosting on top and spread it to the edges.
- Gently place the second layer on top, trying not to smash or slide it (cake architecture is delicate business).
- Coat the whole cake with a thin layer of frosting (that’s your “crumb coat”), then refrigerate for 15-20 minutes.
- Add the final layer of frosting, making it as smooth or artistically rustic as you like.
- Arrange your purple flowers on the cake however inspiration strikes. Pro tip: odd numbers of flowers tend to look more natural.
Common Mistakes to Avoid
Even experienced bakers mess up sometimes. Here’s how not to join that club:
- Skipping the parchment paper. “I’ll just grease the pan really well.” Famous last words before cake tragedy.
- Frosting a warm cake. Unless “melted avalanche” is the look you’re going for, wait until it’s completely cool.
- Overbeating the batter. You’re not whipping it into submission—just mix until combined.
- Going heavy-handed with food coloring. Unless radioactive purple is your aesthetic, start with a tiny amount.
- Making the fondant flowers too thick. Nobody enjoys biting into a half-inch of fondant, no matter how pretty it looks.
Alternatives & Substitutions
Because sometimes the grocery store betrays you or dietary restrictions exist:
- No buttermilk? Add 1 tablespoon of lemon juice or white vinegar to regular milk and let it sit for 5 minutes. Voilà, fake buttermilk that works just fine.
- Coffee hater? Use hot water instead. You’ll lose some depth of flavor, but the cake will still be delicious.
- No fondant skills? Buy pre-made fondant flowers or use buttercream to pipe simple flowers. Alternatively, candied violets or fresh edible flowers work too (just make sure they’re actually edible, FYI).
- Need it dairy-free? Substitute the buttermilk with almond or soy milk + 1 tablespoon vinegar, and use plant-based butter and coconut cream for the frosting.
- Gluten issues? A one-to-one gluten-free flour blend works pretty well in this recipe, though the texture might be slightly different.
FAQ (Frequently Asked Questions)
Can I make this cake in advance?
Absolutely! The unfrosted cake layers can be wrapped tightly and frozen for up to a month. The assembled cake will stay fresh in the fridge for 3-4 days, though the fondant flowers might get a bit sad and droopy after day two.
Do I really need TWO cups of sugar?
I mean, it’s a birthday cake, not a health food. But if you must, you can reduce to 1¾ cups without major issues. Any less and we’re entering science experiment territory with the texture.
What if my fondant keeps sticking to everything?
Sounds like someone needs more powdered sugar dusting! Also, make sure your hands aren’t too warm—fondant gets sticky when it’s hot.
Can I use a different color for the flowers?
Is water wet? Of course you can! Match it to the birthday person’s favorite color, the party theme, or go rainbow if you’re feeling particularly ambitious.
How do I transport this masterpiece without destroying it?
Chill the frosted cake thoroughly before moving it. Use a cake carrier if you have one, or place toothpicks around the top of the cake and loosely tent foil over them to protect the decoration. Drive like there’s an open cup of hot coffee in your lap.
Help! My cake layers are domed in the middle!
No biggie—just slice off the domes with a long serrated knife to make them flat before frosting. Bonus: baker’s snacks!
Final Thoughts
There you have it—a chocolate birthday cake that’s both delicious AND pretty enough to make everyone think you’ve got your life together. The best part? When people ask if you made those flowers yourself, you get to casually say “Oh, these? Yeah, they were easy,” while internally high-fiving yourself.
Remember, even if your flowers don’t look Pinterest-perfect or your frosting job has a few, ahem, “character marks,” it’s still going to taste amazing. And honestly, after everyone sings Happy Birthday and the candles are blown out, that cake is getting demolished regardless of how it looks.
Now go forth and bake! May your layers be even, your frosting be smooth, and your birthday person be thoroughly impressed by your obvious culinary genius.


