Alright, listen up buttercup. Someone’s birthday is looming, and you’ve either bravely volunteered to bake the cake, or maybe it’s *your* birthday and you just want an excuse for a mountain of chocolate. Either way, we’re diving headfirst into making a showstopper of a chocolate birthday cake that not only tastes like a dream but also looks like you actually know what you’re doing. And guess what? It’s easier than trying to assemble IKEA furniture (mostly!). So grab your apron, a good playlist, and maybe a glass of wine – we’re baking!
Why This Recipe is Awesome
Because who needs therapy when you have chocolate cake, right? This isn’t just *any* chocolate cake; it’s *the* chocolate cake. It’s unbelievably moist (yeah, I said it), ridiculously rich, and designed to look like you put in way more effort than you actually did. Plus, it’s **practically idiot-proof**. Seriously, even I haven’t messed it up. Yet. This recipe is your secret weapon for transforming basic ingredients into a jaw-dropping masterpiece without breaking a sweat (or a plate, hopefully).
Ingredients You’ll Need
Don’t panic! Most of these are probably chilling in your pantry already. Or will be after a quick grocery run. No judgment!
For the Seriously Moist Chocolate Cake:
- All-Purpose Flour: 2 cups (240g). The backbone of our cakey dreams.
- Granulated Sugar: 2 cups (400g). Because life is sweet, and so should your cake be.
- Unsweetened Cocoa Powder: ¾ cup (65g), good quality please! Dark cocoa makes it extra fancy.
- Baking Soda: 2 teaspoons. Our lifting agent.
- Baking Powder: 1 teaspoon. Its sidekick, making sure we get maximum fluff.
- Salt: 1 teaspoon. Don’t skip it; it balances the sweetness like a pro.
- Large Eggs: 2, at room temperature. They just *work* better, trust me.
- Buttermilk: 1 cup (240ml). Our secret for ultimate moistness.
- Vegetable Oil: ½ cup (120ml). More moistness, less dry cake drama.
- Vanilla Extract: 2 teaspoons. The soul of all good baking.
- Hot Coffee (or Hot Water): 1 cup (240ml). The absolute secret weapon for deep chocolate flavor. FYI, you won’t taste coffee, just super chocolatey goodness!
For the Dreamy Chocolate Buttercream Frosting:
- Unsalted Butter: 1 cup (226g), softened. Unsalted gives you control over the saltiness.
- Powdered Sugar (Confectioners’ Sugar): 3-4 cups (360-480g), sifted. Nobody likes lumpy frosting!
- Unsweetened Cocoa Powder: ½ cup (45g). More chocolate, obviously.
- Heavy Cream or Milk: ¼ cup (60ml), possibly more. For that perfect, spreadable consistency.
- Vanilla Extract: 1 teaspoon. Because vanilla makes everything better.
- Pinch of Salt: To cut through the sweetness.
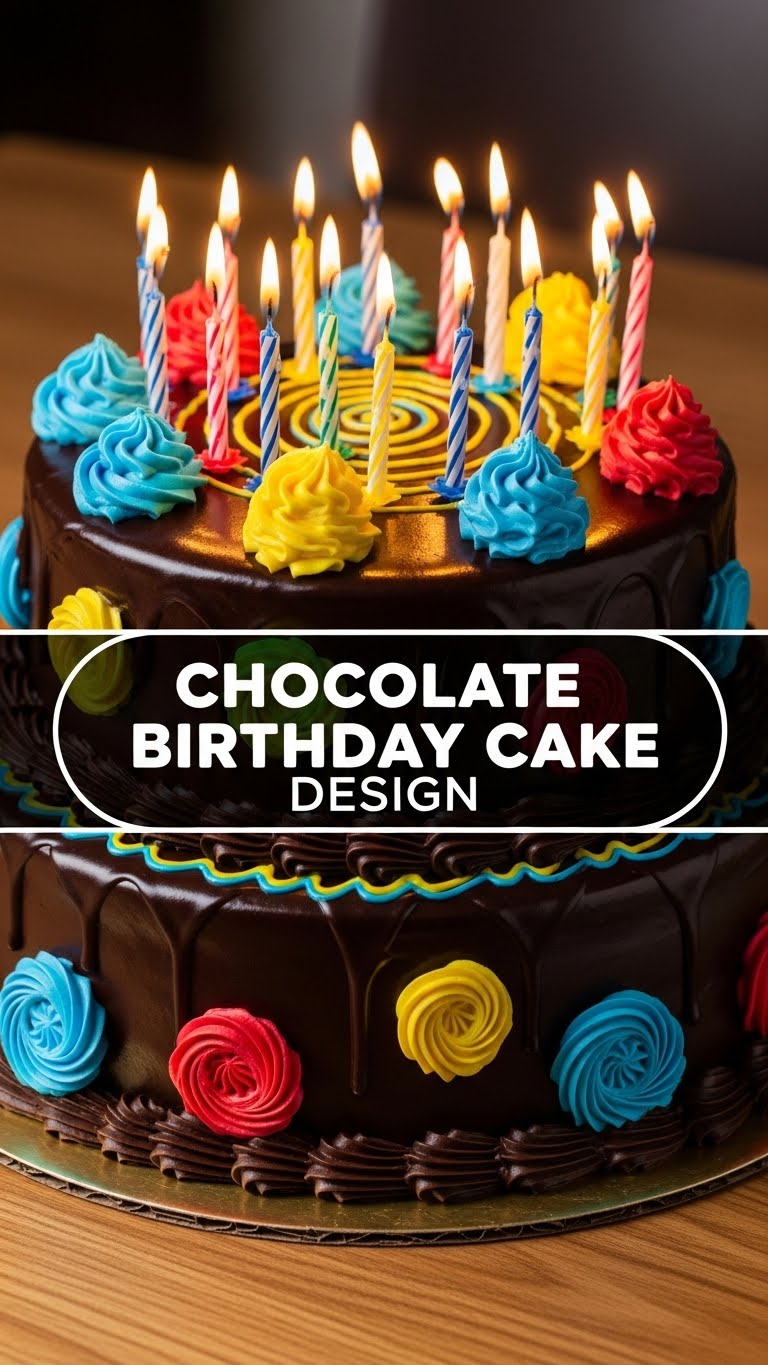
For the Birthday Cake Design Fun:
- Chocolate Bars: A couple for shavings or a quick ganache drip.
- Sprinkles: Any kind! The more colorful, the better. Mandatory fun, IMO.
- Fresh Berries: Strawberries, raspberries, or blueberries for a pop of color (and to feel slightly healthy).
- Birthday Candles: Duh!
Step-by-Step Instructions
Okay, let’s get messy! Remember, baking is a science, but also an art. Mostly art when it comes to frosting.
Part 1: The Glorious Chocolate Cake
- Prep Your Stage: Preheat your oven to 350°F (175°C). Grease and flour two 8-inch or 9-inch round cake pans. Or, even better, line the bottoms with parchment paper and grease the sides. **This prevents sticking and makes removal a breeze!**
- Mix the Dry Stuff: In a large bowl, whisk together the flour, sugar, cocoa powder, baking soda, baking powder, and salt. Make sure there are no lumps of cocoa.
- Combine the Wet Stuff: In another bowl, whisk the eggs, buttermilk, vegetable oil, and vanilla extract until well combined.
- Unite Them: Pour the wet ingredients into the dry ingredients. Mix on low speed (or by hand) until just combined. Don’t overmix! Overmixing is the enemy of tender cake.
- The Secret Weapon: Carefully pour the hot coffee (or hot water) into the batter. It will look thin, don’t worry! Stir until just combined.
- Bake It Up: Divide the batter evenly between your prepared cake pans. Bake for 30-35 minutes, or until a wooden skewer inserted into the center comes out clean.
- Cool Down: Let the cakes cool in the pans for about 10-15 minutes, then invert them onto a wire rack to cool completely. **They MUST be completely cool before frosting!** Otherwise, you’ll have a melted mess, not a masterpiece.
Part 2: The Dreamy Chocolate Buttercream
- Butter Up: In a large bowl, beat the softened butter with an electric mixer until light and fluffy (about 2-3 minutes).
- Add the Goods: Gradually add the sifted powdered sugar and cocoa powder, alternating with splashes of heavy cream or milk. Start on low speed to avoid a powdered sugar cloud explosion in your kitchen.
- Whip It Good: Add the vanilla extract and a pinch of salt. Increase speed to medium-high and beat for another 3-5 minutes until the frosting is light, fluffy, and perfectly spreadable. If it’s too thick, add more cream/milk, one teaspoon at a time. If it’s too thin, add a bit more sifted powdered sugar.
Part 3: Assembly & Birthday Design Fun!
- Level Up: If your cake domes are too high, use a serrated knife to carefully level the tops of your cooled cakes. Flat cakes make for stable stacks!
- First Layer: Place one cake layer on your serving plate or cake stand. Spread about ¾ cup of frosting evenly over the top.
- Second Layer: Gently place the second cake layer on top.
- The Crumb Coat (Don’t Skip This!): Apply a very thin layer of frosting all over the cake – top and sides. This is your “crumb coat” and it traps any loose crumbs. **Pop the cake in the fridge for 15-20 minutes** to set this layer. This makes your final frosting coat perfectly smooth.
- Final Frosting: Take the cake out of the fridge and apply the remaining frosting to the top and sides, smoothing it out with an offset spatula or bench scraper.
- Decorate Like a Pro (or Just Have Fun):
- Chocolate Shavings: Use a vegetable peeler to create curls from a chocolate bar and scatter them over the top and sides.
- Ganache Drip (Optional): Melt some chocolate with a bit of heavy cream, let it cool slightly, then spoon it along the edge of the cake to create beautiful drips.
- Sprinkle Time: Go wild with sprinkles! Cover the top, the sides, or just create a festive border.
- Berries & Candles: Arrange fresh berries artfully on top, then add your birthday candles. Voila!
Common Mistakes to Avoid
We’ve all been there. Learn from my (many) past baking mishaps!
- Thinking you can eyeball measurements: Nope, this isn’t a cocktail. Baking is a science, so **measure precisely**!
- Using cold ingredients straight from the fridge: Your cake and frosting will both suffer. **Room temperature eggs and butter are key** for emulsification and a smooth batter/frosting.
- Overmixing the batter: Unless you’re aiming for a hockey puck texture, mix until *just* combined. Gluten develops when overmixed, leading to tough cake.
- Opening the oven door constantly: Patience, padawan! Resist the urge. Every time you open it, the oven temperature drops, which can cause your cake to sink.
- Not cooling cakes completely before frosting: This is a rookie mistake that will turn your beautiful frosting into a runny, crumb-filled disaster. **Cool completely!** I can’t stress this enough.
- Skipping the crumb coat: Unless you like crumbs in your final frosting, don’t skip this crucial step! It’s worth the extra 15 minutes of chill time.
Alternatives & Substitutions
Life happens, and sometimes you don’t have exactly what the recipe calls for. No stress!
- No Buttermilk? No Problem! You can make your own: simply add 1 tablespoon of white vinegar or lemon juice to a measuring cup, then fill the rest with regular milk (dairy or non-dairy) until you reach 1 cup. Let it sit for 5-10 minutes until it slightly curdles. Boom, instant buttermilk!
- Coffee Haters Unite? If you absolutely, positively despise coffee, you can use hot water instead. But honestly, **the hot coffee doesn’t make the cake taste like coffee; it just intensifies the chocolate flavor** in a magical way. Try it!
- Oil vs. Butter: While the recipe calls for oil for maximum moistness, you *could* use melted butter in the cake. The texture might be slightly different (a bit denser), but still delicious.
- Frosting Flavors: Not a fan of chocolate overload? You could do a simple vanilla buttercream, cream cheese frosting, or even a raspberry buttercream for a fruity twist.
- Decoration Swaps: No chocolate bars for shavings? Use mini chocolate chips, crushed cookies (like Oreos!), or different types of candy. Get creative!
FAQ (Frequently Asked Questions)
Got questions? I’ve got answers (mostly).
Q: Can I make this cake dairy-free?
A: You bet! Swap the buttermilk for plant-based milk + vinegar (as mentioned above), use a good quality dairy-free butter substitute for the frosting, and dairy-free milk/cream in the frosting. Will it taste *exactly* the same? Probably not, but it’ll still be super delish!
Q: My cake sank in the middle! What happened?
A: Oh, the dreaded sinkhole! This usually happens if you opened the oven door too early, overmixed the batter, or your baking soda/powder wasn’t fresh. Make sure your leavening agents aren’t expired!
Q: How far in advance can I make this cake?
A: You can bake the cake layers up to 2-3 days in advance. Once completely cooled, wrap them tightly in plastic wrap and store at room temperature or freeze for longer storage. The buttercream can be made 3-4 days ahead and stored in the fridge; just re-whip it before using.
Q: Do I *have* to use hot coffee?
A: Well, technically no, you can use hot water. But why rob your chocolate of its best friend? It truly amplifies the chocolate flavor without making the cake taste like coffee. Seriously, try it. **It’s a game-changer!**
Q: Can I use store-bought frosting?
A: You *can*, but why put all this effort into baking a cake from scratch only to slack on the frosting? Homemade buttercream is genuinely so much better and worth the extra 10 minutes. Your call, but **homemade is always superior, IMO**.
Q: My frosting is too sweet! Help!
A: This can happen! Make sure you added that pinch of salt, which really helps balance the sweetness. You can also add a tiny bit more unsweetened cocoa powder or a few drops of black coffee (cooled!) to cut through the sweetness. A touch more vanilla never hurts either.
Final Thoughts
There you have it, future cake wizard! You’ve officially graduated from “box mix only” to “I-made-that-from-scratch-and-it-looks-amazing.” You’ve mastered the art of the moist crumb, the dreamy frosting, and the dazzling design. Now go impress someone – or yourself – with your new culinary skills. You’ve earned it! And remember, **chocolate cake is a love language**. Speak it fluently. Happy baking, my friend!


