So, you’ve successfully baked that glorious chocolate birthday cake. High five! Now for the *real* challenge: making it look less like a slightly burnt brown blob and more like an edible masterpiece that screams, “I love you *and* I put effort into this!” But shhh, don’t tell anyone it was actually super easy and kinda fun. 😉
Why This Cake Decoration Is Awesome
Because let’s be real, you’re busy. You don’t have time for intricate fondant sculptures or pastry chef-level piping skills. This decoration guide is your secret weapon. It’s **idiot-proof** (trust me, I’ve tested it), high-impact, and makes any chocolate cake look like it came from a fancy bakery, not your slightly chaotic kitchen. We’re talking maximum “wow” factor with minimum stress. Plus, it’s totally customizable, so you can tailor it to the birthday star’s vibe, or just your current mood. Who doesn’t love options?
Ingredients You’ll Need
Alright, gather your goodies! You’ve got the baked cake, right? Good. Now for the glam squad:
- Your Favorite Chocolate Cake: Already baked and cooled, please. Don’t even *think* about decorating a warm cake unless you enjoy a frosting avalanche.
- Buttercream Frosting: About 3-4 cups. Homemade is boss, but a good quality store-bought works in a pinch. Just make sure it’s at room temperature for easy spreading!
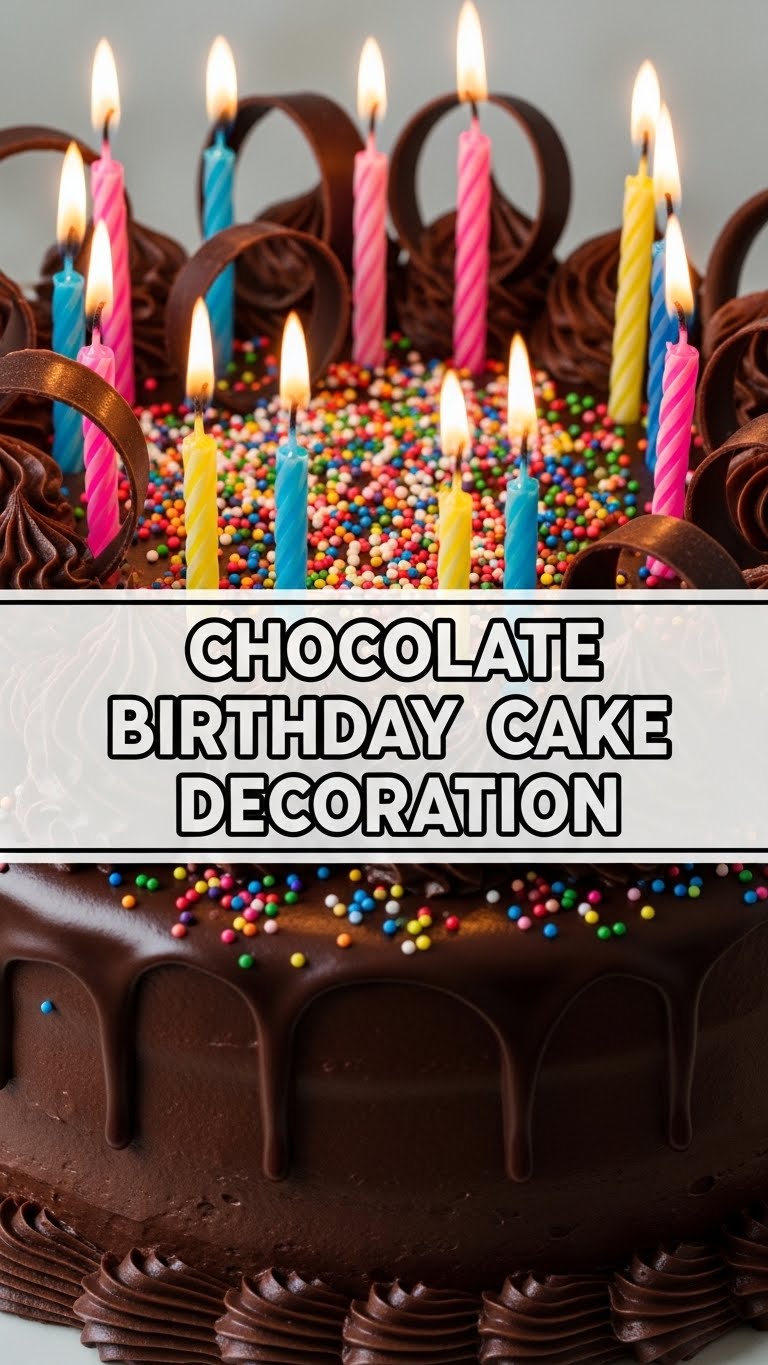
- Sprinkles: The more, the merrier! Rainbow, chocolate, metallic, themed… go wild! This is where the party truly begins.
- Chocolate Ganache (Optional but Highly Recommended): Equal parts heavy cream and good quality chocolate (semi-sweet or dark). This creates that gorgeous drip effect.
- Assorted Chocolates/Candies: Think mini chocolate bars, M&M’s, Kit Kat fingers, Oreos, chocolate-covered pretzels, or fancy truffles. Whatever screams “birthday joy” to you!
- Fresh Berries (Optional): Strawberries, raspberries, or cherries add a pop of color and a fresh counterpoint to all that chocolate. Plus, they look super chic.
- A Sense of Adventure: Because perfection is boring, darling.
Step-by-Step Instructions
Let’s turn that cake into a showstopper!
- Chill Out, Cake: Make sure your cake layers are completely cooled. Seriously, a slightly chilled cake (30 mins in the fridge) is way easier to frost. It prevents crumbles and melting.
- The Crumb Coat (Your MVP): Take about a cup of your buttercream frosting and spread a super thin layer all over the cake – top and sides. This is your “crumb glue.” It traps all those pesky crumbs so your final layer is smooth. Don’t worry about it looking pretty, just cover it. Pop the cake back in the fridge for 15-20 minutes to firm up.
- The Main Event: Once the crumb coat is firm, apply the rest of your buttercream generously. Use an offset spatula or a butter knife to spread it evenly around the sides and on top. For smooth sides, use a bench scraper if you have one, or just embrace the rustic look! Smooth out the top as best you can.
- Ganache Drip (If You’re Feeling Fancy): If you’re going for the drip, now’s the time. Make your ganache (heat cream until simmering, pour over chopped chocolate, let sit for 5 mins, stir until smooth). Let it cool slightly until it’s still pourable but not scalding hot. Drizzle it around the edge of the cake with a spoon or a squeeze bottle, letting it drip down the sides. Then fill in the top. Work quickly!
- Sprinkle Party! While the ganache (if used) is still a little soft, or right after your main frosting layer, grab those sprinkles! Hold the cake over a baking sheet (to catch excess) and apply them liberally to the sides. Then shower the top with even more. There’s no such thing as too many sprinkles on a birthday cake, IMO.
- Candy & Berry Bonanza: Now for the fun part – arranging your chocolates, candies, and berries. You can create a border, a mound in the center, or just scatter them artfully. Break up chocolate bars, stand Kit Kat fingers around the edge, or create a colorful mosaic with M&M’s. Strawberries look gorgeous fanned out or halved.
- Final Flourishes: Stand back and admire your work. See any empty spots? Fill ’em! A birthday candle is obviously essential. You can also dust with a little cocoa powder if you want extra chocolatey vibes.
Common Mistakes to Avoid
Learn from my blunders, my friend!
- Warm Cake, Warm Frosting: Rookie mistake! A warm cake means melting frosting and a crumbly mess. Warm frosting is thin and hard to work with. Make sure both are at appropriate temperatures.
- Skipping the Crumb Coat: This is a non-negotiable step unless you *like* cake crumbs ruining your perfect frosting layer. Don’t be that person.
- Over-Decorating: Sometimes less is more. While we love a sprinkle party, don’t feel like you need to use *every single type* of candy you own. Pick a theme, or a few complementary items.
- Rushing the Chill Times: Patience, grasshopper. Letting the crumb coat and even the final frosted cake chill for a bit makes everything more stable and easier to handle.
- Using Low-Quality Chocolate for Ganache: If you’re doing a drip, use good chocolate. It melts smoother and tastes infinitely better. You’ll regret skimping here, trust me.
Alternatives & Substitutions
Get creative, you culinary wizard!
- Frosting Flavors: Not feeling classic buttercream? Try cream cheese frosting, chocolate fudge frosting (double chocolate, heck yeah!), or even a peanut butter frosting for a Reese’s-esque vibe.
- Naked Cake Style: For a more rustic, understated look, do a super thin layer of frosting (almost translucent) on the sides, leaving some cake visible. Decorate the top with berries and maybe a few edible flowers. Chic AF.
- Cookie Crumbs Instead of Sprinkles: Crush up Oreos, Biscoff, or even graham crackers for a different texture and flavor profile. Instant deliciousness!
- Powdered Sugar Stencil: Place a doily or a cut-out paper shape on top of your *chilled* frosted cake, dust heavily with powdered sugar, then carefully lift the stencil. Instant elegance!
- Different Drips: White chocolate ganache for contrast, or even a caramel drip! The possibilities are endless, my friend.
FAQ (Frequently Asked Questions)
Got questions? I’ve got answers (mostly humorous ones).
- “Can I use store-bought frosting?” Well, technically yes, but why hurt your soul like that? Kidding! A good quality store-bought works fine, especially if you whip it a bit to make it lighter.
- “My ganache is too thick/thin! Help!” Too thick? Add a tiny bit more warm cream, stir, repeat. Too thin? Add a few more chocolate chips, let it sit, stir. It’s a delicate dance!
- “How do I get super smooth sides on my cake?” Practice, an offset spatula, and a bench scraper are your best friends. Also, sometimes a slightly textured, rustic look is even better and way less stress. Embrace imperfection!
- “Can I decorate the cake the day before?” Absolutely! Most frosted cakes (especially with buttercream) hold up beautifully in the fridge for a day or two. Just let it come to room temperature for an hour before serving for optimal flavor and texture.
- “What if my cake is lopsided?” Shh, that’s called “character”! Or, you can strategically place some extra frosting or a tall decoration to camouflage it. Nobody will ever know. 😉
- “Do I *have* to use sprinkles?” What kind of question is that?! Okay, fine, no, but seriously, sprinkles make everything better. It’s science.
Final Thoughts
There you have it! A perfectly decorated chocolate birthday cake that looks impressive but didn’t require an advanced degree in pastry arts. You’ve earned bragging rights, my friend. Now go impress someone—or yourself—with your new culinary skills. You’ve earned it!
