Okay, so you’re scrolling, you’re hungry, and suddenly a tiny, adorable cake pops into your head. A Bento cake! But not just any bento cake… a CHOCOLATE one. Because, duh. And you want it *now* but also don’t want to spend your entire weekend playing master baker? My friend, you’ve come to the right place.
Why This Recipe is Awesome
This isn’t your grandma’s 12-hour-bake-a-thon. This is a “I want chocolate, I want it cute, and I want it relatively fast” kind of recipe. It’s practically idiot-proof, even if your oven usually only sees frozen pizzas. Seriously, the biggest challenge here might be not eating all the batter before it makes it to the oven. Plus, it’s a bento cake, which means it’s perfectly portioned for one, two, or maybe a *very* polite three. No sharing required, IMO.
Ingredients You’ll Need
- All-purpose flour: The backbone of your cake dreams. Sift it if you’re feeling fancy, or just whisk it like a normal human.
- Unsweetened cocoa powder: Don’t skimp here! This is where the chocolate magic happens.
- Baking soda & baking powder: The dream team for a fluffy lift. No flat cakes allowed!
- Salt: Just a pinch, to make all that chocolate sing. Trust me.
- Granulated sugar: Sweetness! Don’t be shy.
- Large egg: Binds everything together. Make sure it’s at room temp; it mixes better.
- Whole milk: Gives moisture and richness. Again, room temp for a happy batter.
- Vegetable oil (or similar neutral oil): For ultimate moistness. Butter is great, but oil keeps cakes super soft.
- Vanilla extract: A little splash elevates everything. Don’t skip it!
- Hot water or hot coffee: The secret weapon for intense chocolate flavor and extra moisture. Coffee *enhances* chocolate, it doesn’t make it coffee-flavored, FYI.
For the Chocolate Buttercream:
- Unsalted butter: Softened, but not melted. Your frosting’s best friend.
- Powdered sugar (confectioners’ sugar): Sift it to avoid lumps, unless you like lumpy frosting (who does?).
- Unsweetened cocoa powder: Again, the chocolate power!
- Heavy cream or milk: For getting that perfect, spreadable consistency.
- Vanilla extract: A dash for extra oomph.
Step-by-Step Instructions
- Preheat & Prep: First things first, preheat your oven to 350°F (175°C). Grab an 8×8 inch (20×20 cm) square pan or two 6-inch round pans. Line it with parchment paper and lightly grease. You want those cute cakes to pop right out!
- Dry Mix: In a large bowl, whisk together your flour, cocoa powder, baking soda, baking powder, salt, and sugar. Give it a good whisk to break up any lumps and make sure everything is evenly distributed.
- Wet Mix: In a separate medium bowl, whisk your egg, milk, oil, and vanilla extract until well combined. This is your wet team.
- Combine & Conquer: Pour the wet ingredients into the dry ingredients. Mix on low speed with an electric mixer (or vigorously by hand) until *just* combined. Don’t overmix! A few lumps are okay.
- The Hot Secret: Carefully pour in the hot water or coffee. Mix again until the batter is smooth but still relatively thin. This will look super liquidy, but trust the process! It’s the key to a super moist cake.
- Bake It Up: Divide your batter evenly into your prepared pans. Bake for about 25-30 minutes (if using an 8×8 pan, adjust for smaller rounds – around 20-25 mins). A toothpick inserted into the center should come out clean.
- Cool Down: Let your cake cool in the pan for 10-15 minutes before carefully inverting it onto a wire rack to cool completely. Patience, young grasshopper! Don’t try to frost a warm cake unless you enjoy a melted, soupy mess.
- Buttercream Time! While your cake cools, make the frosting. Beat the softened butter in a medium bowl until light and fluffy. Gradually add the sifted powdered sugar, cocoa powder, vanilla, and a splash of cream/milk. Beat on high until smooth and creamy. Add more cream/milk, a teaspoon at a time, until you reach your desired consistency.
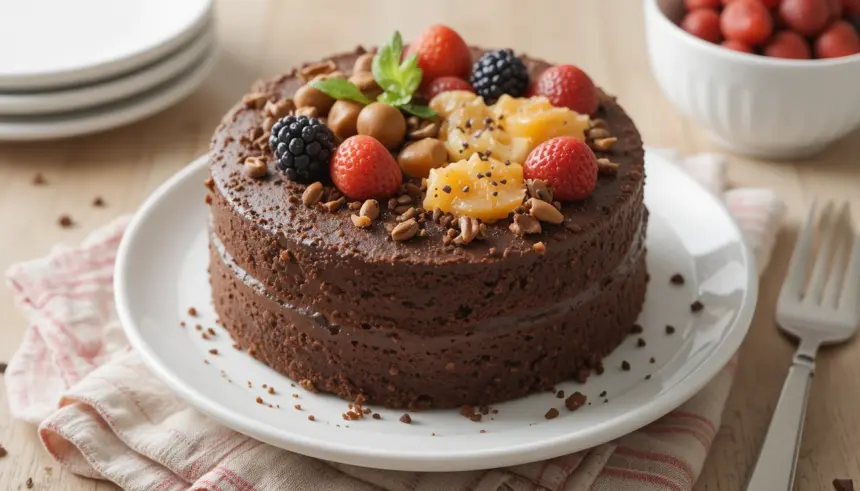
- Assemble Your Masterpiece: Once the cake is completely cool, use a round cookie cutter (about 4-inch/10cm) or just carefully cut out two small round cakes. Slice each round cake horizontally to create layers. Frost between the layers, then cover the top and sides of each bento cake. Decorate as wildly or as simply as you like! Tiny sprinkles? A single raspberry? Your call!
Common Mistakes to Avoid
- Overmixing the batter: This is a one-way ticket to tough, dry cake town. Mix until *just* combined, seriously.
- Not preheating the oven: Rookie mistake! Your cake needs a hot, consistent temperature from the get-go to rise properly.
- Skipping the hot water/coffee: You might think it’s weird, but it’s essential for that deep chocolate flavor and moist texture. Don’t be a hero, use it!
- Frosting a warm cake: Unless you want chocolate soup, wait for the cake to be completely, utterly, undeniably cool.
- Not sifting powdered sugar for frosting: Lumps in frosting are like tiny, sweet speed bumps on the road to deliciousness. Sift it!
Alternatives & Substitutions
- Milk: Out of whole milk? You can absolutely use low-fat milk, almond milk, or even soy milk. It might just be *slightly* less rich, but still delish.
- Oil: Canola oil, sunflower oil, or even melted coconut oil (if you don’t mind a hint of coconut flavor) work perfectly fine instead of vegetable oil.
- Coffee: If you’re really not a coffee fan (or don’t have any), just use hot water. But honestly, the coffee *really* amps up the chocolate flavor without tasting like coffee. Give it a try!
- Buttercream variations: Want a different frosting? Cream cheese frosting is divine, or a simple ganache would be elegant. Live a little!
FAQ (Frequently Asked Questions)
- “Can I make this dairy-free?” Absolutely! Use a plant-based milk (almond, oat, soy) and a neutral oil. For the buttercream, grab some dairy-free butter sticks and plant-based cream. Voila!
- “My cake came out dry. What did I do wrong?” Oh no! Likely culprits are overmixing the batter, baking it for too long, or maybe your oven runs hot. Get an oven thermometer, they’re super handy!
- “How do I store bento cakes?” Pop ’em in an airtight container in the fridge for up to 3-4 days. Let them come to room temp for about 15-20 minutes before serving for the best taste and texture.
- “Can I make mini cupcakes instead?” You bet! Just fill cupcake liners about two-thirds full and bake for a shorter time, maybe 15-20 minutes. Keep an eye on them!
- “I don’t have small round pans/cutters. What now?” No worries! Bake in an 8×8 inch pan, then just cut out squares or rectangles. Bento cake doesn’t *have* to be round, it just has to be cute and tiny!
- “Is this cake *really* easy for beginners?” My friend, if you can measure and stir, you can make this cake. It’s forgiving, it’s delicious, and it’s here for you.
Final Thoughts
See? That wasn’t so scary, was it? You just whipped up an adorable, moist, and ridiculously chocolatey bento cake. Whether you’re making it for a special tiny occasion, a picnic, or just a Tuesday night treat for yourself (no judgment here, trust me), you’ve got this. Now go impress someone—or yourself—with your new culinary skills. You’ve earned it! And don’t forget to take a picture before you devour it!

