So, you’ve scrolled past one too many gourmet dessert photos and now your sweet tooth is doing the Macarena, but the thought of spending hours in the kitchen makes you want to curl up with a bag of chips instead? Yeah, I totally get it. We’ve all been there. But what if I told you there’s a dessert that looks like it took a pastry chef six weeks to create, but in reality, it’s easier than convincing your dog not to beg for scraps? (Okay, maybe *almost* as easy). Enter the glorious, ridiculously simple, and utterly delicious Chocolate Bark Cake!
Why This Recipe is Awesome
Let’s be real, this recipe is awesome because it’s the ultimate illusionist of the dessert world. It screams ‘I’m fancy and I baked for hours!’ while silently whispering ‘I used a box mix and melted chocolate, don’t tell anyone.’ **It’s practically idiot-proof**, which, speaking from personal experience, is saying something. Plus, it’s super customizable, meaning you can basically throw whatever candy or crunchy bits you have lying around on top and call it ‘artistic.’ Minimal effort, maximum deliciousness, and a huge round of applause from anyone lucky enough to try it. **FYI**, it’s also incredibly photogenic! What’s not to love?
Ingredients You’ll Need
- For the Cake Base (your favorite chocolate cake, obviously):
- 1 box of chocolate cake mix (or your go-to scratch recipe, if you’re feeling ambitious and have extra time, *fancy pants*).
- Ingredients required by the cake mix (usually eggs, oil, water/milk).
- For the Chocolate Bark (the fun part!):
- 24 oz (about 4 cups) good quality chocolate chips or chopped chocolate (dark, milk, or a mix – your call, boss).
- 1-2 tbsp coconut oil or vegetable oil (helps with smoothness, makes it easier to work with).
- Your favorite bark toppings (get wild!):
- Crushed pretzels (for that salty crunch, *chef’s kiss*)
- Mini marshmallows
- M&M’s, Reese’s Pieces, or other candy bits
- Chopped nuts (pecans, walnuts, almonds)
- Sprinkles (because why not?)
- Sea salt flakes (always a good idea)
- Drizzles of white chocolate or caramel sauce (optional, but highly encouraged)
Step-by-Step Instructions
- **Bake Your Cake:** Preheat your oven to the temperature specified on your cake mix box. Prepare the cake batter according to the package directions. Pour it into a greased and floured 9×13 inch baking pan (or two 8-inch rounds if you’re stacking). Bake as directed, then let it cool completely on a wire rack. **Seriously, let it cool. Impatience is not your friend here.**
- **Melt the Chocolate:** While your cake is chilling out, grab a microwave-safe bowl. Add your chocolate chips/chopped chocolate and the coconut oil. Microwave in 30-second intervals, stirring well after each, until smooth and glossy. Don’t rush it; burned chocolate is a sad, sad thing.
- **Spread the Bark:** Line a baking sheet with parchment paper. Pour the melted chocolate onto the parchment and spread it evenly into a thin layer, about 1/8 to 1/4 inch thick. Don’t worry about perfection; rustic is in!
- **Decorate with Delight:** Immediately sprinkle your chosen toppings over the melted chocolate bark. Press them down gently so they stick. This is where your inner artist (or chaotic good kitchen wizard) shines.
- **Chill Out, Bark:** Place the baking sheet in the fridge for at least 30 minutes, or until the chocolate is completely set and firm. You can also pop it in the freezer for 15 minutes if you’re in a hurry (who isn’t?).
- **Break the Bark:** Once firm, remove the bark from the fridge. Break it into irregular pieces – big, small, jagged, whatever! These are your cake decorations.
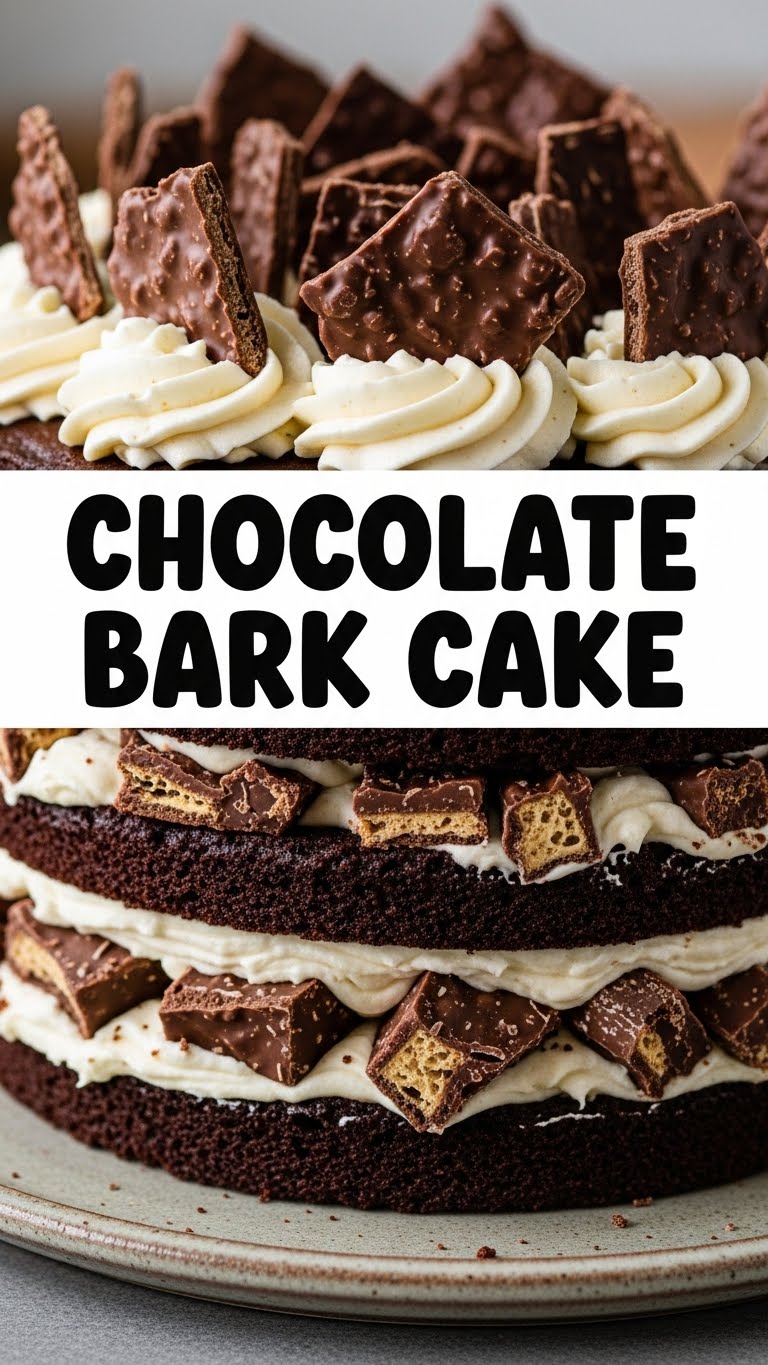
- **Assemble Your Masterpiece:** Once your cake is fully cooled, frost it with your favorite chocolate frosting (store-bought is perfectly acceptable, no judgment here!). Then, arrange the chocolate bark pieces dramatically on top of the frosted cake. You can cover the whole top, or just create a cool, craggy mountain look. **Voila! You’re basically a dessert god.**
Common Mistakes to Avoid
- **Not Cooling the Cake Enough:** Trying to frost a warm cake is like trying to ice skate on custard – a melty, messy disaster. **Patience, my friend, is a virtue (especially in baking).**
- **Over-Microwaving Chocolate:** This is a one-way ticket to seizing-town, population: sad, lumpy chocolate. Low and slow, people! Stir, stir, stir.
- **Forgetting the Oil in the Bark:** While optional, a touch of coconut or vegetable oil makes the bark smoother, easier to spread, and gives it a nice snap. Don’t skip it unless you like your bark *really* brittle.
- **Being Too Neat with the Bark:** The beauty of bark is its rugged, imperfect charm. Don’t stress about making perfect pieces. Embrace the chaos!
Alternatives & Substitutions
- **Cake Base:** Not a chocolate fanatic? (Gasp! But okay, I guess.) You can totally use a vanilla, red velvet, or even a funfetti cake as your base. The bark is the star here, so anything goes.
- **Chocolate Type:** Dark chocolate is my personal fave, but milk chocolate for a sweeter bark, or white chocolate for contrast, are fantastic. Feeling wild? Use all three! **IMO, good quality chocolate really does make a difference here.**
- **Toppings Galore:** The world is your oyster! Crushed cookies (Oreos, Biscoff), dried fruit (cranberries, cherries), different types of nuts, even gummy bears (if you’re feeling adventurous and don’t mind a little chew). Mix and match to your heart’s content.
- **No Coconut Oil?** Vegetable oil or even a tiny bit of butter will work in a pinch for melting the chocolate.
FAQ (Frequently Asked Questions)
- **”Do I *have* to use a box mix? I feel guilty.”** Absolutely not! If you’ve got a killer scratch chocolate cake recipe, go for it! This recipe is all about making your life easier and tastier, so no guilt trips allowed.
- **”My chocolate seized! What now?”** Uh-oh. It happens to the best of us (and by “us,” I mean me, usually). You can *sometimes* rescue it by stirring in a teaspoon of vegetable oil or shortening at a time until it smooths out, but often, it’s a lost cause. **Start fresh if it’s really chunky.**
- **”How do I store this masterpiece?”** Keep it covered in an airtight container at room temperature for up to 3-4 days, or in the fridge if your kitchen is super warm. The bark will stay crisp longer at cooler temps.
- **”Can I make the bark ahead of time?”** Oh yeah, big time! Make the bark a day or two in advance and store it in an airtight container at room temperature or in the fridge. This makes assembly a breeze later.
- **”Is this cake *actually* easy, or are you just being encouraging?”** I promise, it’s genuinely easy. The hardest part is waiting for the chocolate to set, and honestly, that’s just a test of your willpower. **You got this!**
Final Thoughts
See? I told you it was easier than it looks! Now you’ve got a showstopper of a dessert that tastes as good as it looks, and you barely broke a sweat. Go ahead, take a bow. Or, more realistically, go grab a fork and dive in. You’ve earned every single bite of this glorious Chocolate Bark Cake. Now go impress someone—or just yourself—with your new, effortlessly elegant culinary skills. Don’t forget to take a picture before it all disappears! (Because, trust me, it will disappear fast.)


