Ever have those days where your sweet tooth screams for attention, but your energy levels are whispering ‘nah, just order takeout’? Yeah, me too. But what if I told you there’s a chocolate banana cake that’s so ridiculously moist and easy, it feels like cheating? Spoiler alert: there is. And we’re making it today. Get ready to bake something that tastes like a warm hug and looks like you spent hours on it (but shhh, we won’t tell).
Why This Recipe is Awesome
Okay, let’s be real. We’re all busy, and sometimes the idea of baking feels like a marathon. But this recipe? It’s like a sprint to deliciousness. First off, it’s a genius way to use up those sad, spotty bananas sitting on your counter, silently judging you. No more food waste guilt!
Secondly, it’s **fail-proof**. Seriously. If I, a person who once microwaved a fork (long story, don’t ask), can nail this without setting off the smoke alarm, anyone can. It’s practically idiot-proof. And finally, did I mention it’s *moist*? Not just regular moist, but “write a poem about its moistness” moist. You’ll thank me later. It’s perfect for impressing friends, or just devouring solo in your PJs. No judgment here, promise.
Ingredients You’ll Need
Gather your baking squad! Here’s what you’ll need to whip up this chocolatey, banana-y dream:
- 1 ½ cups All-Purpose Flour: The foundational magic dust.
- ½ cup Unsweetened Cocoa Powder: Because chocolate. Duh.
- 1 teaspoon Baking Soda: For that fluffy lift, so it doesn’t turn into a hockey puck.
- ½ teaspoon Salt: Just a pinch, to make all the other flavors sing.
- ½ cup (1 stick) Unsalted Butter: Softened, the good stuff. Unless you’re into salty cake, you rebel.
- ¾ cup Granulated Sugar: Sweetness, obvs.
- 2 Large Eggs: Room temperature, for better emulsification. They’re the binders of deliciousness.
- 1 teaspoon Vanilla Extract: Adds that ‘je ne sais quoi’ factor.
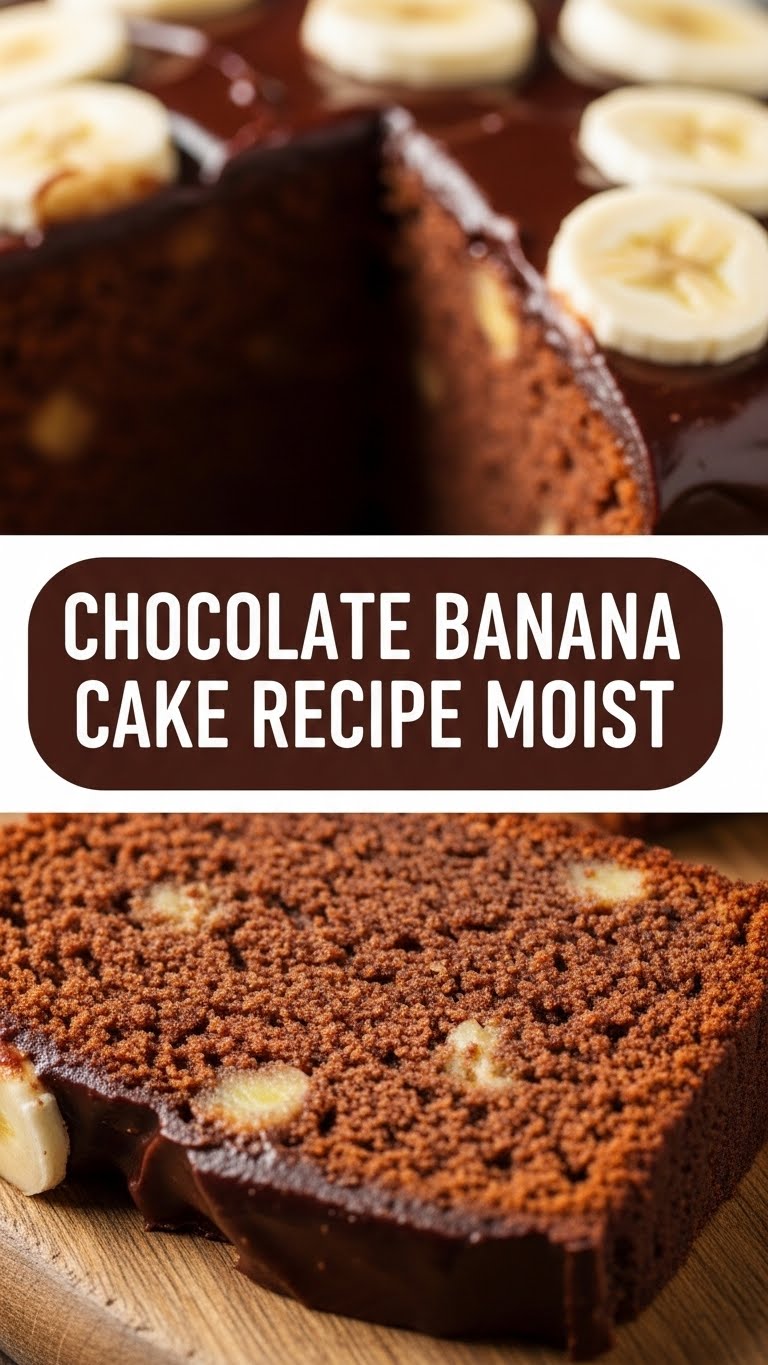
- 1 cup Mashed Ripe Bananas: About 2-3 large ones. **Overripe is key!** The spottier, the better. Seriously, don’t use yellow ones, it’s a crime.
- ½ cup Buttermilk (or regular milk + 1 tbsp lemon juice/vinegar): For ultimate moisture.
- ½ cup Chocolate Chips (optional, but highly recommended): Because why live a life without extra chocolate?
Step-by-Step Instructions
Alright, apron on, game face on. Let’s make some magic happen!
- **Preheat & Prep:** First things first, get that oven hot! Preheat it to 180°C (350°F). Lightly grease and flour a 9×5 inch loaf pan (or an 8×8 inch square pan). Don’t skip the grease, unless you enjoy a wrestling match with your cake.
- **Dry Mix:** In a medium bowl, whisk together your flour, cocoa powder, baking soda, and salt. Give it a good whisk to make sure everything’s evenly distributed. Set aside.
- **Wet Mix (Part 1):** In a large bowl (or stand mixer), cream together the softened butter and granulated sugar until it’s light and fluffy. This usually takes about 2-3 minutes.
- **Wet Mix (Part 2):** Beat in the eggs, one at a time, making sure each is fully incorporated before adding the next. Then stir in the vanilla extract. Scrape down the sides of the bowl to ensure everything’s mixed.
- **Banana Mash:** Mash those super ripe bananas in a separate bowl. A few lumps are totally fine; they add character and extra banana bursts!
- **Combine Everything:** Now for the grand finale of mixing! Alternate adding the dry ingredients and the buttermilk (or DIY buttermilk) to your wet mixture. Start and end with the dry ingredients. Mix on low speed, just until *barely* combined. **Overmixing is the enemy of moist cake, people!**
- **Fold in Goodies:** Gently fold in the mashed bananas and, if you’re using them, the chocolate chips. A spatula is your best friend here.
- **Bake It Up:** Pour the luscious batter into your prepared pan. Pop it into the preheated oven and bake for 50-60 minutes for a loaf, or 30-35 minutes for an 8×8 square. You’ll know it’s done when a wooden skewer or toothpick inserted into the center comes out clean (maybe with a few moist crumbs, but no wet batter).
- **Cool Down:** Let your masterpiece cool in the pan for about 10-15 minutes before carefully transferring it to a wire rack to cool completely. Patience, grasshopper. It’s worth it.
Common Mistakes to Avoid
Even though this recipe is pretty forgiving, a few rookie moves can mess with your masterpiece. Listen up!
- **Not preheating the oven:** It’s like jumping into a cold shower—unpleasant and inefficient. Your cake won’t rise properly if the oven isn’t hot enough from the get-go.
- **Using underripe bananas:** This is a cardinal sin in banana bread/cake making. They won’t give you the flavor, sweetness, or moisture you desperately need. **Spotty is sexy in banana terms!**
- **Overmixing the batter:** I cannot stress this enough. Once you add the dry ingredients, mix *just until combined*. Overmixing develops the gluten too much, resulting in a tough, chewy cake. We want soft, not bouncy!
- **Opening the oven door constantly:** Resist the urge to peek! Every time you open the door, you’re letting precious heat out, messing with the cake’s temperature and potentially causing it to sink.
- **Skipping the cooling step:** Don’t be too eager! Your cake needs to set. If you try to unmold it too soon, it can fall apart. Chill out, literally.
Alternatives & Substitutions
Feeling a little rebellious, or just missing an ingredient? No stress, I got you!
- **Butter vs. Oil:** You *can* use an equal amount of vegetable oil instead of butter for a slightly different texture (often resulting in an even more moist cake). But, IMO, butter adds that rich, classic flavor. It’s a personal preference!
- **Buttermilk:** No buttermilk on hand? No problem! Mix regular milk with a tablespoon of lemon juice or white vinegar and let it sit for 5 minutes. Voila! Instant DIY buttermilk. You’re welcome.
- **Chocolate Chips:** Not feeling the chips? Or ran out? You can swap them for chopped walnuts, pecans, or even white chocolate chips if you’re feeling adventurous. Or, if you’re a purist, just skip ’em entirely!
- **Flour:** All-purpose flour is great, but a 1:1 gluten-free baking blend (the kind with xanthan gum) usually works wonderfully if you’re avoiding gluten.
FAQ (Frequently Asked Questions)
Got questions? I’ve got answers (mostly humorous ones).
- **My bananas aren’t ripe enough, help!** Disaster! But fear not! Stick ’em on a baking sheet and bake at 150°C (300°F) for 15-20 minutes until they’re gloriously black. Instant ripe! Mind blown, right?
- **Can I make cupcakes instead?** Absolutely! Just adjust the baking time (usually 20-25 minutes, depending on your oven). Keep a close eye on them; they’ll bake faster.
- **How do I store this masterpiece?** Keep it in an airtight container at room temperature for 2-3 days, or in the fridge for up to a week. If it lasts that long, you’re a stronger person than me.
- **Can I add frosting?** Is the sky blue? Yes! A simple cream cheese frosting or a rich chocolate ganache would be absolutely divine. Or, if you’re feeling minimalist, a dusting of powdered sugar is elegant.
- **Is this recipe *actually* idiot-proof?** Look, I made it. And I once tried to toast bread in a toaster *on its side*. So, I’m gonna go with a resounding YES. You got this.
Final Thoughts
So there you have it, your new go-to recipe for when life demands chocolate and comfort. This chocolate banana cake isn’t just a dessert; it’s a testament to the fact that deliciousness doesn’t have to be complicated. It’s moist, it’s chocolatey, it uses up those bananas—what’s not to love?
Now go impress someone—or yourself—with your new culinary skills. You’ve earned it! Seriously, go bake something awesome. And maybe send me a slice? Kidding… mostly.


