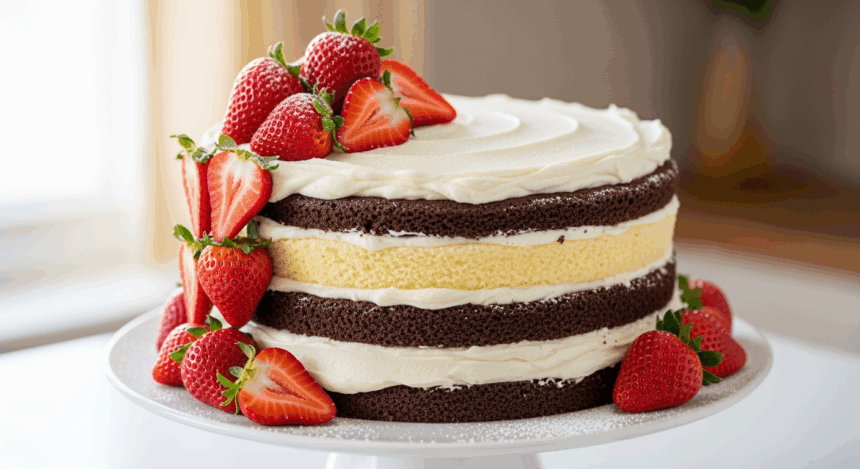
Alright, let’s get real for a second. You know that moment when you’re scrolling through Instagram and see those perfect layered cakes with the most photogenic strawberries and think, “Yeah, that’s never happening in my kitchen”? Well, joke’s on you because today we’re making that exact cake – and I promise it’s WAY easier than those food influencers make it look. This chocolate and vanilla combo with strawberries is basically the mullet of desserts: business on the outside, party on the inside.
Why This Recipe is Awesome
First off, this cake is like the Switzerland of desserts – it pleases everyone. Got a chocolate lover in your life? Covered. Vanilla enthusiast? Yep. Someone who insists fruit makes dessert “healthy”? Bam, strawberries. **It’s literally impossible to disappoint anyone** with this cake unless they hate joy.
Plus, it looks way more complicated than it actually is. You’ll have people thinking you spent hours slaving away when really you were probably scrolling TikTok while waiting for it to bake. The chocolate-vanilla contrast creates that “wow” factor that makes people grab their phones for a pic before even tasting it. #HumbleBrag material right here.
Ingredients You’ll Need
For the vanilla layer:
- 1 ½ cups all-purpose flour (the regular boring kind, nothing fancy)
- 1 cup granulated sugar (the white stuff, not the “I’m pretending to be healthy” sugar)
- ½ cup unsalted butter, softened (meaning: leave it out for an hour, not 15 seconds in the microwave)
- 2 eggs (from a chicken, preferably)
- ½ cup milk (cow, almond, oat – whatever floats your boat)
- 2 tsp vanilla extract (the real stuff if you’re fancy, the cheap stuff if you’re me)
- 1 ½ tsp baking powder (not baking soda, they’re not the same, trust me on this)
- ¼ tsp salt (just a pinch, we’re not making ocean water)
For the chocolate layer:
- Everything above for the vanilla layer PLUS
- ¼ cup cocoa powder (unsweetened, the kind that makes you cough if you accidentally inhale it)
- 2 tbsp extra milk (to compensate for the cocoa powder’s thirstiness)
For the frosting and decoration:
- 1 cup unsalted butter, softened (again, patience is key here)
- 3-4 cups powdered sugar (yes, that much – it’s a CAKE, not a salad)
- 2 tsp vanilla extract
- 3-4 tbsp heavy cream (or milk if you’re out)
- 1 pound fresh strawberries (the redder and juicier, the better)
- Optional: chocolate shavings (for when you’re feeling extra)
Step-by-Step Instructions
- Prep your battlefield. Preheat oven to 350°F (175°C). Grease and line two 8-inch round cake pans. If you only have one pan, you’ll just have to bake twice and practice your patience.
- Start with the vanilla batter. Cream together butter and sugar until fluffy – about 3 minutes if you’re using an electric mixer, or until your arm falls off if doing it manually. Add eggs one at a time, then vanilla, mixing well after each addition.
- Mix dry ingredients. In a separate bowl, whisk together flour, baking powder, and salt. Add this to your butter mixture, alternating with milk. Mix until just combined – **don’t beat it to death**. Overmixing is the silent killer of cakes.
- Split and chocolate-ify. Pour half the batter into one of your prepared pans. To the remaining batter, add cocoa powder and extra milk, stirring gently until no streaks remain. Pour this chocolatey goodness into your second pan.
- Bake those babies. Pop both pans in the oven for 25-30 minutes or until a toothpick comes out clean. Pro tip: the chocolate layer might take a minute or two longer because it’s living its best, more complex life.
- Cool your jets. Let cakes cool in pans for 10 minutes, then transfer to a wire rack to cool completely. And I mean COMPLETELY. Frosting warm cake is like putting makeup on right after a shower – it just slides right off.
- Make the frosting. Beat butter until creamy, then gradually add powdered sugar, vanilla, and enough cream to reach your desired consistency. You want it spreadable but not sliding off the cake. Think: the consistency of soft ice cream.
- Prep the strawberries. Wash, dry, and hull your strawberries. Slice most of them, but save a few pretty ones whole for the top.
- Assemble this masterpiece. Place chocolate layer on your cake plate. Spread a layer of frosting, then arrange a layer of sliced strawberries. Top with the vanilla layer, then frost the entire cake. Go rustic (a.k.a. messy but intentional) or smooth – your cake, your rules.
- Decorate like you mean it. Arrange whole and sliced strawberries on top. Add chocolate shavings if you’re feeling extra. Instagram that beauty. Watch the likes roll in.
Common Mistakes to Avoid
Opening the oven too early. I know you’re excited, but your cake needs privacy for the first 20 minutes. Opening the oven door is like interrupting someone in the middle of a yoga pose – everything collapses.
Frosting a warm cake. Unless you want your frosting to look like it’s having an existential crisis, wait until the cake is completely cool. I’m talking room temperature here, folks.
Skimping on the strawberry prep. Wet strawberries = soggy cake. Make sure those berries are patted dry before they go anywhere near your creation.
Rushing the butter+sugar creaming process. This is where the magic happens. Give it time – you want it light and fluffy, not just mixed. Your cake’s texture depends on this step, so no shortcuts!
Alternatives & Substitutions
Not a strawberry fan? First, who are you? Second, raspberries, blueberries, or even sliced peaches work beautifully here. You could even go wild and use a mix of berries for that farmers’ market flex.
Dietary restrictions? Substitute the all-purpose flour with a 1:1 gluten-free baking flour. For dairy-free, use plant-based butter and milk. The cake might be slightly less rich, but TBH, no one will notice after the second bite.
Want to spice things up? Add a tablespoon of instant espresso powder to the chocolate layer for a mocha twist, or a splash of almond extract to the vanilla layer. IMO, these little tweaks make people think you actually know what you’re doing in the kitchen.
No time for layers? Make this into cupcakes instead! Just reduce the baking time to 18-22 minutes. Bonus: built-in portion control (or the illusion of it, anyway).
FAQ (Frequently Asked Questions)
Can I make this cake ahead of time?
Absolutely! The cake layers can be baked a day ahead and stored wrapped in plastic wrap at room temperature. But hold off on slicing those strawberries until you’re ready to assemble – nobody likes brown, sad fruit.
My cake layers didn’t rise much. What went wrong?
Did you check the expiration date on your baking powder? That stuff doesn’t last forever, contrary to what the back of your pantry believes. Also, overmixing the batter can kill the rise. Gentle folding, people!
Can I use frozen strawberries instead of fresh?
Can you also wear socks with sandals? Technically yes, but why would you want to? Frozen berries release too much moisture when they thaw and will make your cake soggy. Fresh is best here.
Do I really need to use unsalted butter?
Unless you enjoy playing Russian roulette with the saltiness of your cake, yes. Different brands of salted butter contain different amounts of salt, so unsalted gives you control. You’re the captain now.
How do I store leftovers?
“Leftovers” – that’s cute. But if by some miracle you don’t finish the whole thing, refrigerate it because of the fresh strawberries. Just bring slices back to room temperature before eating, because cold cake is sad cake.
Final Thoughts
Look at you, standing there with flour on your shirt and a gorgeous cake that looks straight out of a bakery window! This chocolate-vanilla strawberry situation isn’t just a dessert – it’s a conversation starter, an excuse to invite people over, and proof that you’ve got skills beyond your Netflix-binging abilities.
Remember, the beauty of this recipe is in its versatility and forgiving nature. Layers not perfectly even? Call it “rustic.” Frosting a bit messy? It’s “artisanal.” Dropped strawberry juice on the white frosting? You’ve created a “natural color gradient.” Baking is all about confidence and storytelling!
Now go slice into that beauty, take a bite, and accept your rightful place as the dessert wizard you’ve become. Your social media followers (and actual human friends) are waiting!

