Ever stare at a plain cake and think, “You deserve better”? Yeah, me too. Especially when that ‘better’ involves both chocolate AND vanilla. It’s like the ultimate power couple, but for your taste buds. Forget complex patisserie techniques; we’re going for maximum impact with minimal fuss. Because who has time for fuss when there’s cake to be eaten?
Why This Decoration is Awesome
Because, let’s be real, who wants a boring cake? This isn’t just about slathering on some frosting; it’s about transforming a humble cake into a showstopper with minimal effort. Plus, it’s pretty much **fail-proof**, unless you mistake salt for sugar, in which case, we need to have a serious chat. This method is quick, requires no fancy skills (honest!), and makes any cake look like it came from a high-end bakery, not your slightly messy kitchen. It’s also incredibly versatile – perfect for birthdays, Tuesdays, or just because you woke up and decided life needed more pretty things.
Ingredients You’ll Need
No need for a grocery list as long as your arm. We’re keeping it simple, friend!
- Your Cake Base: A fully cooled, un-iced cake. Store-bought, boxed mix, or your grandma’s secret recipe—no judgment here!
- Unsalted Butter: 2 sticks (1 cup / 226g), softened to room temperature. This is crucial! No rock-hard butter, please; it’s not your enemy.
- Powdered Sugar (Confectioners’ Sugar): About 4 cups (480g), sifted. The magic dust that makes everything sweet.
- Vanilla Extract: 2 teaspoons. Go for good quality; your taste buds will thank you. IMO, it makes a huge difference.
- Unsweetened Cocoa Powder: ½ cup (45g). For that deep, dark, chocolatey goodness.
- Heavy Cream (or Milk): 3-5 tablespoons, or as needed. To get that perfect, spreadable consistency.
- Optional Fun Stuff: Sprinkles (duh!), chocolate shavings, edible glitter, or whatever your heart desires!
Step-by-Step Instructions
Time to get our hands a little messy! But in a fun, delicious way, of course.
- Whip the Butter: In a large bowl or stand mixer with the paddle attachment, beat your softened butter on medium speed for about 2-3 minutes until it’s light and fluffy. It should look like a cloud, not a stick of butter.
- Introduce the Sugar: Gradually add the sifted powdered sugar, about 1 cup at a time, mixing on low speed until combined. Once it starts coming together, increase speed to medium-high and beat for another 2-3 minutes. **Pro tip:** Start slow to avoid a sugar cloud eruption in your kitchen!
- Vanilla Time: Pour in the vanilla extract and beat until fully incorporated. Scrape down the sides of the bowl to make sure everything gets mixed in properly.
- Cream for Consistency: With the mixer on low, slowly drizzle in 2-3 tablespoons of heavy cream (or milk) until your frosting reaches a smooth, spreadable consistency. You want it soft enough to spread, but firm enough to hold its shape. Add more if needed, one teaspoon at a time.
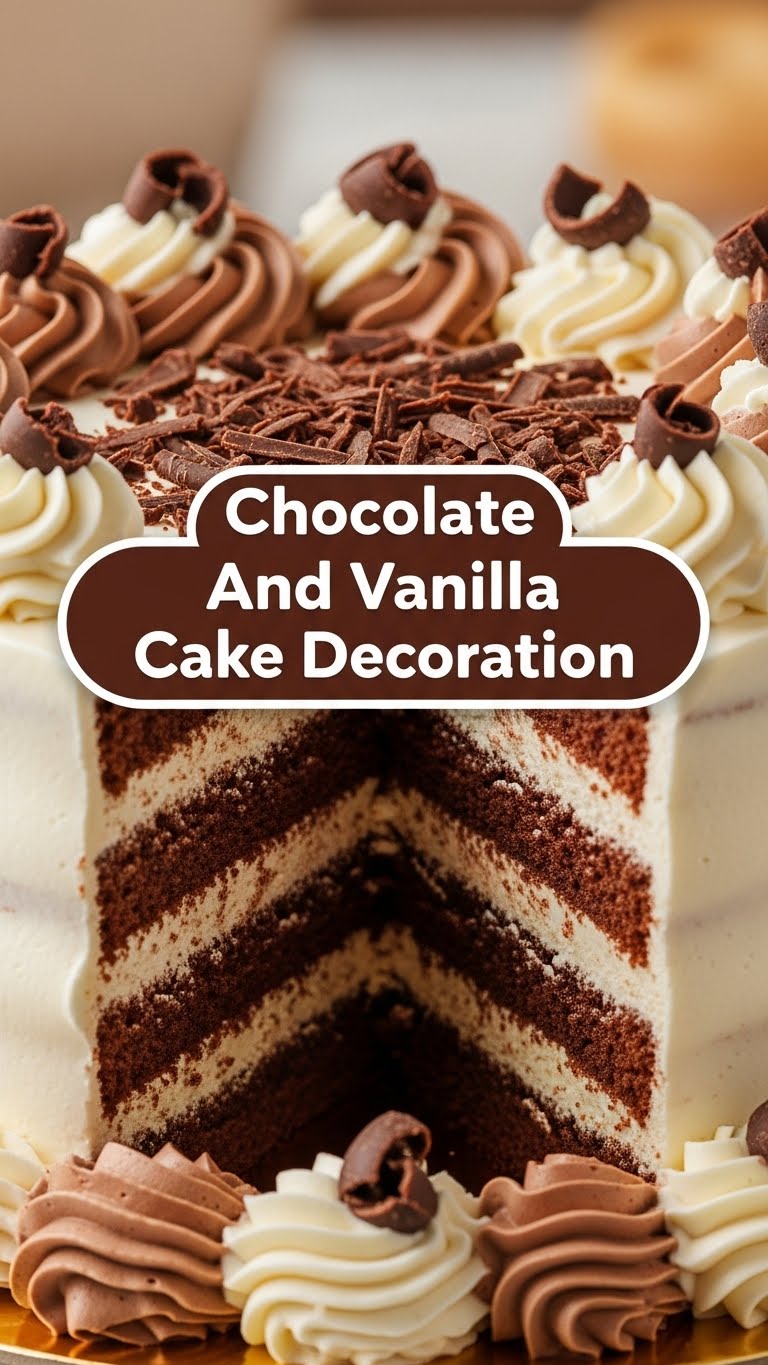
- Divide & Conquer: Now for the two-flavor magic! Divide your frosting evenly into two separate bowls. Keep one half as your glorious vanilla frosting.
- Chocolate Magic: To the second bowl, add the ½ cup of unsweetened cocoa powder and 1-2 more tablespoons of heavy cream (or milk). Mix until it’s perfectly smooth and chocolatey, scraping down the sides as you go.
- Decorate! Now for the fun part! You can either frost your entire cake with vanilla first, then add chocolate accents, or go wild with a two-tone effect. For an easy two-tone swirl, spoon both frostings side-by-side into a piping bag fitted with a large star tip. Pipe swirls, rosettes, or just artistic dollops. Don’t overthink it; messy can be magnificent!
Common Mistakes to Avoid
We all make ’em. Here’s how to avoid the most common frosting faux pas.
- Cold Butter Syndrome: Trying to cream cold, hard butter is like trying to reason with a toddler – pointless and frustrating. **Always use room temperature butter!** It’s the secret to light, fluffy frosting.
- Not Sifting Powdered Sugar: Unless you enjoy lumps in your smooth, dreamy frosting, please sift your powdered sugar. It takes literally 30 seconds.
- Over-Mixing Once Combined: Once your frosting is smooth and the right consistency, stop mixing. Over-mixing can incorporate too much air, making it less stable and sometimes harder to spread nicely.
- Ignoring Consistency: If your frosting is too stiff, add a tiny bit more cream. Too runny? Add a tablespoon or two of sifted powdered sugar. Trust your gut and the texture!
Alternatives & Substitutions
Because sometimes you gotta work with what you’ve got!
- Butter: Can you use margarine instead of butter? Well, **technically yes, but why hurt your soul like that?** The flavor, texture, and stability just aren’t the same. IMO, stick to butter for the best results.
- Heavy Cream: Milk works just fine too! Plant-based milks (like almond or oat) can also be used, but you might need slightly less as they can be thinner.
- Cocoa Powder: Want a super dark chocolate frosting? Use dark cocoa powder! For a richer flavor, you could even melt some good quality dark chocolate and add it to the chocolate frosting instead of or in addition to the cocoa powder (just ensure it’s cooled!).
- Cake Base: This decoration works on ANY cake. Cupcakes, sheet cakes, layer cakes, even brownies! Don’t feel pressured to bake from scratch if you’re short on time. A delicious store-bought cake gets an instant upgrade with homemade frosting.
FAQ (Frequently Asked Questions)
Got questions? I’ve got (casual) answers!
- Q: My frosting is too stiff! Help!
A: Relax! Just add heavy cream or milk, about a teaspoon at a time, mixing well after each addition until it reaches the perfect spreadable consistency. Easy peasy!
- Q: My frosting is too runny! Disaster!
A: Not a disaster! Just add a tablespoon or two of sifted powdered sugar at a time, mixing until it thickens up. It’s like a delicious, edible seesaw.
- Q: Can I make this frosting ahead of time?
A: Absolutely! Store it in an airtight container in the fridge for up to a week. When you’re ready to use it, let it come to room temperature and then give it a good whip with your mixer to get it fluffy again. FYI, it might need a tiny splash of cream or milk after refrigeration.
- Q: How do I get those fancy two-tone swirls with a piping bag?
A: Easy! Take a piping bag, and gently spoon your vanilla frosting down one side of the bag. Then, spoon your chocolate frosting down the other side. When you squeeze, both colors will come out together, creating a beautiful swirl. It’s like magic, but edible!
- Q: What if I don’t have a stand mixer?
A: No worries! A hand mixer works perfectly fine. Just be prepared for a bit more arm workout, but think of it as pre-cake exercise. If you only have a whisk, you can still do it, but it’ll be quite the endeavor!
- Q: Do I need a special piping bag and tips?
A: Not at all! For a rustic look, you can just use a regular butter knife or an offset spatula to spread the frosting. If you want to pipe but don’t have a fancy bag, cut the corner off a Ziploc bag, and voilà! Instant piping bag. For tips, a simple round or star tip will do wonders, but even no tip can create cool effects.
Final Thoughts
See? That wasn’t so scary, was it? You’ve just elevated your cake game from “meh” to “marvelous” with two classic flavors. Now go forth and create delicious, beautiful things. And hey, if you “accidentally” eat half the frosting before it even hits the cake, that’s just quality control, right? You’ve earned it! Now go impress someone—or yourself—with your new culinary skills. Enjoy your masterpiece!

