So, you’ve scrolled past a million pretty food pics on your feed, and now your sweet tooth is practically screaming for attention, but the thought of a complicated recipe makes you want to crawl back under your blanket, huh? Been there, done that, bought the oversized hoodie. Good news, my friend: I’ve got a recipe that’s about to become your new best friend. We’re talking chocolate. We’re talking peanut butter. We’re talking cake. And the best part? It’s so ridiculously easy, you’ll wonder why you ever bothered with those fancy-pants bakery cakes. Let’s get baking!
Why This Recipe is Awesome
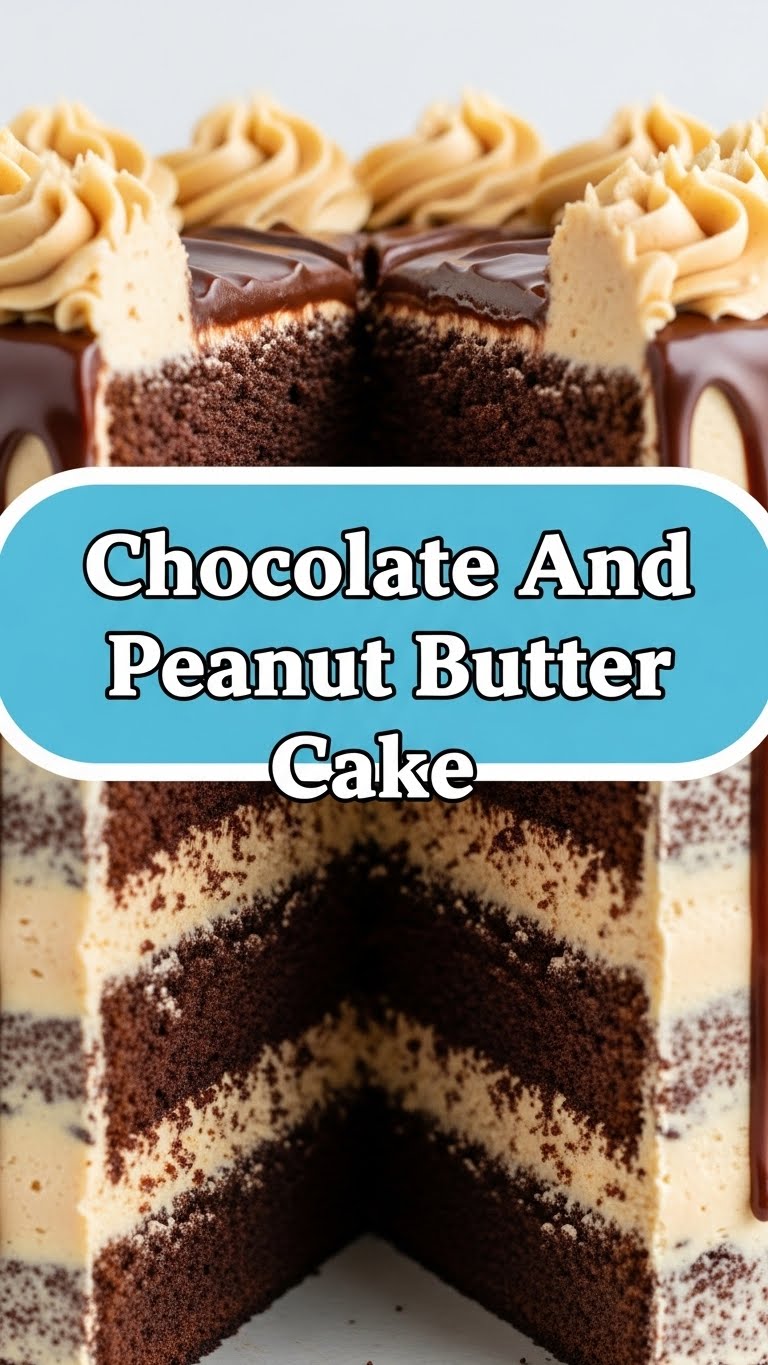
Okay, let’s cut to the chase. Why this particular chocolate and peanut butter cake? Because it’s basically the culinary equivalent of a warm hug from your favorite person, but with chocolate and peanut butter. It’s got that perfect balance of rich, fudgy chocolate cake and creamy, dreamy peanut butter frosting that just makes your taste buds sing. Plus, it’s super straightforward. Like, “even your cat could probably follow these steps” straightforward. You don’t need a pastry degree, a stand mixer with all the attachments (though a hand mixer helps!), or a particularly patient disposition. It’s the kind of cake you whip up when you need a serious mood boost, or when you suddenly remember you offered to bring “something” to the potluck tonight. No stress, all deliciousness. Seriously, it’s idiot-proof; even *I* didn’t mess it up!
Ingredients You’ll Need
Time to gather your trusty kitchen comrades! Nothing too wild or obscure here, just the good stuff you probably already have lurking in your pantry (or can grab on a quick, panic-fueled grocery run).
For the Chocolate Cake:
- 1 ½ cups (180g) all-purpose flour: The backbone of our cakey dreams.
- 1 ½ cups (300g) granulated sugar: For that sweet, sweet goodness.
- ¾ cup (65g) unsweetened cocoa powder: Go for the good stuff if you can; it really makes a difference.
- 1 ½ teaspoons baking soda: Our magical lift-off agent.
- 1 teaspoon salt: To balance all that sweetness and make the chocolate pop!
- ¾ cup (180ml) buttermilk: Or DIY it with regular milk + a splash of vinegar/lemon juice (let it sit for 5 mins). Trust me on the buttermilk; it keeps things moist.
- ¾ cup (180ml) warm water: Helps bloom the cocoa and keeps the cake tender.
- ½ cup (120ml) vegetable oil: Or canola oil. Keeps things super moist.
- 2 large eggs: Our binding heroes.
- 1 teaspoon vanilla extract: Because everything is better with vanilla.
For the Peanut Butter Frosting:
- 1 cup (226g) unsalted butter: Softened, please! Don’t be a hero trying to beat cold butter.
- 1 cup (250g) creamy peanut butter: The star of the show! Use good quality, regular creamy, not natural/separated stuff unless you like a grainy frosting.
- 3-4 cups (360-480g) powdered sugar: Sifted, unless you like lumpy frosting (you don’t).
- ¼ cup (60ml) heavy cream or milk: To get that perfect, spreadable consistency.
- 1 teaspoon vanilla extract: A little extra oomph!
Step-by-Step Instructions
Alright, apron on (or don’t, I won’t judge), let’s make some cake magic!
- Get Prepped: Preheat your oven to 350°F (175°C). Grease and flour two 8 or 9-inch round cake pans. Don’t skip the greasing; nobody likes a stuck cake.
- Dry Mix Fun: In a large bowl, whisk together your flour, sugar, cocoa powder, baking soda, and salt. Make sure there are no lumpy bits.
- Wet Mix Whatchamacallit: In another, smaller bowl, whisk together the buttermilk, warm water, oil, eggs, and vanilla extract until everything is nicely combined.
- Combine & Conquer: Pour the wet ingredients into the dry ingredients. Mix on low speed with an electric mixer (or by hand with a whisk if you need a bicep workout) until just combined. Don’t overmix! Overmixing leads to tough cakes, and we’re not about that life.
- Bake Time: Divide the batter evenly between your two prepared pans. Bake for 25-30 minutes, or until a wooden skewer inserted into the center comes out clean.
- Cool Down: Let the cakes cool in the pans for about 10-15 minutes before inverting them onto a wire rack to cool completely. Patience is a virtue here; trying to frost a warm cake is a recipe for disaster (and melty frosting).
- Frosting Frenzy: While the cakes are cooling, let’s make that glorious peanut butter frosting! In a large bowl, beat the softened butter and peanut butter together until light and fluffy. This takes a few minutes.
- Sweeten It Up: Gradually add the powdered sugar, one cup at a time, beating well after each addition. If it gets too thick, add a splash of cream/milk. Keep adding sugar and cream/milk until you reach your desired consistency and sweetness. Stir in the vanilla extract.
- Assemble Your Masterpiece: Once the cakes are completely cool (and I mean completely!), place one layer on your serving plate. Spread a generous amount of frosting on top. Place the second cake layer on top, then frost the top and sides of the entire cake. Feel free to get creative with swirls and peaks!
- Admire & Devour: Slice, serve, and bask in the glory of your chocolate-peanut butter creation. You earned it!
Common Mistakes to Avoid
We all make mistakes, especially in the kitchen. Here’s how to dodge some common cake-baking blunders:
- Thinking you don’t need to preheat the oven: Rookie mistake! A properly preheated oven ensures even baking.
- Overmixing the batter: This is a big one. As soon as the dry and wet ingredients are just combined, stop mixing. Overworking the gluten in the flour makes for a dense, rubbery cake. Sad.
- Trying to frost a warm cake: Oh, honey, no. You’ll end up with a sliding, melting mess. Always wait until the cakes are completely cool. Pop them in the fridge for a bit if you’re really impatient.
- Not greasing AND flouring your pans: Just greasing might not be enough. The flour creates a non-stick barrier. Trust me, it’s worth the extra 10 seconds to avoid a demolished cake.
- Using cold butter for frosting: Softened butter creams beautifully. Cold butter? You’ll be beating it for an hour and still have lumps. Plan ahead!
Alternatives & Substitutions
Feeling a little rebellious? Here are some ways to shake things up, or just use what you’ve got:
- Buttermilk: No buttermilk? No problem! Add 1 tablespoon of white vinegar or lemon juice to a measuring cup, then fill the rest with regular milk until you reach ¾ cup. Let it sit for 5 minutes. Voila, DIY buttermilk!
- Peanut Butter Type: I really recommend creamy for frosting, but if you’re feeling adventurous and love a bit of crunch, go for crunchy peanut butter in the frosting. Just be prepared for a slightly different texture! IMO, creamy is king here.
- Chocolate Drizzle: Want even MORE chocolate? Melt some chocolate chips with a tiny bit of coconut oil or butter and drizzle over the top of the frosted cake. Instant fancy points.
- Milk/Cream for Frosting: If you don’t have heavy cream, any milk (whole, 2%, even almond milk) will work in a pinch for the frosting. The fat content might change the richness slightly, but it’ll still be delicious.
- Dietary Swaps: For a dairy-free version, use unsweetened almond milk for the buttermilk (or DIY with almond milk + vinegar) and for the frosting, use dairy-free butter and plant-based cream/milk.
FAQ (Frequently Asked Questions)
Got questions? I’ve got (mostly sarcastic) answers!
- Can I use margarine instead of butter? Well, technically yes, but why hurt your soul (and the cake’s flavor) like that? For best results, butter is always the move, especially for flavor and texture.
- How long does this cake last? If you manage to hide it from yourself, it’ll last about 3-4 days at room temperature (covered). In the fridge, maybe up to a week. But let’s be real, it rarely makes it past day two.
- Can I make this cake ahead of time? Absolutely! You can bake the cake layers a day or two in advance, wrap them tightly, and store them at room temp or freeze them. Make the frosting the day of assembly for peak freshness.
- My frosting is too thin/thick! Help! Thin? Add more powdered sugar. Thick? Add a tiny splash more heavy cream or milk until it’s just right. It’s like a choose-your-own-adventure for frosting consistency.
- What if I don’t have two cake pans? No stress! You can bake the whole thing in a 9×13 inch pan (adjust baking time, probably 35-45 mins) for a sheet cake, or bake one layer at a time. FYI, baking one at a time might take longer.
- Can I add chocolate chips to the cake batter? Oh, you’re a genius! Yes, a half cup or so of mini chocolate chips would be an excellent addition to the cake batter. Go for it!
Final Thoughts
So there you have it, folks! Your new favorite chocolate and peanut butter cake recipe, delivered with love and a healthy dose of sass. This isn’t just a cake; it’s a statement. A statement that says, “I can bake, I am fabulous, and I will share this deliciousness… maybe.” Now go impress someone—or yourself—with your new culinary skills. You’ve earned it!


