So you’re craving something tasty but too lazy to spend forever in the kitchen, huh? Same, friend, same. We’ve all been there: the fridge is giving you the side-eye, your stomach’s rumbling louder than a bass drum, and the idea of actual “cooking” seems like an Olympic sport you’re definitely not signing up for today. But what if I told you there’s a magical dish that combines the comforting hug of a cheeseburger with the effortless charm of a casserole? Enter the Cheeseburger Casserole, your new weeknight hero!
Why This Recipe is Awesome
Seriously, this isn’t just another recipe; it’s a lifestyle choice for the deliciously lazy. Here’s why you’re about to fall head over heels for it:
- It’s practically idiot-proof. No, really. Even I, who once mistook baking powder for baking soda (it was a dark time for those cookies), managed to pull this off without setting off the smoke detector.
- One-Pan Wonder (mostly)! Less dishes means more time for… well, whatever you want! Binge-watching, napping, contemplating the meaning of life, you name it.
- Serious Comfort Food Vibes. It’s basically a hug in a bowl. All the cheesy, beefy, carby goodness you love from a cheeseburger, but without having to wrestle with a grill or build a towering burger.
- Family Favorite. Kids (and picky adults) devour this. It’s got all the familiar flavors, making it a guaranteed win at the dinner table.
- Quick & Easy. From start to delicious finish, we’re talking under 30-40 minutes. Perfect for those “oh crap, what’s for dinner?” moments.
Ingredients You’ll Need
Gather your troops, culinary commander! Here’s what you’ll need to make this cheesy masterpiece. Don’t worry, nothing too fancy, just good ol’ deliciousness.
- 1 lb Ground Beef: The star of our show. Use lean if you’re feeling virtuous, but regular works just fine (just drain that fat!).
- 1 Small Onion: Diced. Adds that sweet, savory depth. Don’t skip it unless you absolutely can’t stand onions (but why?).
- 2-3 cloves Garlic: Minced. Because everything is better with garlic, it’s just science.
- 1 (14.5 oz) can Diced Tomatoes: Undrained. These bring a little tang and moisture.
- 1 cup Beef Broth: For flavor and to cook our pasta.
- 1/2 cup Ketchup: The OG burger sauce.
- 2 tbsp Yellow Mustard: Adds that classic burger zest. Don’t be shy!
- 1 tsp Worcestershire Sauce: The secret weapon for extra umami.
- 1 1/2 cups Elbow Macaroni (or similar small pasta): Uncooked. This cooks right in the sauce!
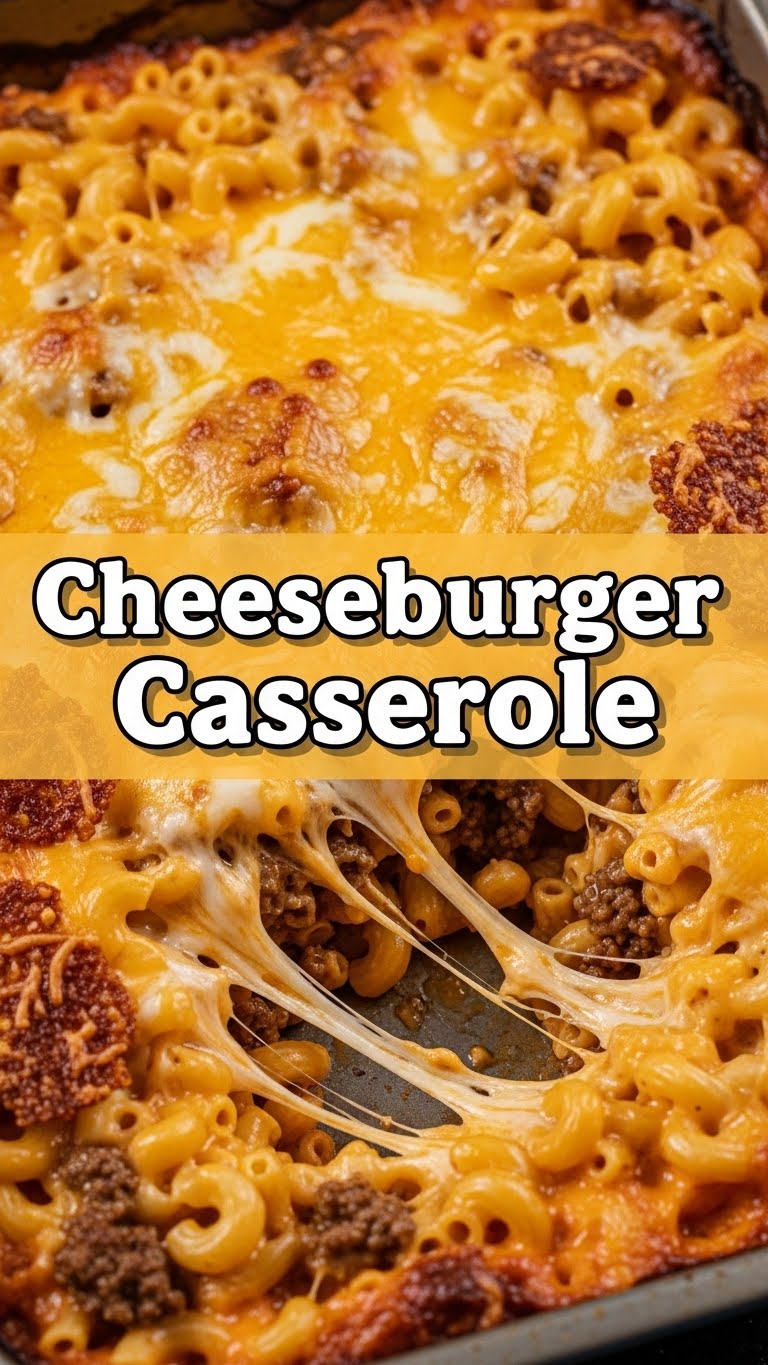
- 2 cups Shredded Cheddar Cheese: Or a cheddar blend. Because it’s not a cheeseburger without the cheese, am I right?!
- Salt and Pepper: To taste. Don’t forget to season, you culinary rockstar!
- Optional Toppings: Diced pickles, extra shredded cheese, a drizzle of “special sauce” (mayo + ketchup + relish), fresh parsley.
Step-by-Step Instructions
Alright, apron on (or not, we don’t judge), let’s get cooking! These steps are so simple, you could probably do them in your sleep.
Brown the Beef & Onion: Grab a large skillet or Dutch oven (the bigger, the better for one-pan magic!). Heat it over medium-high heat. Add your ground beef and diced onion. Cook, breaking up the beef with a spoon, until the beef is fully browned and the onion is softened. This usually takes about 5-7 minutes. **Don’t forget to drain any excess grease!** Nobody wants a greasy casserole.
Garlic Time: Reduce the heat to medium. Toss in your minced garlic and cook for another minute until fragrant. Mmm, smell that? That’s the smell of deliciousness coming your way.
Add the Liquids & Seasonings: Pour in the diced tomatoes (undrained), beef broth, ketchup, mustard, and Worcestershire sauce. Give it a good stir to combine everything. Add a generous pinch of salt and pepper here, too.
Pasta Party: Stir in the uncooked elbow macaroni. Make sure it’s mostly submerged in the liquid. Bring the mixture to a simmer, then reduce the heat to low, cover the skillet, and let it cook for about 12-15 minutes, or until the pasta is al dente (still has a slight bite). Give it an occasional stir to prevent sticking.
Cheesy Finale: Once the pasta is cooked and most of the liquid has been absorbed, turn off the heat. Stir in about 1 1/2 cups of your shredded cheddar cheese until it’s melted and beautifully gooey. Sprinkle the remaining 1/2 cup of cheese over the top, cover for a minute or two, allowing it to melt into a glorious blanket of cheesy goodness.
Serve It Up: Ladle out generous portions and top with your favorite burger fixings like diced pickles or a dollop of special sauce. Enjoy your culinary triumph!
Common Mistakes to Avoid
Even though this recipe is practically fail-proof, there are a few rookie errors that can stand between you and ultimate cheeseburger casserole bliss. Don’t be that person.
- Skipping the Grease Drain: Seriously, don’t. Your casserole will be swimming in fat, and not in a good way. Take the extra minute, your taste buds will thank you.
- Under-Seasoning: Bland food is sad food. **Always taste and adjust** your salt and pepper as you go. You’re the chef, you set the flavor rules!
- Overcooking the Pasta: Mushy pasta is a tragedy. Cook it until it’s al dente – tender but still firm. Nobody wants a gummy casserole, right?
- Going Light on the Cheese: It’s called cheeseburger casserole for a reason. Don’t skimp! Embrace the cheese!
Alternatives & Substitutions
Feeling creative? Or maybe you just ran out of an ingredient (we’ve all been there). No worries, this recipe is super flexible!
- Ground Meat: Not a beef fan? Swap it for ground turkey or chicken. It’ll be a lighter (but still delicious) version.
- Pasta: Elbow macaroni is classic, but small shells, rotini, or even penne would work too. Just make sure it’s a quick-cooking pasta.
- Cheese: Colby Jack, Monterey Jack, a Mexican blend, or even some mozzarella for extra stretchiness. Go wild!
- Veggies: Want to sneak in some extra nutrients? Sauté diced bell peppers or mushrooms with the onion. Just make sure they’re tender before adding the liquids.
- Spice It Up: A pinch of red pepper flakes or a dash of hot sauce in the liquid mixture can give it a nice kick.
FAQ (Frequently Asked Questions)
Got questions? I’ve got answers! (Mostly.)
Can I make this ahead of time?
Sort of! You can cook the beef and onion mixture, then store it. When you’re ready to eat, add the liquids and pasta, then finish as directed. I wouldn’t cook the pasta ahead of time unless you like mushy pasta (and you don’t, trust me).
Can I freeze leftovers?
Absolutely! Portion it out into freezer-safe containers. It’ll last a couple of months. Thaw in the fridge overnight and reheat gently on the stovetop or in the microwave. Might need a splash of broth or water to loosen it up.
What kind of pasta works best?
Small, quick-cooking pasta like elbow macaroni, small shells, or ditalini are ideal because they cook evenly in the sauce. Anything too large might take ages or soak up too much liquid.
Can I add bacon?
Is that even a question? Of course, you can! Cook up some crispy bacon, crumble it, and stir it in at the end or sprinkle it on top as a garnish. Bacon makes everything better, **FYI**.
What if I don’t like pickles?
Then don’t add them! It’s your casserole, your rules. No pickle police here. But if you’re feeling adventurous, try adding a tiny bit of pickle juice to the sauce for a subtle tang – it’s surprisingly good!
Is this recipe good for meal prep?
OMG, yes! It reheats beautifully, making it perfect for packing lunches or having quick dinners ready to go throughout the week. You’ll be the envy of your office/couch.
Final Thoughts
There you have it, folks! Your new go-to, stress-free, totally delicious Cheeseburger Casserole. It’s proof that you don’t need to be a Michelin-star chef to whip up something truly satisfying. This dish is hearty, flavorful, and incredibly easy, making it perfect for busy weeknights or whenever you just need a serious dose of comfort food.
Now go impress someone—or yourself—with your new culinary skills. You’ve earned it! And maybe take a picture before you devour it all. Happy cooking!


