Oh hello there, carrot cake enthusiast! Or perhaps you’re just a dessert lover who happened to stumble upon this recipe while procrastinating something more important? Either way, you’ve hit the jackpot because this isn’t just any carrot cake recipe—it’s a carrot cake WITH FILLING. That’s right, we’re going all in today. The kind of cake that makes people say, “Wait, there’s something amazing in the middle of this?” while their eyes roll back in pleasure. Let’s make some magic happen!
Why This Recipe is Awesome
First off, this recipe delivers that perfect balance of spicy-sweet carrot cake goodness with a creamy filling that’ll make you question all the basic, filling-less carrot cakes you’ve eaten before. It’s like the difference between a regular text message and one with the perfect emoji—that extra something that takes it from good to unforgettable.
Plus, despite looking fancy AF when finished, it’s actually pretty straightforward to make. No pastry degree required! The filling step might seem intimidating, but trust me—if I can do this while simultaneously binge-watching my favorite show and texting my mom back, you’ve totally got this.
Ingredients You’ll Need
For the cake:
- 2 cups all-purpose flour (the regular stuff, nothing fancy)
- 2 cups grated carrots (approximately 4 medium carrots—your arm will get a workout, consider it pre-cake exercise)
- 1 cup granulated sugar (the white stuff)
- 1 cup brown sugar, packed (the more interesting sugar)
- 1 cup vegetable oil (or canola oil if you’re feeling rebellious)
- 4 eggs (room temperature, because cold eggs are party poopers)
- 2 tsp baking powder (the stuff that makes things rise, not to be confused with baking soda)
- 1 tsp baking soda (see above)
- 1 tsp salt (because even sweet things need balance in life)
- 2 tsp ground cinnamon (the non-negotiable spice)
- ½ tsp ground nutmeg (the secret weapon)
- ½ cup chopped walnuts or pecans (optional, for the texture enthusiasts)
For the heavenly filling:
- 8 oz cream cheese, softened (the real deal, not the low-fat impostor)
- ¼ cup butter, softened (unsalted, please—we’re controlling the salt here)
- 2 cups powdered sugar (don’t inhale while mixing unless you want to look like a ghost)
- 1 tsp vanilla extract (the good stuff, not the imitation nonsense)
- ½ cup crushed pineapple, drained (trust me on this one)
For the cream cheese frosting:
- 8 oz cream cheese, softened (yes, more cream cheese—it’s a good day)
- ½ cup butter, softened (creating magic here)
- 3 cups powdered sugar (for sweet tooth satisfaction)
- 1 tsp vanilla extract (because flavor matters)
- Pinch of salt (to make the sweetness pop)
Step-by-Step Instructions
- Prep your battle station. Preheat your oven to 350°F (175°C). Grease and flour two 9-inch round cake pans. If you’re feeling extra cautious, line the bottoms with parchment paper. This is your insurance policy against stuck cake.
- Mix the dry team. In a medium bowl, whisk together flour, baking powder, baking soda, salt, cinnamon, and nutmeg. Set aside and feel accomplished already.
- Beat the wet squad. In a large bowl, beat the oil and both sugars until well combined. Add eggs one at a time, mixing well after each. Your arm getting tired? That’s why stand mixers were invented.
- Unite the ingredients. Gradually add the dry ingredients to the wet mixture, mixing just until combined. Don’t overmix unless you’re aiming for tough cake (you’re not).
- Introduce the star. Fold in the grated carrots and nuts (if using). The batter should look speckled and beautiful, like a freckled redhead.
- Divide and conquer. Pour the batter evenly between your two prepared pans. Tap them gently on the counter to remove air bubbles. Those bubbles? Not invited to this party.
- Bake to perfection. Slide those pans into your preheated oven and bake for 30-35 minutes, or until a toothpick inserted in the center comes out clean. The kitchen will smell amazing—accept all compliments graciously.
- Cool your jets. Let the cakes cool in pans for 10 minutes, then turn out onto wire racks to cool completely. Patience is a virtue here—warm cakes and filling are not friends.
- Make that luxurious filling. Beat cream cheese and butter until smooth and fluffy. Add powdered sugar and vanilla, mixing until creamy. Gently fold in the drained pineapple. Try not to eat it all straight from the bowl.
- Prepare the frosting. In another bowl (yes, you’ll be washing dishes later), beat cream cheese and butter until fluffy. Gradually add powdered sugar, vanilla, and salt, beating until smooth. This is what dreams are made of.
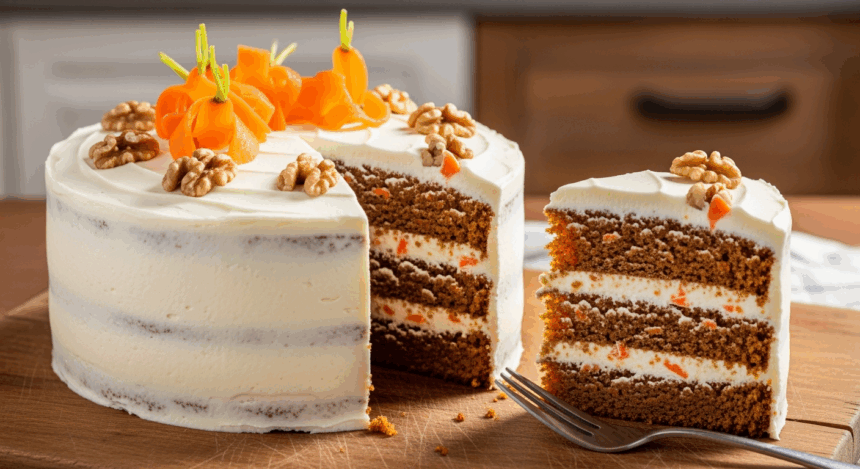
- Assemble your masterpiece. Place one cake layer on your serving plate. Spread the filling evenly on top, leaving about ½ inch from the edge (to prevent overflow). Carefully place the second cake layer on top.
- Frost like a boss. Cover the top and sides of the cake with your cream cheese frosting. Get artistic if you want, or just slather it on—it’ll taste amazing either way.
- Final touches. Optionally, sprinkle the top with more chopped nuts or a light dusting of cinnamon for that “I’m-a-professional” look.
- Chill out. Refrigerate for at least 1 hour before serving to let the flavors meld and the filling set. This also makes it easier to cut clean slices.
Common Mistakes to Avoid
Overmixing the batter. This isn’t a workout session—once the ingredients are combined, stop mixing! Overmixed cake = tough cake = sad you.
Using cold ingredients for the filling and frosting. Room temperature cream cheese and butter blend much better. Cold ingredients lead to lumpy frosting, and nobody wants to explain why their frosting looks like cottage cheese.
Rushing the cooling process. Hot cake + filling = melty disaster. Be patient or be prepared for a slip-and-slide situation with your cake layers.
Forgetting to drain the pineapple. Unless you want soupy filling (you don’t), make sure that pineapple is well-drained. Maybe even give it a gentle squeeze with paper towels if you’re feeling extra.
Skipping the refrigeration step. Room temperature cream cheese frosting in summer? Let’s just say gravity becomes your enemy. Give it that chill time.
Alternatives & Substitutions
Make it healthier: Swap half the oil for unsweetened applesauce. You’ll barely notice the difference except in your calorie count. You could also use whole wheat flour for half the all-purpose flour, but honestly, we’re already eating carrot cake with filling—let’s not pretend we’re at health camp.
Filling variations: Not a pineapple fan? Replace it with finely chopped raisins soaked in rum (hello, adult version!) or even chopped dried apricots. You could also do a straight-up cream cheese filling without fruit if simplicity is your thing.
Spice it up: Add ½ teaspoon of ground ginger or cardamom to the cake batter for an extra dimension of flavor. Or throw in a pinch of cloves if you’re feeling adventurous.
Nut alternatives: Allergic to nuts or just not a fan? Substitute with sunflower seeds or just skip them altogether. The cake will still be fabulous.
Make it boozy: Add 2 tablespoons of rum or bourbon to the cake batter. I won’t tell anyone if you add a splash to the frosting too. Hiccup.
FAQ (Frequently Asked Questions)
Can I make this cake ahead of time?
Absolutely! In fact, it often tastes even better the next day when the flavors have had time to mingle and get friendly. Store it in the refrigerator for up to 4 days, if it lasts that long (spoiler alert: it won’t).
Can I freeze this masterpiece?
You can! Freeze the unfrosted cake layers wrapped tightly in plastic wrap and aluminum foil for up to 2 months. The filling and frosting can be made 2-3 days ahead and refrigerated. Just let everything come to room temperature before assembling.
Do I really need to use both baking powder AND baking soda?
Yes, they’re doing different jobs here. Baking soda reacts with the acidic ingredients, while baking powder provides additional lift. Skip either one and your cake might end up flatter than my jokes after midnight.
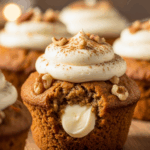
Can I make this into cupcakes?
Clever thinking! Yes, you can—fill cupcake liners about 2/3 full, bake for about 20-22 minutes, then core out the center of each cooled cupcake, fill with filling, and frost the tops. Boom—carrot cake cupcakes with filling!
My carrots turned green in the batter! Did I mess up?
Nope! Sometimes the baking soda can react with the carrots and turn them slightly green. It’s perfectly safe to eat and will usually disappear after baking. Chemistry is weird but delicious!
Can I reduce the sugar?
You can reduce the sugar in the cake by up to 1/4 cup without majorly affecting the texture. The frosting and filling, however, need that sugar for structure, so proceed with caution there. Remember, dessert isn’t supposed to be a health food—that’s what kale is for.
Final Thoughts
Congratulations! You’ve just leveled up from basic baker to “that friend who makes the amazing carrot cake with the stuff inside.” Your dessert game is now officially strong. Whether you’re making this for a special occasion or just because you deserve something delicious (you do), this filled carrot cake will not disappoint.
The best part about this recipe? It looks like you spent hours laboring in the kitchen, when really you just followed some straightforward steps with a little bit of waiting in between. The perfect balance of effort to impression ratio, if you ask me.
Now go forth and slice yourself a piece of that beautiful creation. Take a picture for social media if you must (we all do it), but then put the phone down and actually enjoy it. You’ve earned every single calorie! And remember, calories don’t count when there are vegetables involved, right? That’s how it works…at least in my kitchen!
