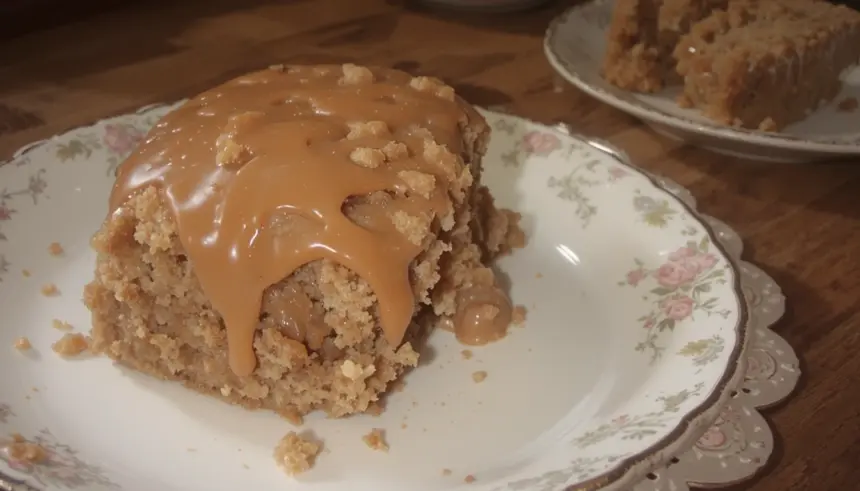
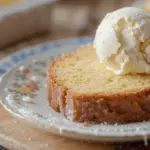
Caramel Pound Cake with Caramel Icing: Because Life Needs More Sweetness (and Less Effort)
So you’re craving something utterly decadent, ridiculously comforting, and, let’s be honest, a little bit extra, but you’re also *kinda* done with complicated recipes? Welcome to the club, friend. I’m here to save your dessert dreams with this Caramel Pound Cake and its luscious Caramel Icing. It’s basically a warm hug in cake form, and trust me, it’s way easier than it looks (and tastes way better than it had any right to). Let’s get baking! 🙂
Why This Recipe is Awesome
Okay, let’s break down why this cake is your new best friend. First off, it’s outrageously moist and packed with caramel flavor. It doesn’t just have caramel *in* it; the whole dang cake sings of buttery, sweet caramel. Then there’s the icing. Oh, the icing! It’s smooth, glossy, and drips down the sides like a sweet waterfall. Plus, it’s surprisingly forgiving. Even if you’re a kitchen newbie who sometimes confuses baking soda with baking powder (guilty!), you’ve got a solid shot at nailing this. It’s practically idiot-proof, which, IMO, is the gold standard for any recipe.
Ingredients You’ll Need
- For the Pound Cake:
- 1 cup (2 sticks) unsalted butter, softened (Don’t skimp here, butter is life!)
- 1 ½ cups granulated sugar (For that classic sweet hug)
- ½ cup packed light brown sugar (For that deeper caramel vibe)
- 4 large eggs, at room temperature (Cold eggs = sad cake batter)
- 1 teaspoon vanilla extract (The unsung hero of baked goods)
- 1 teaspoon caramel extract (Optional, but highly recommended for an extra caramel punch)
- 2 ½ cups all-purpose flour, sifted (Sifting is your friend, don’t let anyone tell you otherwise)
- ½ teaspoon baking powder (Just a little lift, no need for it to go to the moon)
- ½ teaspoon salt (Balances all that sweetness, essential!)
- 1 cup buttermilk, at room temperature (This is key for moisture, folks! Don’t use milk, it’s just not the same.)
- For the Caramel Icing:
- 1 cup (2 sticks) unsalted butter
- 1 cup packed light brown sugar
- ⅓ cup evaporated milk (Or heavy cream if you’re feeling fancy)
- 1 teaspoon vanilla extract
- Pinch of salt
- 1 ½ – 2 cups powdered sugar, sifted (Adjust for your desired thickness)
Step-by-Step Instructions
- Preheat and Prep: Preheat your oven to 325°F (160°C). Grease and flour a 9×5 inch loaf pan. If you’re feeling extra, line it with parchment paper for easy removal.
- Cream it Up: In a large bowl, beat the softened butter, granulated sugar, and brown sugar together until light and fluffy. This usually takes a good 3-5 minutes with an electric mixer. Think sunshine and fluffy clouds.
- Egg-cellent Addition: Beat in the eggs one at a time, making sure each one is fully incorporated before adding the next. Then, stir in the vanilla and caramel extracts.
- Dry and Wet Unite: In a separate bowl, whisk together the sifted flour, baking powder, and salt. In a small bowl or jug, combine the buttermilk.
- Alternate Attack: Now, alternate adding the dry ingredients and the buttermilk to the butter mixture, starting and ending with the dry. Mix on low speed just until combined. **Don’t overmix!** Overmixing makes tough cakes, and we don’t want that.
- Bake it Till You Make It: Pour the batter into your prepared pan and smooth the top. Bake for 60-75 minutes, or until a wooden skewer inserted into the center comes out clean.
- Cool Down: Let the cake cool in the pan for about 15 minutes, then invert it onto a wire rack to cool completely. Seriously, let it cool. It’ll be too fragile to ice if it’s still warm. Patience, grasshopper!
- Caramel Magic (Icing Time!): While the cake cools, make the icing. In a saucepan over medium heat, melt the butter. Stir in the brown sugar and evaporated milk (or cream). Bring to a boil, stirring constantly, and let it boil for 1 minute.
- Smooth Operator: Remove from heat and stir in the vanilla extract and a pinch of salt. Let it cool slightly, then gradually whisk in the sifted powdered sugar until you reach a smooth, pourable consistency. If it’s too thick, add a tiny splash of milk; if it’s too thin, add more powdered sugar.
- Drizzle and Dream: Once the cake is completely cool, pour or drizzle the caramel icing over the top, letting it cascade down the sides. Let the icing set slightly before slicing and devouring.
Common Mistakes to Avoid
- Ignoring Room Temperature Ingredients: Seriously, cold butter and eggs are the enemies of fluffy cakes. Plan ahead, people!
- Overmixing the Batter: This is a big one. Overmixing develops the gluten too much, resulting in a tough, dense cake. Mix until *just* combined.
- Not Cooling the Cake Completely Before Icing: Warm cake + warm icing = a melted mess. Let it cool fully, or at least mostly.
- Skipping the Sifting: Flour can clump up. Sifting ensures a lighter texture and prevents those little flour pockets of sadness.
- Using the Wrong Milk in the Cake: Buttermilk is magic for tenderizing and adding moisture. Regular milk just doesn’t have the same pizzazz.
Alternatives & Substitutions
Feeling a little adventurous or just missing an ingredient? No sweat.
- No Buttermilk? No problem! For every cup of buttermilk needed, stir 1 tablespoon of lemon juice or white vinegar into 1 cup of regular milk. Let it sit for 5-10 minutes until it looks a bit curdled. Voila! DIY buttermilk.
- No Caramel Extract? It’s not the end of the world! You’ll still get a lovely caramel flavor from the brown sugar and the icing. You can also try adding an extra teaspoon of vanilla extract for good measure.
- Craving Pecans? Fold in about ½ cup of chopped toasted pecans into the cake batter before baking. They add a delightful crunch and extra nutty flavor. Highly recommend!
- Want a Darker Caramel Flavor? Use dark brown sugar instead of light brown sugar in both the cake and the icing. It’ll give it a richer, more intense caramel taste.
FAQ (Frequently Asked Questions)
Got burning questions? I’ve got… well, hopefully, the answers.
- Can I make this in a Bundt pan? Absolutely! Just adjust your baking time. It might take a bit longer, so keep an eye on it and use the skewer test.
- How long does this cake last? Store it in an airtight container at room temperature for about 3-4 days. If it’s super humid where you are, the fridge might be a better bet, but let it come to room temp before serving for optimal deliciousness.
- Can I use margarine instead of butter? Well, technically yes, but why hurt your soul (and your cake’s flavor) like that? Butter provides the best flavor and texture. IMO, for this kind of cake, it’s worth it.
- My icing is too runny! What did I do wrong? Oopsie! You probably added too much liquid or didn’t let the butter mixture cool enough. Just whisk in more sifted powdered sugar, a tablespoon at a time, until it’s the right consistency.
- Can I freeze this cake? Yes! You can freeze the un-iced cake (wrap it tightly in plastic wrap and then foil) for up to 2 months. Thaw it completely before making and adding the icing.
- Is caramel extract really necessary? It’s not strictly necessary, but it does amp up the caramel flavor significantly, making it taste like it came from a fancy patisserie. If you have it, use it!
Final Thoughts
There you have it! A show-stopping, incredibly delicious Caramel Pound Cake that’s surprisingly manageable. It’s perfect for a special occasion, a “just because” treat, or when you just need a serious dose of comfort. So go on, grab your apron (or don’t, I won’t judge), and whip up this little slice of heaven. Now go impress someone—or yourself—with your new culinary skills. You’ve earned it!
