So you’re craving something tasty but too lazy to spend forever in the kitchen, huh? Same. What if I told you that you could have apple pie filling at your fingertips year-round, without all the last-minute peeling and slicing chaos? Yep, we’re talking about canning apple pie filling with the magic ingredient: Clear Gel. Get ready to impress yourself (and maybe a few lucky friends) with minimal effort later!
Why This Recipe is Awesome
Okay, let’s be real. This isn’t just “awesome”; it’s borderline life-changing. First off, imagine this: it’s a cold winter night, you suddenly crave apple pie, and BOOM! You’ve got ready-to-go filling sitting pretty on your shelf. No frantic peeling, no sticky mess when you’re already half-asleep. This recipe makes your future self incredibly happy. Plus, it’s idiot-proof. Seriously, even I didn’t mess it up, and my kitchen adventures often involve smoke alarms. The Clear Gel is the secret sauce here, preventing that weird cloudy, gummy texture you sometimes get with other thickeners. Your pies will be picture-perfect, every single time. Who needs a time machine when you can just open a jar of homemade goodness?
Ingredients You’ll Need
Gather ’round, fellow culinary adventurers! Here’s what you’ll need to make your future pie dreams a reality:
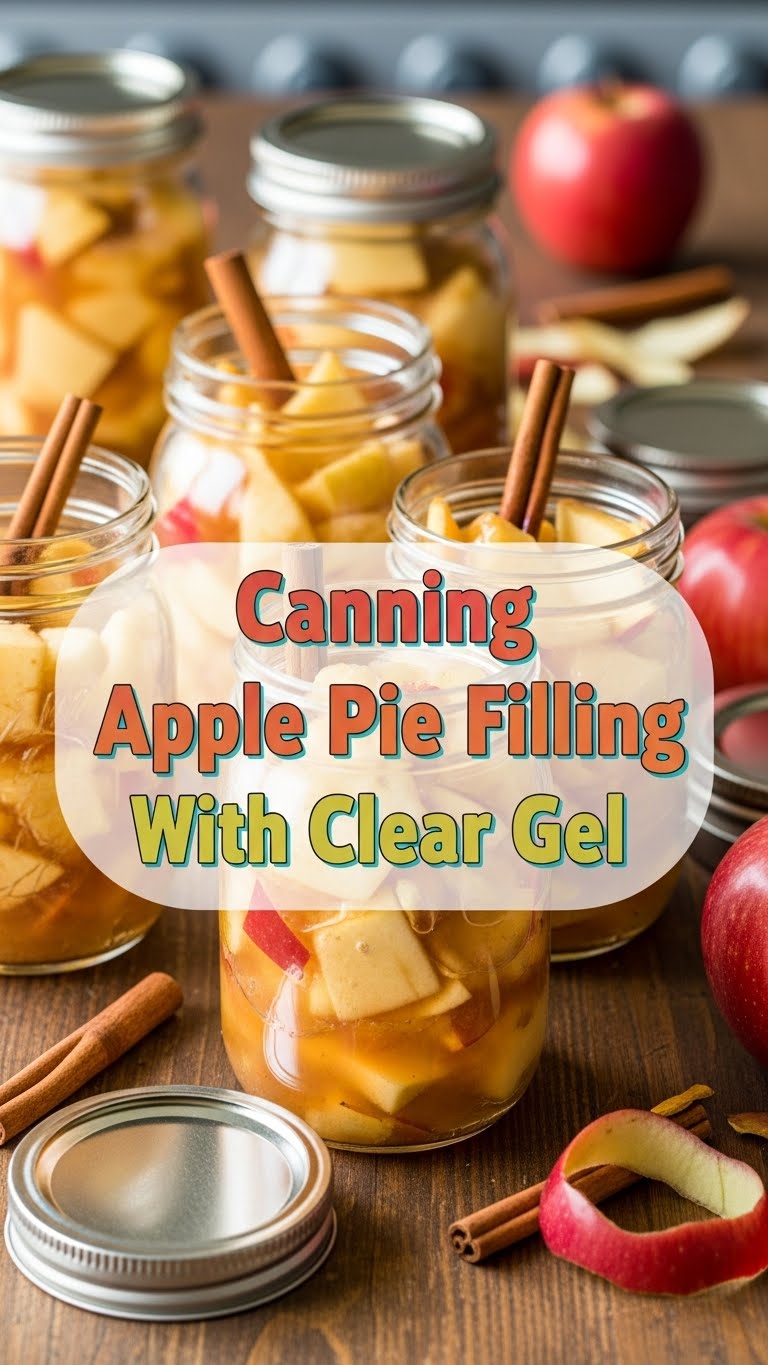
- About 12 pounds of firm, crisp apples: Think Granny Smith, Honeycrisp, Fuji, or Braeburn. Don’t even *think* about using those mealy Red Delicious apples. Seriously, don’t.
- 7 cups granulated sugar: Sweetness! Because life’s too short for bland pie.
- 2 cups Clear Gel (or Clear Jel): This is the non-negotiable MVP. It’s modified cornstarch specifically for canning, ensuring your filling stays beautifully clear and thick without getting gummy. Do not substitute with regular cornstarch!
- 1 tablespoon ground cinnamon: Spice, spice, baby.
- 1/2 teaspoon ground nutmeg: For that warm, cozy, “I’m a baking genius” vibe.
- 2 cups cold water: Just plain old H2O. Nothing fancy.
- 1/2 cup bottled lemon juice: Important for safety and to keep those apples from turning brown and sad.
- Canning jars with lids and bands: Pint or quart size, whatever floats your pie boat. Make sure they’re clean and sterilized!
Step-by-Step Instructions
Alright, let’s get down to business! Follow these steps, and you’ll be a canning pro in no time.
- First things first, prep your apples. Wash ’em, peel ’em, core ’em, and slice ’em into nice, uniform 1/2-inch pieces. You want about 16 cups of sliced apples. Don’t dilly-dally too much, or they’ll start browning.
- In a large stockpot, whisk together the sugar, Clear Gel, cinnamon, and nutmeg. Make sure there are no lumps—you want a smooth start to your deliciousness.
- Gradually whisk in the cold water and lemon juice until everything is well combined and smooth. Place the pot over medium-high heat.
- Bring the mixture to a boil, stirring constantly. It’s going to thicken up nicely, so keep stirring to prevent scorching. Let it boil for about 1 minute.
- Remove the pot from the heat and gently fold in your sliced apples. Stir them until they are thoroughly coated in that beautiful, thick syrup.
- Now, grab your hot, sterilized canning jars. Ladle the hot apple filling into the jars, leaving a 1-inch headspace. This is crucial for proper sealing!
- Remove any air bubbles with a non-metallic spatula or knife. Wipe the rims of the jars clean with a damp cloth – any residue can prevent a good seal.
- Place the lids and bands on the jars, tightening to fingertip-tight. Don’t crank them down too hard!
- Process the jars in a boiling water canner. For pint jars, process for 20 minutes; for quart jars, process for 25 minutes. Adjust processing time if you’re at a high altitude. (Check a reliable canning guide for your specific altitude!)
- Once processing is complete, carefully remove the jars from the canner and place them on a towel-lined counter, leaving space between them. Let them cool undisturbed for 12-24 hours. You should hear those satisfying “ping!” sounds as they seal.
Common Mistakes to Avoid
Listen up, buttercup! Don’t fall into these common traps:
- Substituting Clear Gel: Seriously, I’m not kidding about this. Regular cornstarch or flour will give you a cloudy, gummy, and potentially unsafe product for canning. Clear Gel is non-negotiable.
- Not leaving enough headspace: Skimping on that 1-inch headspace can lead to jar sealing failures or siphoning (when liquid leaks out during processing). Precision matters here!
- Using the wrong apples: Soft, mealy apples will turn to mush during processing. Stick to crisp, firm varieties that hold their shape. Nobody wants apple sauce pie.
- Not processing long enough: Undercooking or under-processing isn’t just a culinary misstep; it can be a safety hazard. Follow the recommended times for your jar size and altitude.
- Not sterilizing jars: Thinking a quick rinse is enough? Nope. Sterilized jars are a must to ensure your canned goods stay safe and fresh.
Alternatives & Substitutions
While the core recipe is pretty solid, you do have a *little* wiggle room to play with flavor, but remember, for canning, we stick to the script for safety!
- Apple Varieties: Feel free to mix and match! A blend of tart Granny Smiths and sweeter Honeycrisps or Fujis can give you a more complex flavor profile. Just make sure they’re all firm and canning-friendly.
- Spices: Want to get wild? A pinch of allspice or a tiny dash of cardamom can elevate your filling. Just remember to keep it subtle; you don’t want to overpower the apple goodness. However, avoid adding too many “extras” like vanilla bean paste *before* canning, as they can sometimes affect pH or density in unpredictable ways for safe canning. Add those later when you bake!
- Sugar Content: You can slightly reduce the sugar if your apples are super sweet, but don’t go overboard. Sugar contributes to the preservation process, so a drastic reduction isn’t recommended for safe, long-term canning. IMO, stick close to the recipe for best results.
FAQ (Frequently Asked Questions)
Got questions? I’ve got answers (and maybe a little sass)!
- Why can’t I just use regular cornstarch or flour instead of Clear Gel?
Because you don’t want a cloudy, gooey, possibly unsafe mess! Regular thickeners break down during the high heat of canning, leaving you with thin, unappetizing liquid and a lumpy texture. Clear Gel is specially formulated to withstand that heat and keep your filling perfectly clear and thick. Trust me on this. - Do I *have* to can it? Can’t I just make the filling and freeze it?
Well, you *could* make the filling and freeze it if you don’t want to go through the canning process. It won’t have the same shelf-stable magic, but it’s an option for shorter-term storage. But then, it wouldn’t be “canned” apple pie filling, now would it? - What if my jars don’t seal?
Don’t panic! If a jar doesn’t seal (the lid will feel loose or pop up when pressed), simply refrigerate it and use the filling within a week or two. Or, you can reprocess it with a fresh lid, but only if it’s within 24 hours of the initial processing. - Can I add other fruits to this filling for canning?
Not really for this specific recipe. Adding other fruits changes the acidity and density of the filling, which could affect canning safety. Stick to tried-and-true recipes for mixed fruit fillings to ensure they’re safe for canning. - How long does this canned apple pie filling last?
Properly sealed and stored in a cool, dark place, your homemade apple pie filling should last for at least a year. Some folks claim longer, but for optimal flavor and quality, aim to use it within 12-18 months. - Is bottled lemon juice really necessary, or can I use fresh?
For canning, always use bottled lemon juice. The acidity level in bottled lemon juice is consistent and regulated, which is crucial for safe canning. Fresh lemon juice can vary wildly in acidity, making it unreliable for ensuring proper preservation.
Final Thoughts
And there you have it! You’ve just bottled a little bit of future happiness, ready for those spontaneous pie cravings or when you need a quick, impressive dessert. Canning might seem a little intimidating at first, but with this Clear Gel magic, it’s actually pretty straightforward. Now you’ve got a secret weapon in your pantry that says, “Yes, I *do* make homemade pie filling, and yes, it *is* amazing.” Go forth and impress someone—or just yourself—with your new culinary superpowers. You’ve earned it!


