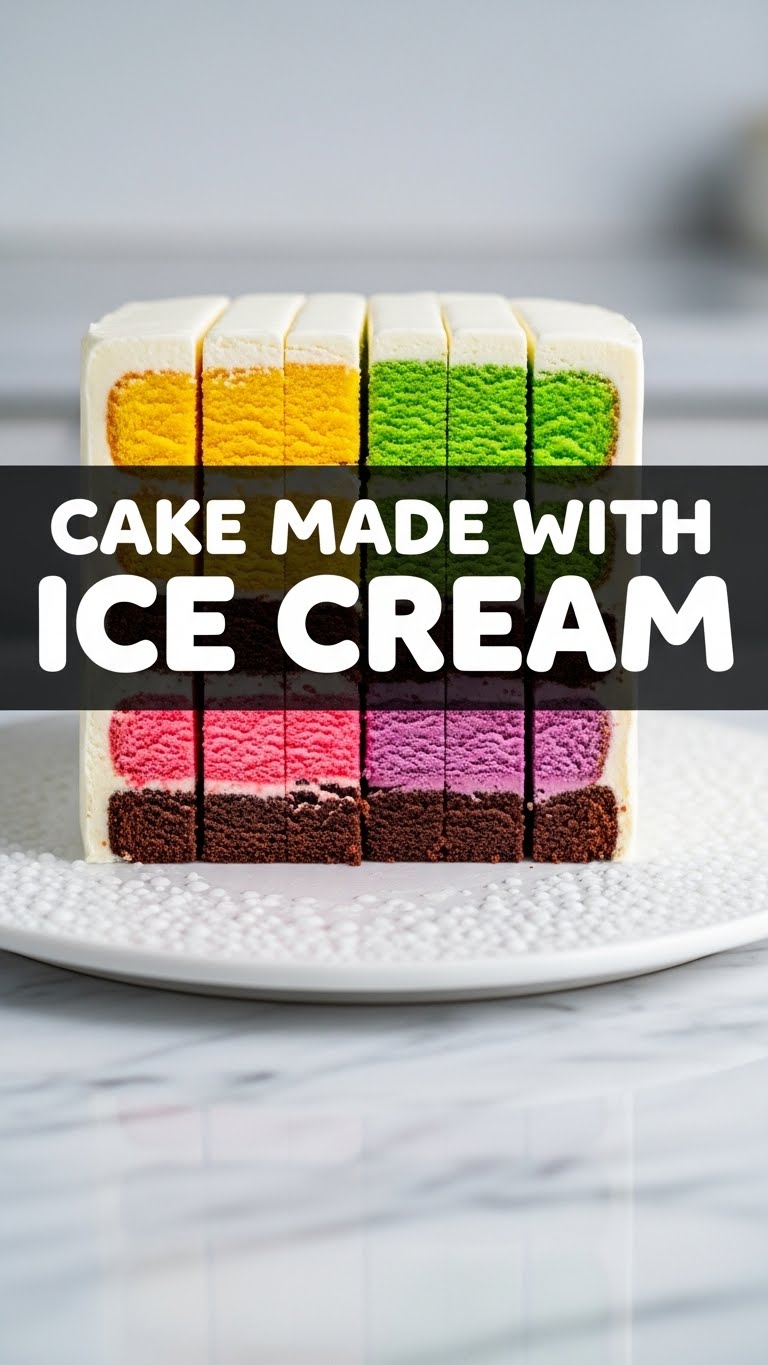
So, you’re craving something ridiculously delicious, but the mere thought of turning on the oven or spending an hour meticulously measuring flour makes you want to curl up with a bag of chips instead? Same, friend. Utterly, completely same. Good news: I’ve got a recipe that screams “gourmet dessert wizard” but actually whispers “I just threw some stuff together.” Get ready for a cake made with ice cream that will change your life (or at least your dessert game) forever!
Why This Recipe is Awesome
Okay, let’s be real. This isn’t just a recipe; it’s a life hack. Why is it awesome? First, **zero baking involved.** Yes, you heard that right. Your oven can take a much-needed nap. Second, it’s practically **idiot-proof** – even I managed not to mess it up, and my track record with anything more complex than toast is… questionable. It looks incredibly impressive, tastes out-of-this-world, and requires minimal effort. It’s perfect for when you want to look fancy without, you know, actually *being* fancy. You’re welcome.
Ingredients You’ll Need
Gather your loot, kitchen warrior! Here’s what you’ll need to assemble your frozen masterpiece:
- Your Favorite Crunchy Cookies (about 20-25): Think Oreos, graham crackers, Biscoff – whatever makes your taste buds sing. You’ll be crushing these, so go ahead and get out some aggression.
- Unsalted Butter (1/2 cup, melted): Because everything’s better with butter, right?
- Two Different Flavors of Premium Ice Cream (1.5 quarts each): This is where your inner child gets to shine. Pick flavors you absolutely adore. Chocolate and vanilla is a classic, but don’t be afraid to go wild with mint chip and cookie dough!
- Your Go-To Toppings: Hot fudge, caramel sauce, sprinkles, whipped cream, crushed candy bars, fresh berries – the world is your oyster! This is the fun part, so don’t skimp.
- A 9-inch Springform Pan: Trust me on this one; it makes serving so much easier.
Step-by-Step Instructions
Alright, let’s get down to business. Follow these super simple steps, and you’ll be a dessert hero in no time!
- Make the Crust: Take those cookies and crush them until they’re fine crumbs. A food processor makes quick work of this, but a Ziploc bag and a rolling pin are equally therapeutic. Mix the crumbs with the melted butter until well combined. Press this mixture firmly into the bottom of your springform pan. **Pop it in the freezer for at least 30 minutes** to set.
- First Ice Cream Layer: Let your first ice cream flavor soften on the counter for about 10-15 minutes. It should be pliable but not soupy. Spread this softened ice cream evenly over your chilled cookie crust. Return the pan to the freezer for at least an hour, or until firm.
- Second Ice Cream Layer: Repeat the softening and spreading process with your second ice cream flavor. Gently spread it over the first frozen layer. Try not to press too hard, or you’ll mix the layers (unless that’s your vibe, then go for it!). Back to the freezer it goes for another 2-3 hours, or even overnight, until it’s super solid.
- Decorate and Serve: Once your cake is nice and firm, remove it from the freezer. Carefully run a warm knife around the edge of the pan before releasing the springform sides. Now for the best part: decorate to your heart’s content! Drizzle with sauces, pile on the whipped cream, shower with sprinkles. **Serve immediately** for maximum deliciousness.
Common Mistakes to Avoid
Listen, we all make mistakes. But with this recipe, we’re aiming for perfection (or at least edible success). Here are a few rookie errors to steer clear of:
- Not Freezing Long Enough: This isn’t a race, people! Patience is a virtue here. If your layers aren’t firm enough, you’ll end up with a sad, melty, mixed-up mess when you try to add the next layer or slice it. So, chill out, literally.
- Using Rock-Hard Ice Cream: Trying to spread frozen concrete is a workout nobody asked for. Let it soften a bit on the counter; it should be scoopable and spreadable, not something you need an ice pick for.
- Forgetting the Springform Pan: Sure, you *could* use a regular cake pan, but getting that cake out in one piece without a springform is an Olympic sport I’m not trained for. Plus, it looks way prettier.
- Over-Decorating While Soft: Adding heavy toppings to a freshly layered, still-soft ice cream cake will cause them to sink. Wait until it’s fully frozen, or at least mostly solid, before going wild with the sprinkles.
Alternatives & Substitutions
Feeling adventurous? Or maybe you just have different stuff in your pantry? No worries, this recipe is super flexible!
- Crust: Don’t have cookies? Use a pre-made graham cracker crust (time-saver alert!), or even blend some stale brownies for a rich chocolate base.
- Ice Cream: If you’re going for something lighter, try using sorbet for one of the layers, or even frozen yogurt. Dairy-free ice cream works just as well for those with dietary restrictions.
- Toppings: Get creative! Fresh fruit like sliced strawberries or raspberries adds a lovely tartness. Chopped nuts, mini marshmallows, or even a crumbled candy bar between layers can take it up a notch. IMO, the more chocolate, the better!
FAQ (Frequently Asked Questions)
Got questions? I’ve got answers (mostly humorous ones).
- Can I make this ahead of time? Absolutely! This cake is a freezer superstar. It actually needs to be frozen for several hours to be perfect, so making it a day or two in advance is ideal. Just try not to “sample” it all before your guests arrive.
- What if I only have one ice cream flavor? No problem! One flavor wonders work too. Just spread it thick, or maybe layer it twice with a generous layer of hot fudge or caramel in the middle for extra flair.
- How long does it last in the freezer? If you manage to keep it hidden from hungry eyes, usually up to 2 weeks. After that, it might start to get a bit icy, but honestly, it rarely lasts that long!
- Do I really need a springform pan? Highly recommended for easy serving and a beautiful presentation. However, if you’re in a pinch, you can line a regular cake pan with plastic wrap, leaving an overhang to help you lift the cake out once frozen. It’s trickier, but doable.
- Can I add booze to this? Ooh, fancy! For an adult version, a thin drizzle of a liqueur like Kahlúa, Baileys, or crème de menthe between layers could be epic. Just don’t overdo it, or it might not freeze properly. A little goes a long way!
- Is this actually healthier than a regular cake? LOL, no. But it tastes like pure joy, and that’s what matters, right?
Final Thoughts
See? Told ya it was easy! You’ve just whipped up a dessert that looks like it took hours, but in reality, was a breeze. Now go forth and conquer those cravings. You’re basically a dessert wizard now, and your friends and family are about to be seriously impressed. **Don’t forget to take a picture before it’s all gone** – and maybe send me a slice (or at least a pic!). You’ve earned this, chef!

