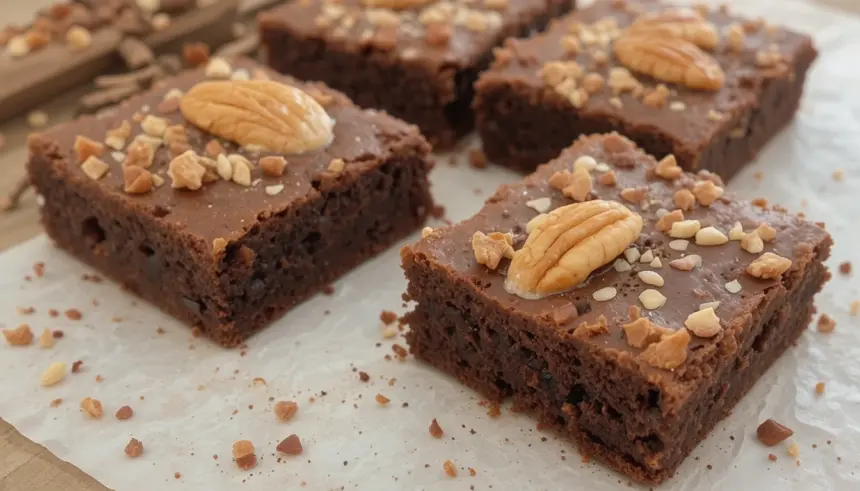
So, you’re staring into the abyss of your pantry, and a single, undeniable craving hits you like a truck full of pure joy: BROWNIES. But not just any brownies, oh no. We’re talking brownies with NUTS. Because let’s be real, life’s too short for naked brownies. And if you’re anything like me, you want that chocolatey goodness without a culinary marathon. Well, buckle up, buttercup, because I’ve got you covered!
Why This Recipe is Awesome
Okay, let’s talk turkey. Or, you know, chocolate and nuts. This recipe is like your favorite comfy sweatpants – easy, reliable, and guaranteed to make you feel good. It’s seriously **foolproof**. I’m talking melt-the-butter-and-stir-stuff-together kind of easy. No fancy techniques, no weird ingredients you have to Google three times. Plus, the nuts on top? They’re not just for crunch, they’re for *style*. They scream, “I’m sophisticated, but I also secretly want to eat half the pan.” And who doesn’t love that vibe?
Ingredients You’ll Need
- 1 cup (2 sticks) unsalted butter, melted (because anything less is just lazy)
- 2 cups granulated sugar (yes, it’s a lot, no regrets)
- 4 large eggs (room temperature is cool, but, like, who has time for that? Use ’em cold!)
- 1 teaspoon vanilla extract (the magical potion that makes everything better)
- 1 cup all-purpose flour (don’t go getting fancy with artisanal stone-ground stuff, this ain’t that)
- 1 cup unsweetened cocoa powder (the darker, the better. Embrace the bitterness!)
- ½ teaspoon baking powder (just a smidge, we’re not making cakes here)
- ½ teaspoon salt (to balance out all that sweetness, duh)
- 1 cup chopped nuts (pecans or walnuts are classic, but go wild, I won’t judge. Almonds? Sure. Macadamia nuts? You’re living the dream!)
Step-by-Step Instructions
- Preheat your oven to 350°F (175°C). Grease and flour a 9×13 inch baking pan. Or, you know, line it with parchment paper so you don’t have to scrub later. Smart thinking, right?
- In a large bowl, whisk together the melted butter and sugar until it looks like a happy, glossy puddle.
- Beat in the eggs one at a time, then stir in the vanilla. Don’t overmix! We’re making brownies, not meringue.
- In a separate bowl, whisk together the flour, cocoa powder, baking powder, and salt. Get all those dry ingredients acquainted.
- Gradually add the dry ingredients to the wet ingredients, mixing until *just* combined. Seriously, stop when you don’t see any more dry streaks. Overmixing is the enemy of fudgy brownies.
- Pour the batter into your prepared pan and spread it evenly.
- Now for the fun part: Sprinkle those gorgeous chopped nuts all over the top. Press them in gently so they don’t float away like little edible balloons.
- Bake for 25-30 minutes, or until a toothpick inserted into the center comes out with moist crumbs attached (not wet batter, that’s a no-go).
- Let them cool completely in the pan before cutting. This is arguably the hardest part. Patience, grasshopper.
Common Mistakes to Avoid
- Overbaking: This is the cardinal sin of brownie-making. Dry, crumbly brownies are a tragedy. Keep an eye on them!
- Underbaking (to the point of raw batter): A toothpick with wet batter means you’ve got a gooey center. A toothpick with moist crumbs is perfection. A toothpick with wet batter means you’ve got a science experiment.
- Skipping the Salt: That little bit of salt is crucial for flavor. Don’t be a hero and leave it out.
- Using the Wrong Cocoa: Dutch-processed cocoa is great, but natural cocoa works just fine here. Just make sure it’s UNSWEETENED. Sugar-added “chocolate powder” is NOT the same thing.
Alternatives & Substitutions
Feeling adventurous? Or perhaps you’re missing a crucial ingredient? No drama!
- Nuts: If you’re not a nut fan (what’s wrong with you? Kidding… mostly!), you can totally skip them. Or, for some flair, try mini chocolate chips on top instead. Or a sprinkle of sea salt flakes! Ooh la la.
- Butter: Margarine can work in a pinch, but IMO, butter gives you that superior richness and flavor. It’s worth the splurge if you can swing it.
- Flour: Gluten-free all-purpose flour blends usually work well as a 1:1 substitute. Just manage your expectations; the texture might be slightly different.
FAQ (Frequently Asked Questions)
Can I make these ahead of time?
Of course! Brownies are often even better the next day. Just store them in an airtight container at room temperature. They’re like fine wine, but way more chocolatey.
My brownies look a little cracked on top. Is that bad?
Nah, that’s actually a good sign! Those beautiful cracks often mean you’ve achieved that perfect fudgy texture. It’s like a brownie’s freckles. Cute!
Can I use different kinds of nuts?
Absolutely! As long as they’re chopped and you like the taste, go for it. Pecans, walnuts, almonds, hazelnuts… the world is your nutty oyster!
How do I know when they’re done baking?
The toothpick test is your BFF. Moist crumbs clinging to it means they’re ready for their cooling spa treatment. If it comes out clean, they *might* be a tad overbaked. If it’s covered in batter, they need more time.
Why are my brownies so cakey?
Probably because you added too much flour, or you overmixed the batter. Gentle hands and a little less flour next time should do the trick!
Can I freeze these?
Yes, you totally can! Wrap them up well, and they should be good for a few months. Thaw them at room temperature, and they’ll be like a delightful little surprise from your past self.
Final Thoughts
And there you have it! A batch of ridiculously delicious, nut-topped brownies that require minimal effort and maximum reward. See? Baking doesn’t have to be a daunting task. It can be fun, messy, and oh-so-satisfying. Now go forth and bake! May your brownies be fudgy, your nuts be crunchy, and your cravings be vanquished. You’ve earned this chocolatey goodness. Enjoy!

