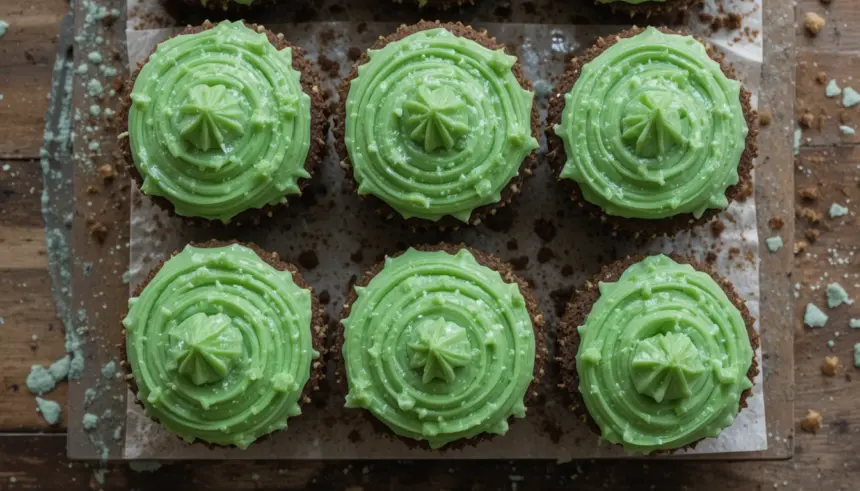
Brownies with Green Frosting: Because Sometimes Life Needs a Little Color (and Chocolate!)
So you’re craving something tasty but too lazy to spend forever in the kitchen, huh? Same. And you want it to be… fun? Well, my friend, you’ve come to the right place. Forget boring old chocolate brownies. We’re talking about a fudgy, decadent chocolate brownie base topped with a vibrant, shockingly green frosting. Why green? Because why the heck not? Let’s make some magic happen!
Why This Recipe is Awesome
Honestly, this recipe is awesome because it’s ridiculously easy and looks way fancier than it is. You get all the fudgy brownie goodness you crave, plus a pop of color that screams “I’m a grown-up who still likes fun!” Plus, let’s be real, who *doesn’t* love green frosting? It’s a conversation starter, a mood lifter, and a great excuse to eat brownies for breakfast (don’t judge). And the best part? It’s pretty much idiot-proof. Even I didn’t mess it up, and that’s saying something.
Ingredients You’ll Need
For the Brownies (The Fudgy Bit):
- 1 cup (2 sticks) unsalted butter, melted (because life is too short for softened butter)
- 2 cups granulated sugar (yes, it’s a lot, but worth it!)
- 4 large eggs (room temperature is ideal, but who has time for that?)
- 1 teaspoon vanilla extract (don’t skimp on this!)
- 1 1/3 cups all-purpose flour (sifted if you’re feeling fancy)
- 3/4 cup unsweetened cocoa powder (the darker, the better)
- 1 teaspoon salt
- 1 cup chocolate chips (optional, but HIGHLY recommended)
For the Green Frosting (The Star of the Show):
- 1/2 cup (1 stick) unsalted butter, softened (actual softened butter is important here)
- 3 cups powdered sugar (sifted, or your frosting will have lumps of sadness)
- 1/4 cup milk (or heavy cream, if you’re feeling decadent)
- 1 teaspoon vanilla extract
- Green food coloring (gel is best for vibrant color without making it watery)
Step-by-Step Instructions
1. **Preheat & Prep:** Preheat your oven to 350°F (175°C). **Grease and flour a 9×13 inch baking pan.** Trust me, you don’t want these sticking.
2. **Wet Ingredients:** In a large bowl, whisk together the melted butter and sugar until they’re well combined. Don’t go crazy here, just mix.
3. **Add Eggs & Vanilla:** Beat in the eggs one at a time, then stir in the vanilla extract. It might look a little weird, but it’s fine.
4. **Dry Ingredients:** In a separate bowl, whisk together the flour, cocoa powder, and salt.
5. **Combine:** Gradually add the dry ingredients to the wet ingredients, mixing until *just* combined. **Do NOT overmix!** Overmixing equals tough brownies, and nobody wants that.
6. **Fold in Chips:** If you’re using chocolate chips, fold them in now. They’re like little pockets of joy.
7. **Bake It:** Pour the batter into your prepared pan and spread it evenly. Bake for 25-30 minutes, or until a toothpick inserted into the center comes out with moist crumbs attached (not wet batter, but not totally clean either).
8. **Cool Down:** Let the brownies cool COMPLETELY in the pan. This is crucial for frosting success. Patience, grasshopper.
9. **Frosting Time!:** While the brownies are cooling, make the frosting. Beat the softened butter in a medium bowl until creamy.
10. **Add Sugar & Milk:** Gradually add the powdered sugar, alternating with the milk, beating until smooth and fluffy. Stir in the vanilla.
11. **Get Your Green On:** Add your green food coloring, a drop or two at a time, until you achieve your desired shade of awesome. Mix it in really well.
12. **Frost Away!:** Once the brownies are totally cool, spread the green frosting evenly over the top. Go wild with a spatula, or just slop it on – it’s all good.
Common Mistakes to Avoid
* **Underbaking:** Nobody likes a gooey, raw brownie center. Stick to the toothpick test!
* **Overmixing the batter:** This is a biggie. Seriously, just mix until it’s combined.
* **Frosting warm brownies:** This is a recipe for a melted frosting disaster. Let them cool completely!
* **Not using enough green food coloring:** Don’t be shy! Embrace the vibrant green.
* **Thinking you don’t need to preheat the oven:** Rookie mistake. Your brownies will be sad and flat.
Alternatives & Substitutions
* **For the brownies:** If you’re feeling extra lazy, you can use a good-quality box brownie mix and just top it with the homemade green frosting. Nobody needs to know, wink wink.
* **For the frosting:** If you don’t have milk, you can use water, but milk or cream will make it richer. For a cream cheese frosting twist, add a couple of ounces of softened cream cheese to the butter before adding the sugar. It’s divine. And for a less conventional green, try a swirl of mint extract for a subtle flavor and a pale green hue (though food coloring is your best bet for that vibrant pop).
* **Chocolate chips:** Feel free to swap them out for white chocolate chips, butterscotch chips, or even chopped nuts if that’s your jam.
FAQ (Frequently Asked Questions)
* **Can I make these ahead of time?** Absolutely! Brownies are often even better the next day. Just keep them covered at room temperature.
* **Why is my frosting so lumpy?** You probably didn’t sift your powdered sugar, or you didn’t beat it long enough. Give it another good whip!
* **Can I use margarine instead of butter?** Well, technically yes, but why hurt your soul like that? Butter provides the best flavor and texture for both the brownies and the frosting.
* **How long will these keep?** They’ll be good for about 3-4 days at room temperature, as long as they’re covered. Though, let’s be honest, they probably won’t last that long.
* **My frosting is too thin, what do I do?** Add more powdered sugar, a tablespoon at a time, until it reaches your desired consistency.
* **Can I freeze these?** Yes! Freeze them unfrosted, then frost once thawed. Or, frost them and freeze them, but the frosting might get a little smooshed.
Final Thoughts
And there you have it! Delicious, fudgy brownies with a shockingly delightful green frosting. This is the kind of dessert that’s perfect for birthdays, Halloween, St. Paddy’s Day, or just a Tuesday when you need a little extra sparkle. So go forth, bake these beauties, and let your inner child (and your adult self) rejoice. Now go impress someone—or yourself—with your new culinary skills. You’ve earned it! Happy baking!

