So you’re craving something warm, gooey, and utterly delicious but the thought of kneading dough by hand makes your arms ache just thinking about it? Yeah, me too. We’re all busy, or, let’s be honest, sometimes just plain lazy. And that’s okay! Because today, we’re unleashing the unsung hero of lazy baking: your bread machine. Get ready for **Bread Machine Cinnamon Rolls** that taste like they took all day but actually just require a bit of strategic button-pushing. You’re welcome.
Why This Recipe is Awesome
Let’s be real, who has time for a whole day of baking? Not us! This recipe is your ticket to bakery-level cinnamon rolls with minimal effort. Seriously, it’s so easy, your cat could probably do it (if it had opposable thumbs, obvs). What’s so great about it, you ask?
- **Hands-off Dough Making:** Your bread machine does all the heavy lifting – kneading, proofing, the whole shebang. You just dump ingredients in and walk away. Magic!
- **Fresh Rolls, Anytime:** Imagine waking up to the smell of warm cinnamon. No more sad, store-bought pastries. You’re a hero now.
- **Idiot-Proof:** Honestly, if I didn’t mess this up, you won’t either. The instructions are clear, the steps are minimal, and the reward is maximum.
Ingredients You’ll Need
Gather ’round, my fellow kitchen minimalists. Here’s what you’ll need to make your cinnamon roll dreams a reality. Nothing too fancy, just the good stuff.
For the Dough:
- 1 cup warm milk (about 105-115°F / 40-46°C – like a warm bath, not boiling!)
- 1/4 cup granulated sugar (the sweet stuff that feeds the yeast)
- 1 packet (2 1/4 teaspoons) active dry yeast (the magical puff-up-ers)
- 1/4 cup unsalted butter, melted (because everything’s better with butter, duh)
- 1 large egg (for richness and binding, makes them extra tender)
- 3 1/4 cups all-purpose flour (the base of all greatness)
- 1 teaspoon salt (just a pinch, don’t forget it!)
For the Filling:
- 1/2 cup unsalted butter, softened (room temp, not melted! This is key.)
- 3/4 cup packed light brown sugar (for that deep, molasses-y goodness)
- 2 tablespoons ground cinnamon (the real star of the show!)
For the Glaze:
- 1 1/2 cups powdered sugar (aka confectioners’ sugar, for silky smoothness)
- 2-3 tablespoons milk or cream (a splash, to get that perfect drizzle consistency)
- 1 teaspoon vanilla extract (because vanilla makes everything sing)
Step-by-Step Instructions
Alright, let’s get down to business. Follow these simple steps and you’ll be basking in cinnamon roll glory in no time.
- **Dough Time!** First things first, add your wet ingredients to your bread machine pan: warm milk, melted butter, and egg. Then, carefully add the dry ingredients on top: sugar, flour, and salt. Make a small well in the center of the flour (don’t let it touch the liquids yet!) and add the active dry yeast. Set your bread machine to the “Dough” cycle. Press start and let it do its thing.
- **Rise and Shine:** Once the dough cycle finishes (it usually takes about 1.5 – 2 hours), gently remove the dough from the machine. It should be soft, elastic, and ready to party. Lightly flour your clean counter or a large cutting board.
- **Roll It Out:** Place the dough on your floured surface and roll it out into a large rectangle, roughly 12×18 inches. Don’t stress too much about perfection here; it’s going to get rolled up anyway.
- **Fill ‘Er Up!** Spread the softened butter all over the dough, almost to the edges. In a small bowl, mix together the brown sugar and cinnamon. Sprinkle this delicious mixture generously over the buttered dough.
- **Roll It Tight:** Starting from one of the long edges, carefully roll the dough up tightly into a log. Once you reach the end, pinch the seam firmly to seal it shut.
- **Slice and Dice:** This is where the magic happens! Use a piece of unwaxed dental floss (seriously, try it!) or a very sharp knife to cut the log into 12 equal rolls. Aim for about 1 to 1.5 inches thick per roll.
- **Second Rise:** Lightly grease a 9×13 inch baking dish. Arrange your beautiful rolls in the dish, making sure they have a little breathing room. Cover the dish with a clean kitchen towel and let them rise in a warm spot for 30-45 minutes, or until they’re visibly puffy and almost doubled in size.
- **Bake ‘Em!** While your rolls are puffing up, preheat your oven to 375°F (190°C). Once preheated and the rolls have risen, pop them in the oven. Bake for 20-25 minutes, or until they’re golden brown and the centers are set. **Don’t overbake!**
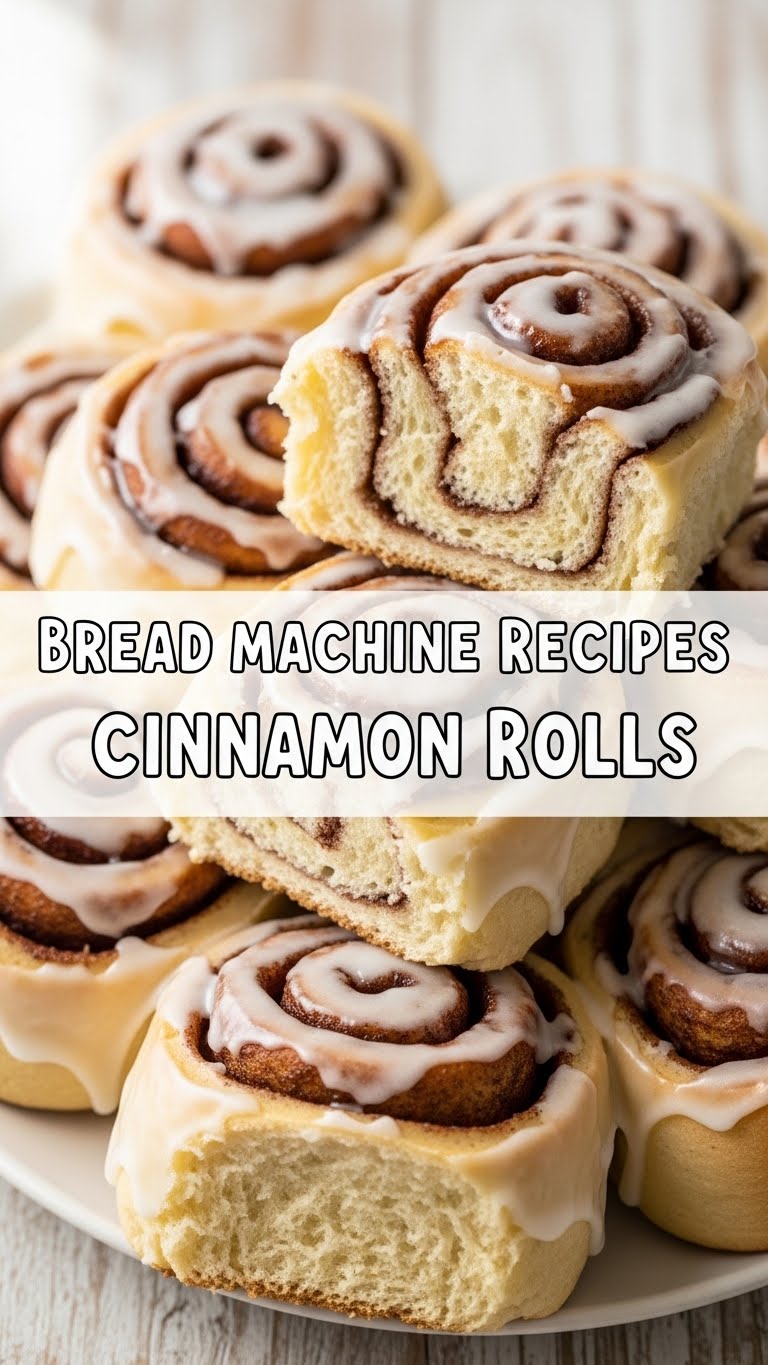
- **Glaze Away:** While the rolls are still warm (fresh out of the oven is best!), whisk together your powdered sugar, milk/cream, and vanilla extract for the glaze. If it’s too thick, add a tiny bit more milk; too thin, a dash more powdered sugar. Drizzle that dreamy glaze generously over the warm rolls. Serve immediately and prepare for compliments!
Common Mistakes to Avoid
Look, we all make mistakes. But with these insider tips, you won’t make *these* mistakes. You’re welcome.
- **Using hot milk for yeast:** You’ll kill the yeast, RIP. Use warm milk, like baby bathwater warm. Too cold, and it won’t activate. Too hot, and it’s game over.
- **Forgetting to scrape down the sides of the bread machine pan:** Sometimes flour or other ingredients hide in the corners, leading to lumpy or uneven dough. Give it a quick scrape during the first few minutes of mixing, if needed.
- **Over-flouring your surface:** Too much flour makes tough, dry rolls. A light dusting is all you need, my friend, when rolling out the dough.
- **Overbaking:** This is a cardinal sin! Dry rolls are a sad, sad sight. Pull them out when they’re golden, even if the center looks a *tad* soft. They’ll firm up as they cool.
- **Being impatient with the second rise:** Seriously, let them get puffy. It’s worth the wait for that incredibly fluffy, tender texture. Don’t rush perfection.
Alternatives & Substitutions
Feeling adventurous? Or just out of an ingredient? Here are some simple swaps and additions to customize your rolls.
- **Gluten-Free:** Can you use GF flour? Some bread machines handle it, but results can vary wildly. If you’re going GF, I’d suggest finding a recipe specifically designed for GF bread machine dough, as the ratios are different.
- **Dairy-Free:** Swap regular milk for your favorite unsweetened plant-based milk (almond, soy, oat work great) and use a high-quality dairy-free stick butter substitute. Just make sure your butter alternative is suitable for baking.
- **Nuts for Crunch:** Add chopped pecans or walnuts to the filling for an extra layer of texture and flavor. **Pro tip:** Toast them lightly first for maximum nuttiness!
- **Cream Cheese Frosting Upgrade:** For an even more decadent experience, ditch the simple glaze and whip up a cream cheese frosting. IMO, this is a game-changer. Just beat 4 oz softened cream cheese with 1/4 cup softened butter, 2 cups powdered sugar, and 1 teaspoon vanilla extract until smooth.
FAQ (Frequently Asked Questions)
Got questions? I’ve got (casual, humorous) answers!
- **Can I prepare these ahead of time?** Oh, absolutely! You can let the rolls do their second rise (step 7) in the fridge overnight. Just pull them out an hour or so before baking to come to room temperature while your oven preheats.
- **What if my dough is too sticky/dry?** Troubleshooting time! If it’s too sticky, add a *tiny* bit more flour (teaspoon by teaspoon). Too dry, add a *tiny* bit more milk or water. Your bread machine might need a little coaxing depending on humidity and altitude.
- **Can I freeze the baked cinnamon rolls?** You bet! Freeze them *without* the glaze. Once completely cool, wrap them tightly in plastic wrap and then foil. Reheat gently in the oven or microwave, then glaze fresh.
- **My rolls aren’t rising. What went wrong?** Most likely dead yeast. Check the expiry date on your yeast! Also, ensure your milk isn’t too hot (kills it) or too cold (doesn’t activate it). Yeast is sensitive, bless its little heart.
- **Why use dental floss to cut?** It’s a secret weapon! A knife can squish the rolls and mess up their pretty spirals, but floss gives a clean, perfect cut every time. Try it, you’ll feel like a pro.
- **Can I add more cinnamon?** Go wild! If you’re a cinnamon fiend, absolutely increase the amount in the filling to 3 tablespoons. Just don’t overdo it to the point of bitterness.
Final Thoughts
There you have it, folks! Warm, gooey, homemade cinnamon rolls with basically zero stress. Your kitchen will smell like a bakery, and your tummy will thank you. Now go impress someone—or yourself—with your new culinary skills. You’ve earned it (especially since the bread machine did most of the work, shhh!). Happy baking!


