Okay, confession time. You’re dreaming of warm, gooey, cinnamon-spiced goodness, but the thought of kneading dough for an hour makes you want to crawl back into bed? Been there, done that, bought the bread machine! If you’re anything like me – a lover of delicious things but a firm believer in the “work smarter, not harder” philosophy – then get ready for your new best friend. We’re talking **Bread Machine Cinnamon Rolls**, baby!
Why This Recipe is Awesome
Because it’s practically magic, that’s why! Seriously, your bread machine does all the heavy lifting – the mixing, the kneading, the first rise. You literally just dump stuff in, press a button, and *poof*, perfect dough. It’s so **idiot-proof**, even I haven’t managed to mess it up yet (and trust me, I’ve tried). This means less time scrubbing flour off every surface in your kitchen, and more time perfecting your “just-woke-up-like-this” hair while the house fills with the most incredible smell. Your neighbours might just try to break in, FYI.
Ingredients You’ll Need
Get ready to assemble your deliciousness arsenal!
- For the Dough:
- 1 cup warm milk: Not too hot, not too cold. Think a comfy bath temperature for yeast.
- 1 large egg: Room temp is best, it just plays nicer.
- 1/4 cup unsalted butter: Melted and slightly cooled. Because butter makes everything better, duh.
- 1/4 cup granulated sugar: Sweetens the deal.
- 1 teaspoon salt: Balances all that sweetness. Crucial!
- 3 cups all-purpose flour: The main event!
- 2 1/4 teaspoons active dry yeast: Or one packet. The little guys that make all the magic happen. Make sure it’s not expired unless you like flat disappointment.
- For the Filling:
- 1/2 cup unsalted butter: Softened. Again with the butter, because we’re not messing around here.
- 1 cup packed light brown sugar: The sticky, sweet hero of cinnamon rolls.
- 2 tablespoons ground cinnamon: Don’t skimp! This is why we’re all here.
- For the Cream Cheese Icing:
- 4 oz cream cheese: Softened. Full-fat, please, for maximum decadence.
- 1/4 cup unsalted butter: Softened. You know the drill.
- 2 cups powdered sugar: Sifted, if you’re feeling fancy and want to avoid lumps.
- 1/2 teaspoon vanilla extract: A splash of warmth.
- 1-2 tablespoons milk or heavy cream: To get that perfect drizzly consistency.
Step-by-Step Instructions
- Into the Bread Machine They Go! Add the dough ingredients to your bread machine pan in the order recommended by your machine’s manufacturer (usually liquids first, then dry, then yeast on top). Most machines go: milk, egg, melted butter, sugar, salt, flour, then yeast.
- Let the Machine Do Its Thing. Select the “Dough” or “Dough Cycle” setting and press start. Now go binge-watch something or take a nap. It’ll take about 1.5 to 2 hours.
- Prep Your Workspace. Once the cycle finishes, gently remove the dough from the machine. Lightly flour a clean surface (your counter is fine!) and your rolling pin.
- Roll It Out! Roll the dough into a large rectangle, roughly 12×18 inches. Aim for an even thickness, about 1/4 inch.
- Spread the Love (and Butter). In a small bowl, mix the softened butter, brown sugar, and cinnamon for the filling until it forms a paste. Evenly spread this glorious mixture all over the dough, leaving about a 1/2-inch border on one of the long edges.
- Roll ‘Em Up! Starting from the long edge opposite the border, carefully roll the dough into a tight log. Pinch the seam closed to seal.
- Slice and Dice. Using a sharp knife or, even better, unflavored dental floss (seriously, it cuts so clean!), slice the log into 12 equal pieces, about 1 1/2 inches thick.
- Arrange and Rise (Again!). Grease a 9×13 inch baking pan. Place the rolls cut-side down in the pan, leaving a little space between each. Cover the pan loosely with plastic wrap or a clean kitchen towel. Let them rise in a warm place for another 30-45 minutes, or until they look puffy and have nearly doubled in size.
- Preheat and Bake. While the rolls are doing their second rise, preheat your oven to 375°F (190°C). Once risen, pop the pan into the preheated oven and bake for 20-25 minutes, or until golden brown and cooked through.
- Whip Up the Icing. While the rolls are baking, combine the softened cream cheese, butter, powdered sugar, vanilla, and 1 tablespoon of milk/cream in a medium bowl. Beat with an electric mixer until smooth and creamy. Add more milk/cream a teaspoon at a time if you want a thinner icing.
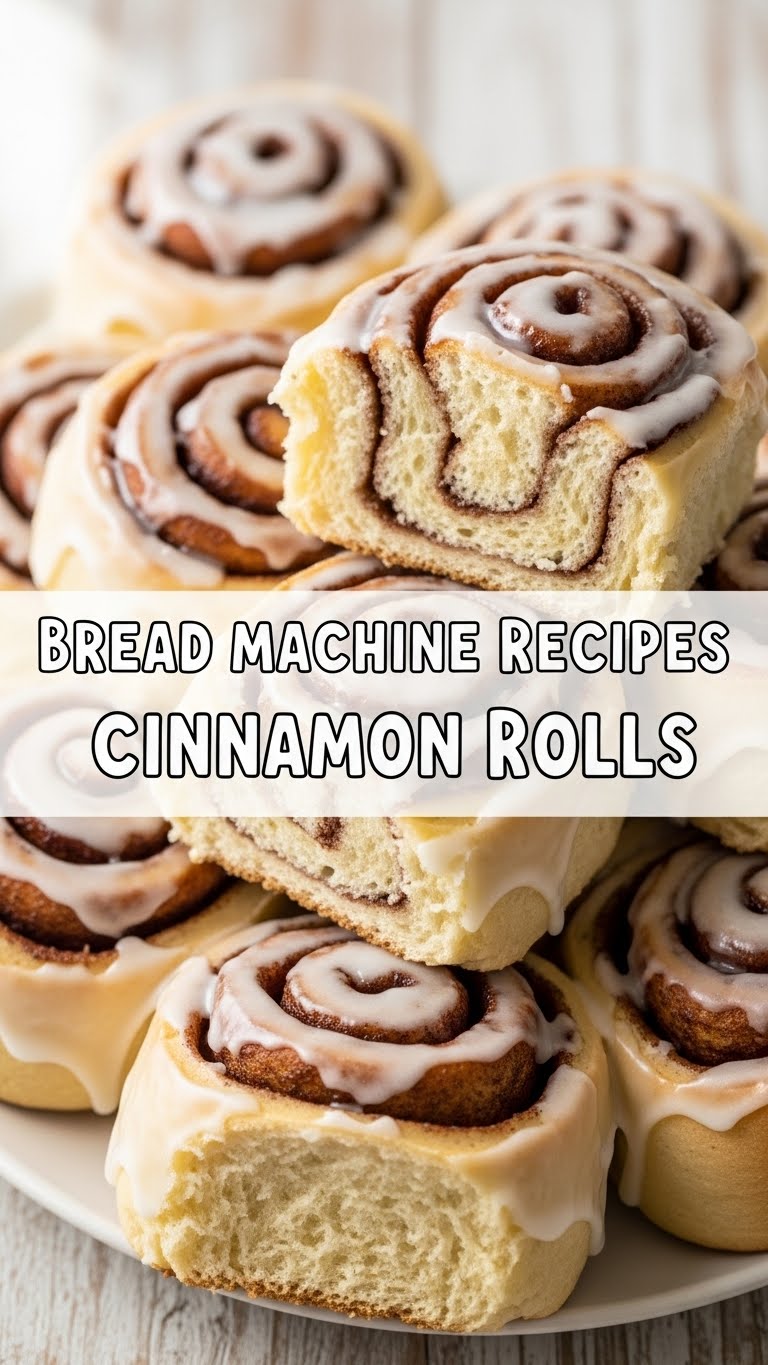
- Ice ‘Em While They’re Warm. As soon as the rolls come out of the oven, generously spread or drizzle that luscious cream cheese icing all over them. Don’t wait too long; the warmth helps the icing melt into every nook and cranny.
Common Mistakes to Avoid
- Old Yeast Syndrome: Using expired yeast is like inviting a sleepy sloth to a race. It’s just not gonna work. **Always check your yeast’s expiry date!**
- Ignoring Liquid Temperature: If your milk is too hot, you’ll kill the yeast. Too cold, and they won’t activate. Think Goldilocks: just right (lukewarm).
- Over-flouring Your Dough: Resist the urge to add more flour unless the dough is *seriously* sticky. Too much flour makes dry, tough rolls. No one wants that.
- The Oven Guessing Game: Thinking you don’t need to preheat the oven? Rookie mistake! **A properly preheated oven is key for even baking.**
- Under-proofing: Rushing the second rise means dense, sad rolls. Give them their time to puff up and get happy.
- Waiting for Icing: Don’t let the rolls cool completely before icing! The warm rolls slightly melt the icing, making it perfectly gooey and irresistible.
Alternatives & Substitutions
Feel free to get creative, my friend!
- Dairy-Free? Swap regular milk for unsweetened almond or soy milk, and use a good quality plant-based butter (like Miyoko’s or Earth Balance) for both the dough and filling/icing.
- Spice It Up: Add a pinch of nutmeg or cardamom to your cinnamon filling for an extra layer of warmth and complexity. Divine, IMO.
- Add-ins: Fold in some chopped pecans, walnuts, or even raisins/cranberries into your filling for extra texture and chewiness.
- No Cream Cheese Icing? If you’re not a fan, just make a simple glaze with powdered sugar, a little milk, and vanilla extract. Still delicious!
FAQ (Frequently Asked Questions)
- Can I use margarine instead of butter? Well, technically yes, but why hurt your soul like that? Butter just tastes better and gives a richer flavor. If you *must*, make sure it’s good quality.
- My dough isn’t rising! What gives? Usually, it’s either dead yeast (see “Common Mistakes”) or your liquid was too hot/cold. Check your yeast, and ensure your milk is truly lukewarm.
- Can I make these ahead of time? Absolutely! After placing the sliced rolls in the baking pan (step 8), cover tightly and refrigerate overnight. In the morning, pull them out, let them come to room temp and proof for about an hour before baking as usual.
- How do I store leftover cinnamon rolls? Pop them in an airtight container at room temperature for a day or two, or in the fridge for up to 5 days. Reheat briefly in the microwave for that fresh-baked feel.
- Can I freeze them? Yes! You can freeze the baked and iced rolls (individually wrapped) for up to 2 months. Thaw at room temperature and reheat. You can also freeze the unbaked rolls after the second rise. Place them in the pan, freeze, then transfer frozen rolls to a freezer bag. When ready to bake, place frozen rolls in a greased pan, cover, and let them thaw and rise at room temperature for several hours before baking.
- What if I don’t have a bread machine? You’re in for a good arm workout! You’d knead the dough by hand or with a stand mixer until smooth and elastic, then follow the rest of the steps. But hey, this article is for bread machine lovers!
Final Thoughts
There you have it! Delicious, homemade cinnamon rolls, with about 80% less effort than the “traditional” way. Your house smells amazing, your tummy is happy, and you barely broke a sweat. Now go impress someone – or yourself, which is arguably more important – with your new culinary skills. You’ve earned it! Maybe share one… or five. Enjoy, my friend!


