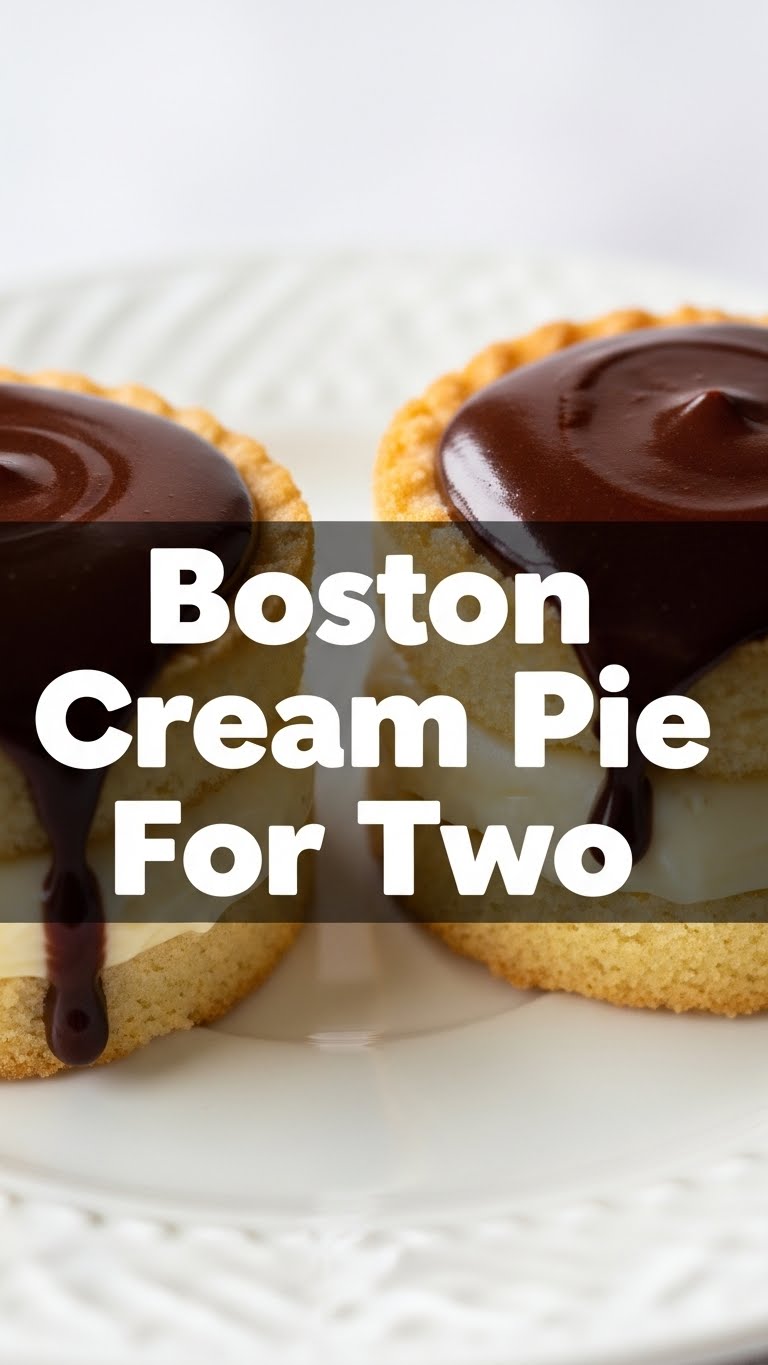
So you’re craving something tasty but too lazy to spend forever in the kitchen, huh? Same, friend, same. We’ve all been there: that sudden, undeniable urge for something utterly decadent, but the thought of wrestling with a full-sized cake that’ll haunt your fridge (and your waistline) for a week? Nah, not today. That’s where our tiny, mighty hero swoops in: **Boston Cream Pie For Two**. Get ready to impress yourself (or your equally hungry significant other) without breaking a sweat, I promise.
Why This Recipe is Awesome
Okay, let’s be real. Making a full-sized Boston Cream Pie is a commitment. A delicious, but frankly, *intense* commitment. But this version? It’s like the universe heard our tiny dessert prayers and delivered. This recipe is **idiot-proof** – and trust me, if I can nail it without setting off the smoke detectors, so can you. It’s perfectly portioned, meaning no awkward leftovers giving you the side-eye every time you open the fridge. Plus, it looks fancy AF, but requires minimal effort. It’s basically a magic trick for your tastebuds, allowing you to indulge in creamy, dreamy goodness without the post-baking remorse. You get all the classic flavors packed into a cute, personal-sized treat. What’s not to love?
Ingredients You’ll Need
Gather ’round, buttercup! Here’s what you’ll need for your mini masterpiece. Don’t worry, nothing too exotic here.
- **For the adorable little cakes:**
- 1/2 cup all-purpose flour (the basic stuff, no fancy flours needed)
- 1/4 cup granulated sugar (sweetness! yay!)
- 1/2 tsp baking powder (our little lift-off agent)
- Pinch of salt (it makes everything taste better, seriously)
- 1/4 cup milk (any kind works, even almond if you’re feeling adventurous)
- 2 tbsp vegetable oil (or any neutral oil you have lurking)
- 1/2 tsp vanilla extract (the MVP of flavor, don’t skimp!)
- **For the luscious pastry cream:**
- 1 large egg yolk (save the white for an omelet, or just, you know, discard it)
- 2 tbsp granulated sugar (more sweetness, because why not?)
- 1 tbsp cornstarch (our thickening superstar)
- 1/2 cup milk (full fat is best for creaminess, IMO)
- 1/2 tsp vanilla extract (again, don’t be shy)
- **For the shiny chocolate glaze:**
- 1/4 cup semi-sweet chocolate chips (the melty good stuff)
- 1 tbsp heavy cream (or milk, for a slightly thinner glaze)
- 1 tsp butter (for that extra shine and silky texture)
Step-by-Step Instructions
Alright, apron on, game face ready! Let’s get baking!
- **Prep for Success:** Preheat your oven to **350°F (175°C)**. Grease and flour two small 4-inch cake pans, or line a muffin tin with two paper liners if you’re going super mini.
- **Whisk the Dry Bits:** In a small bowl, whisk together the flour, sugar, baking powder, and salt. Make sure there are no lumpy surprises!
- **Wet it Up:** In another small bowl, mix the milk, oil, and vanilla extract.
- **Combine & Bake:** Pour the wet ingredients into the dry ingredients and mix until *just* combined. Don’t overmix, or your cakes will be tough—nobody wants a tough cake! Divide the batter evenly between your prepared pans/liners. Bake for **15-20 minutes**, or until a toothpick inserted into the center comes out clean. Let them cool in the pans for 5 minutes, then transfer to a wire rack to cool completely.
- **Cream Dream Prep:** While the cakes cool, let’s make that glorious pastry cream! In a small saucepan, whisk together the egg yolk, sugar, and cornstarch until smooth.
- **Heat the Milk & Thicken:** Gradually whisk in the milk. Place the saucepan over medium heat, whisking constantly, until the mixture thickens and comes to a gentle boil. It’ll get nice and gloopy! Remove from heat, stir in the vanilla extract, and transfer to a small bowl. Cover with plastic wrap directly on the surface of the cream to prevent a “skin” from forming. Chill in the fridge for at least 30 minutes, or until completely cool.
- **Glaze Glory:** Once everything is cool, it’s time for the chocolate magic. In a small microwave-safe bowl, combine the chocolate chips, heavy cream, and butter. Microwave in 15-second intervals, stirring after each, until smooth and glossy. Be patient!
- **Assemble Your Masterpiece:** Once the cakes are completely cool (this is important!), slice each cake horizontally in half. Place the bottom half of one cake on a plate. Spread half of the chilled pastry cream over it, then top with the other cake half. Repeat with the second cake.
- **Drizzle & Devour:** Spoon the warm chocolate glaze over the top of each assembled cake, letting it drip down the sides for that classic look. Let the glaze set for a few minutes. Now, go impress someone—or yourself—with your new culinary skills. You’ve earned it!
Common Mistakes to Avoid
Even though this recipe is chill, there are a few rookie errors to sidestep. Learn from my past kitchen mishaps, my friend!
- **Overmixing the Cake Batter:** Seriously, once the wet and dry ingredients just come together, STOP. Mixing too much develops the gluten, making your cake dense and chewy instead of light and fluffy. It’s like trying to make a fluffy cloud into a brick.
- **Not Chilling the Pastry Cream:** You *need* that cream to be cold before assembly. Trying to spread warm cream on your cakes will result in a messy, slidy disaster. Patience is a virtue here, my friend.
- **Scorching the Pastry Cream:** Keep whisking it on the stove! If you walk away, it’ll stick to the bottom and burn, giving you lumpy, burnt-tasting cream. Nobody wants that.
- **Applying Glaze to Warm Cake:** The glaze will melt right off! Ensure your cake is completely cool before glazing. It’s like trying to put sunscreen on a melting snowman.
- **Thinking you don’t need to preheat the oven:** Rookie mistake! An un-preheated oven is like trying to run a marathon without warming up. Your cake won’t rise properly or bake evenly.
Alternatives & Substitutions
Feeling creative? Or maybe your pantry is looking a little sparse? No worries, we’ve got options!
- **The Cake:** If you’re truly in a rush (or just feeling extra lazy, no judgment!), you could use a yellow cake mix. Just follow the box directions for a small batch, or bake into a few cupcakes and slice those. It won’t be *exactly* the same, but it’ll be delicious.
- **The Pastry Cream:** Don’t have cornstarch? All-purpose flour can work as a thickener, but cornstarch gives a smoother, clearer finish. For a super-duper shortcut, you *could* try instant vanilla pudding, but frankly, making the cream from scratch is half the fun and tastes way better. Your soul deserves better than instant pudding, FYI.
- **The Glaze:** Not a fan of semi-sweet? Milk chocolate works too, though it’ll be sweeter. Or, if you’re out of heavy cream, a splash of milk will do the trick, though the glaze might be a tad thinner. No butter? It’s fine, but the butter adds a lovely gloss and richness.
- **Flavor Fun:** Want to spice things up? Add a tiny pinch of espresso powder to your chocolate glaze for a mocha kick. Or, swap out vanilla extract for almond extract in the cake or cream for a different vibe.
FAQ (Frequently Asked Questions)
Got questions? I’ve got (casual and humorous) answers!
- **”Can I make this ahead of time?”** Absolutely! You can bake the cakes and make the pastry cream a day in advance. Store the cakes airtight at room temp, and the cream covered tightly in the fridge. Assemble and glaze just before serving for the best results.
- **”My pastry cream is lumpy, help!”** Did you whisk constantly? If it’s just a *little* lumpy, a quick blitz with an immersion blender or pushing it through a fine-mesh sieve will smooth things out. If it’s a total curdled mess, well, time to start over, buttercup.
- **”Can I use margarine instead of butter?”** Well, technically yes, but why hurt your soul like that? Butter just tastes better and gives a richer flavor. Treat yourself!
- **”How long do these mini pies last?”** Since they contain dairy cream, store them in an airtight container in the fridge for up to 2-3 days. They’re best enjoyed fresh, though, because, duh.
- **”What if I don’t have small cake pans?”** No worries! You can bake the batter in two regular-sized muffin cups (just fill them about halfway). The baking time might be slightly less, so keep an eye on them!
- **”I don’t have chocolate chips, can I use a chocolate bar?”** Yep! Just chop it up finely so it melts evenly. A good quality chocolate bar will make your glaze extra special.
Final Thoughts
And there you have it! A perfectly sized, utterly delicious Boston Cream Pie that won’t leave you with a week’s worth of leftovers or a kitchen looking like a disaster zone. This little beauty is proof that great things (and great desserts) come in small packages. So go on, whip up this treat, enjoy every single bite, and bask in the glory of your culinary prowess. You deserve it! Now go impress someone—or yourself—with your new culinary skills. You’ve earned it!

