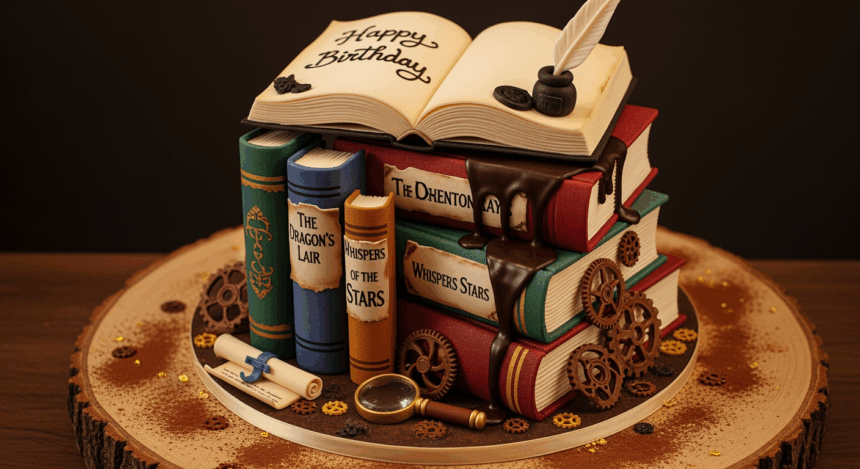
Alright, bookworms and baking enthusiasts! Ever wanted to literally eat your words? Well, today’s your lucky day! We’re making a book-themed cake that’s so gorgeous, you’ll want to Instagram it before anyone takes a bite (and they will want to take a bite). This literary masterpiece isn’t just pretty—it’s a page-turner of flavors that’ll have everyone asking for the sequel!
Why This Recipe is Awesome
Let’s be real—this cake is basically the Hemingway of desserts: simple yet profound. First off, it looks complicated enough to impress your friends, but the secret? It’s actually pretty straightforward (don’t worry, I won’t tell). Plus, it combines two of humanity’s greatest inventions: books and chocolate. What’s not to love? And unlike that novel you’ve been “about to finish” for months, this project you’ll actually complete in one sitting!
Bonus points: You can customize it to look like any book cover you want. Harry Potter fan? Done. Pride and Prejudice enthusiast? You got it. Fifty Shades of Grey? Well… maybe make that one for close friends only.
Ingredients You’ll Need
For the cake:
- 2 boxes of vanilla cake mix (because life’s too short to measure flour)
- 6 eggs (the chicken’s contribution to literature)
- 1 cup vegetable oil (or canola if you’re feeling fancy)
- 2 cups water (tap is fine, no need to get Fiji for this)
- 1 tablespoon vanilla extract (the real stuff, not that imitation nonsense)
For the frosting:
- 4 cups buttercream frosting (store-bought or homemade if you’re an overachiever)
- Food coloring of choice (to match your book theme)
- 1 pound fondant (for the book cover—yes, it tastes meh, but it looks amazing)
For the chocolate decorations:
- 8 oz semi-sweet chocolate (the darker, the more sophisticated your “book” will seem)
- Parchment paper (your artist’s canvas)
- Small piping bag (or ziplock bag if you’re in a pinch)
- Edible gold dust (optional, but makes you feel like King Midas)
Step-by-Step Instructions
- Prep your literary foundation. Preheat oven to 350°F (or whatever your cake mix demands). Grease and line two 9×13 inch pans with parchment paper.
- Mix your cake batter. Combine cake mix, eggs, oil, water, and vanilla in a large bowl. Beat until smooth but don’t overdo it—this isn’t an arm workout.
- Bake those babies. Pour batter evenly between pans and bake for 25-30 minutes or until a toothpick comes out clean. Let them cool completely. Seriously, COMPLETELY. Impatience here leads to frosting landslides.
- Shape your book. Stack the cooled cakes with a layer of buttercream between them. Then carve into a rectangular book shape. Save the scraps for snacking—I mean, “quality testing.”
- Crumb coat time! Spread a thin layer of buttercream all over your cake and chill for 30 minutes. This is like the primer before painting your masterpiece.
- Cover with fondant. Roll out fondant to about 1/4 inch thickness and carefully drape over your cake. Smooth it down gently and trim excess. Now it’s starting to look like a book!
- Add book details. Use a knife to gently score lines for pages on the sides. Create a “spine” effect by adding a fondant strip down one side.
- Make chocolate decorations. Melt chocolate in the microwave in 30-second intervals. Pour into piping bag and create book-themed designs on parchment paper: tiny books, reading glasses, bookmarks, or letters. Let harden completely.
- Decorate your “cover.” Use colored buttercream to write the title or create design elements. Carefully place your chocolate decorations. Brush with edible gold dust if you’re feeling extra.
- Final touches. Add any remaining details with piping gel or edible markers. Take approximately 47 photos for social media before anyone’s allowed to touch it.
Common Mistakes to Avoid
Rushing the cooling process. Nothing ruins a book cake faster than melting frosting. Patience, grasshopper.
Forgetting to crumb coat. Skipping this step is like forgetting punctuation in a novel—technically you can, but why would you do that to yourself?
Over-handling the fondant. This stuff gets cranky with too much manhandling. Work quickly and decisively, like editing a first draft.
Making chocolate decorations too thin. They’ll break faster than your resolution to read more classics. Keep them sturdy.
Going overboard with details. Remember, it’s a cake interpretation of a book, not an exact replica of War and Peace. Keep it simple enough to actually finish in this lifetime.
Alternatives & Substitutions
Not a vanilla fan? Any cake flavor works here. Chocolate for a mysterious thriller, red velvet for romance novels, lemon for summer beach reads—you get the picture.
Fondant haters unite! If you’re in the “fondant tastes like sweetened cardboard” camp (fair), use a smooth buttercream finish instead. It won’t be quite as crisp-looking, but it’ll taste way better.
No piping bag? A ziplock with the corner snipped off works in a pinch. It’s the literary equivalent of reading on your phone instead of a hardcover—gets the job done!
Gluten-free option: Use GF cake mix for your celiac bookworm friends. The decorating process stays exactly the same.
Short on time? Buy a plain sheet cake from the store and just add the decorative elements. I won’t tell if you don’t. Consider it the “Cliff’s Notes” version.
FAQ (Frequently Asked Questions)
How far in advance can I make this cake?
The cake itself can be made 1-2 days ahead, but add the chocolate decorations the same day you’re serving. Otherwise, they might get soggy and that’s a plot twist nobody wants.
Can I make a multi-volume book stack?
Ambitious, aren’t we? Absolutely! Just make more cake layers and stack them with dowels for support. It’s like a book series—each one needs to stand on its own, but also work together.
What if my fondant keeps tearing?
Is it too dry? Add a tiny bit of shortening. Too sticky? Dust with powdered sugar. Fondant is like that one friend who needs perfect conditions or they complain the whole time.
Do I really need special tools for this?
Nope! While fancy fondant tools exist, a pizza cutter, ruler, and butter knife can get you surprisingly far. MacGyver would be proud.
Can I use white chocolate instead?
Sure thing! White chocolate makes for great “paper” effects. Just know it’s more temperamental to work with. Like that one author who keeps missing deadlines but writes brilliantly when they finally deliver. (Looking at you, George R.R. Martin.)
How do I transport this masterpiece?
Very carefully! A cake carrier with a flat bottom works best. If you don’t have one, use a sturdy cardboard base and keep it level. And maybe don’t take speed bumps at 40mph.
Final Thoughts
There you have it—a cake that celebrates the joy of reading in the most delicious way possible! Whether you’re making it for a book club meeting, a librarian’s birthday, or just because you finished reading something other than your Twitter feed, this bookish treat is sure to be a bestseller.
The best part? Unlike that 800-page Russian novel on your nightstand, you’ll definitely finish this project. And even if your decorating skills are more “first draft” than “final edit,” remember that it’s going to get devoured anyway. So channel your inner literary genius, embrace the chocolate-covered chaos, and create a cake worth bookmarking!
Now go forth and bake something worth writing home about. Your Instagram feed (and your taste buds) will thank you!
