Hey, you! Ever scrolled through Instagram and thought, “Ugh, I wish I could make something *that* cute without, you know, actually trying too hard?” Same, friend, same. Especially when it comes to those adorable bento box cakes that look like they’ve been handcrafted by tiny, magical baking elves. Well, guess what? Today, we’re making one that’s not only ridiculously pretty (hello, blue!) but also so easy, you’ll wonder why you ever bought those overpriced café slices. No need for wizardry, just some basic kitchen moves and a dash of playful rebellion against boring desserts.
Why This Recipe is Awesome
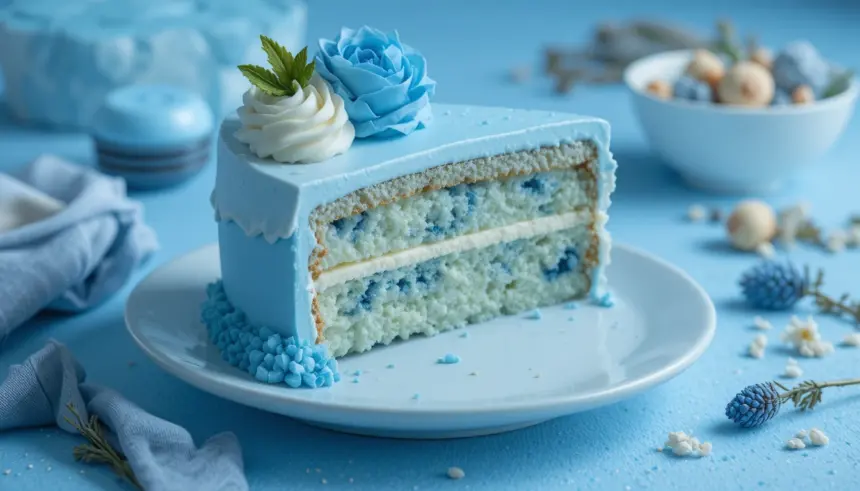
Okay, so why *this* recipe, you ask? Well, for starters, it’s a **bento cake**. That means it’s perfectly tiny, designed for one (or maybe two if you’re feeling incredibly generous, but honestly, why share pure joy?). No giant cake disasters to hide under a pile of sprinkles! Plus, it’s blue. Like, ocean-deep, sky-high, “I’m feeling fabulous” blue. It’s a literal mood booster on a plate. It’s also **surprisingly simple**. I’m talking “even-my-cat-could-probably-do-this-if-she-had-opposable-thumbs” simple. Less cleanup, less stress, and maximum aesthetic points. Win-win-win, if you ask me. Plus, it’s a tiny cake, so it’s basically portion control, right? (Don’t judge if you eat the whole thing. I won’t.)
Ingredients You’ll Need
Gather ’round, fellow kitchen adventurer! Here’s what you’ll need to transform into a bento cake master. Don’t sweat it; most of these are probably chilling in your pantry already.
- All-Purpose Flour: 1 cup. The foundational magic dust.
- Granulated Sugar: 1/2 cup. For that sweet, sweet joy.
- Baking Powder: 1 teaspoon. Our little lift-off specialist.
- Salt: 1/4 teaspoon. Just a pinch, because balance, right?
- Milk: 1/2 cup (any kind, even oat if you’re feeling fancy). For moisture and good vibes.
- Vegetable Oil or Melted Unsalted Butter: 1/4 cup. For maximum moistness, because dry cakes are a culinary crime.
- Vanilla Extract: 1 teaspoon. The MVP of flavor, don’t skip it!
- Large Egg: 1. The binder of dreams.
- Blue Gel Food Coloring: A few drops. The star of our show! **Gel works best**, FYI, for vibrant color without messing up consistency.
For the Easy Peasy Buttercream Frosting:
- Unsalted Butter: 1/2 cup (1 stick), softened. We control the salt around here!
- Powdered Sugar (Confectioners’ Sugar): 2 cups. For that smooth, sweet frosting. Sift it if you’re feeling ambitious and hate lumps.
- Milk or Cream: 1-2 tablespoons. To get that perfect spreadable consistency.
- Vanilla Extract: 1/2 teaspoon. More flavor, baby!
- Blue Gel Food Coloring: A few more drops. To match our cake, obvs.
Step-by-Step Instructions
Alright, apron on, game face on (or just your comfy pajamas, no judgment here!). Let’s bake this beauty.
- Prep Your Stage: Preheat your oven to 350°F (175°C). Lightly grease and flour a 4-inch round cake pan (or two if you want thinner layers and have ’em) or even a few muffin cups if you’re improvising. Line the bottom with parchment paper if you’re extra.
- Whisk the Dry Stuff: In a medium bowl, whisk together your flour, sugar, baking powder, and salt. Give it a good swish to make sure everything’s evenly distributed.
- Mix the Wet Stuff: In a separate bowl, whisk together the milk, oil (or melted butter), vanilla extract, and the egg. It’s like a liquid flavor party!
- Combine & Color: Pour the wet ingredients into the dry ingredients. Stir just until combined – don’t overmix! A few lumps are totally fine, even desirable. Then, add a few drops of your blue gel food coloring until you reach your desired “wow, that’s blue!” shade.
- Bake Time! Pour your gorgeous blue batter into your prepared pan(s). Bake for about 20-25 minutes for a 4-inch pan, or 15-20 minutes for muffin cups. A toothpick inserted into the center should come out clean.
- Cool Down: Let the cake cool in the pan for about 10 minutes before gently inverting it onto a wire rack to cool completely. This is crucial! **Don’t rush it.**
- Frosting Frenzy: While your cake is chilling, make the frosting. In a medium bowl, beat the softened butter with an electric mixer until light and fluffy (about 2 minutes). Gradually add the powdered sugar, one cup at a time, mixing until smooth. Beat in the vanilla and 1 tablespoon of milk/cream. If it’s too thick, add the second tablespoon of milk/cream, a little at a time, until it’s spreadable. Finally, add your blue gel food coloring until it matches your cake’s vibe or goes even bolder!
- Decorate! Once the cake is COMPLETELY cool (I mean it!), slice it into two layers horizontally if you baked one thick cake. Spread frosting between the layers, then frost the top and sides. Get creative with sprinkles, edible glitter, or tiny candies if you’re feeling extra. Put it in a cute bento box for presentation!
Common Mistakes to Avoid
We all make mistakes, darling. But some are easily avoided, especially when armed with a bit of foresight and a pinch of sarcasm. Listen up:
- Thinking you don’t need to preheat the oven: Rookie mistake. It’s not a suggestion, it’s a command for even baking.
- Overmixing the batter: This is how you get a tough, rubbery cake. Stop stirring once everything is just combined. Lumps are your friends here!
- Not using gel food coloring: Liquid food coloring will dilute your batter and won’t give you that vibrant, Instagram-worthy blue without a lot of it. Gel is the way to go, trust me.
- Frosting a warm cake: Seriously, don’t do it unless you want a blue, soupy mess instead of a beautifully frosted cake. **Patience, young padawan!**
- Underbaking (or overbaking): Keep an eye on that toothpick! Too gooey and it’s raw; too dry and it’s a crumbly desert.
Alternatives & Substitutions
Feeling a little rebellious? Want to put your own spin on it? I support that! Here are a few ideas:
- Color Swap: Not feeling blue? Go pink, purple, green, or even rainbow swirls! It’s your cake, your rules.
- Flavor Fiesta: Swap vanilla extract for almond, lemon, or even a dash of mint extract in the cake or frosting. Lemon cake with blue frosting? Divine!
- Dairy-Free Delight: Use plant-based milk and a good dairy-free butter alternative for a vegan-friendly version.
- Cream Cheese Frosting: If you prefer a tangier frosting, swap out some of the butter for softened cream cheese in your buttercream recipe. Oh. My. Goodness.
- Box Mix Hack (Shhh!): Super lazy? Use a small portion of a white cake box mix and just add blue food coloring. I won’t tell anyone. It’s our little secret.
FAQ (Frequently Asked Questions)
Got questions? I’ve got (casual, humorous) answers!
- Can I use margarine instead of butter in the frosting? Well, technically yes, but why hurt your soul like that? Butter just tastes better, IMO.
- How long does this tiny masterpiece last? Kept in an airtight container in the fridge, it’ll be good for 3-4 days. But let’s be real, it won’t last that long.
- My cake pan is bigger than 4 inches, what do I do? You can definitely use a slightly larger pan (like 6-inch) but your cake will be thinner, or you might need to increase the recipe by 1.5x. Adjust baking time accordingly!
- Can I make it less sweet? You can slightly reduce the sugar in both the cake and frosting. I’d start by cutting about 1/4 cup from the frosting sugar and 1-2 tablespoons from the cake sugar.
- Why is it called a “bento” cake? Because it’s small, perfectly proportioned, and often presented in a cute little takeaway box, just like a bento lunch! It’s all about the aesthetic, my friend.
- Can I add sprinkles *before* baking? Nah, they’ll just melt or sink. Sprinkles are for post-bake glory, always!
Final Thoughts
And there you have it! Your very own, incredibly adorable, blue bento cake. You made something beautiful, and honestly, that’s a win in my book. Whether you’re making it for yourself, a friend, or just to prove you can, know that you just leveled up your baking game without breaking a sweat (too much, anyway). Now go impress someone—or yourself—with your new culinary skills. You’ve earned it! Go on, treat yourself. You deserve a little blue moment of joy.

