So, You’re Craving Something Sweet but Also… Kinda Lazy? Same.
Let’s be real. We all have those moments. You want that warm, comforting hug of a dessert, maybe a cobbler, but the thought of peeling a million apples and making dough from scratch? Yeah, no thanks. Not today, Satan. Today, we’re embracing the beautiful, glorious, time-saving magic that is Bisquick, a can of pie filling, and a dream. Get ready to whip up a Bisquick Apple Cobbler that’s so ridiculously easy, you’ll wonder why you ever bothered with anything else. Your taste buds (and your couch-potato self) will thank you.
Why This Recipe is Awesome (Beyond Belief)
Okay, buckle up, because this isn’t just a recipe; it’s a life hack. Here’s why this Bisquick Apple Cobbler is about to become your new best friend:
- It’s Idiot-Proof: Seriously. If you can measure and stir, you can make this. I even managed it, and my baking skills usually involve calling the pizza place.
- Speed Demon: From zero to oven in about 10 minutes. Yes, you read that right. Ten. Minutes. Perfect for last-minute cravings or surprise guests who don’t know you’re a culinary fraud.
- Minimal Mess: We’re talking one bowl, one baking dish. Less cleanup means more time for eating said cobbler and watching Netflix. Priorities, people.
- Pure Comfort: It tastes like your grandma spent all day making it, but without any of the actual effort. It’s warm, gooey, sweet, and just feels like a hug from the inside.
Ingredients You’ll Need (The Non-Fussy List)
Gather your troops! This is a short, sweet, and to-the-point list:
- 1 stick (1/2 cup) unsalted butter: Because everything’s better with butter, duh.
- 1 cup Bisquick baking mix: Your trusty sidekick. The real hero of this story, IMO.
- 1 cup granulated sugar: For that sweet, sweet goodness.
- 1 cup milk: Any kind works, but whole milk gives it that extra lusciousness.
- 1 (21-ounce) can apple pie filling: The pre-made, glorious kind. Don’t even think about fresh apples unless you want to complicate things (which we don’t!).
- Optional: A sprinkle of cinnamon or nutmeg for that extra “oomph!”
Step-by-Step Instructions (It’s So Easy, It’s Almost Cheating)
Alright, chef, let’s get cooking! (Or, you know, assembling and baking.)
- Preheat your oven to 375°F (190°C). Don’t skip this, seriously. A cold oven is a sad oven.
- Melt the butter. Grab a 9×13 inch baking dish (or an 8×8 if you’re halving it) and toss that stick of butter in. Pop it in the preheating oven for a few minutes until it’s completely melted. Keep an eye on it so it doesn’t burn!
- Mix the dry, then the wet. In a medium bowl, whisk together the Bisquick and the sugar. Once combined, pour in the milk and stir until just combined. A few lumps are totally fine; don’t overmix it, or you’ll end up with tough cobbler (and who wants that?).
- Pour it over the butter. Carefully remove the hot dish with the melted butter from the oven. Pour the Bisquick batter directly over the melted butter. Do NOT stir. I repeat, resist the urge to stir!
- Dollop the apple magic. Spoon the entire can of apple pie filling over the Bisquick batter. Again, do NOT stir. The magic happens in layers. If you’re feeling fancy, sprinkle with cinnamon now.
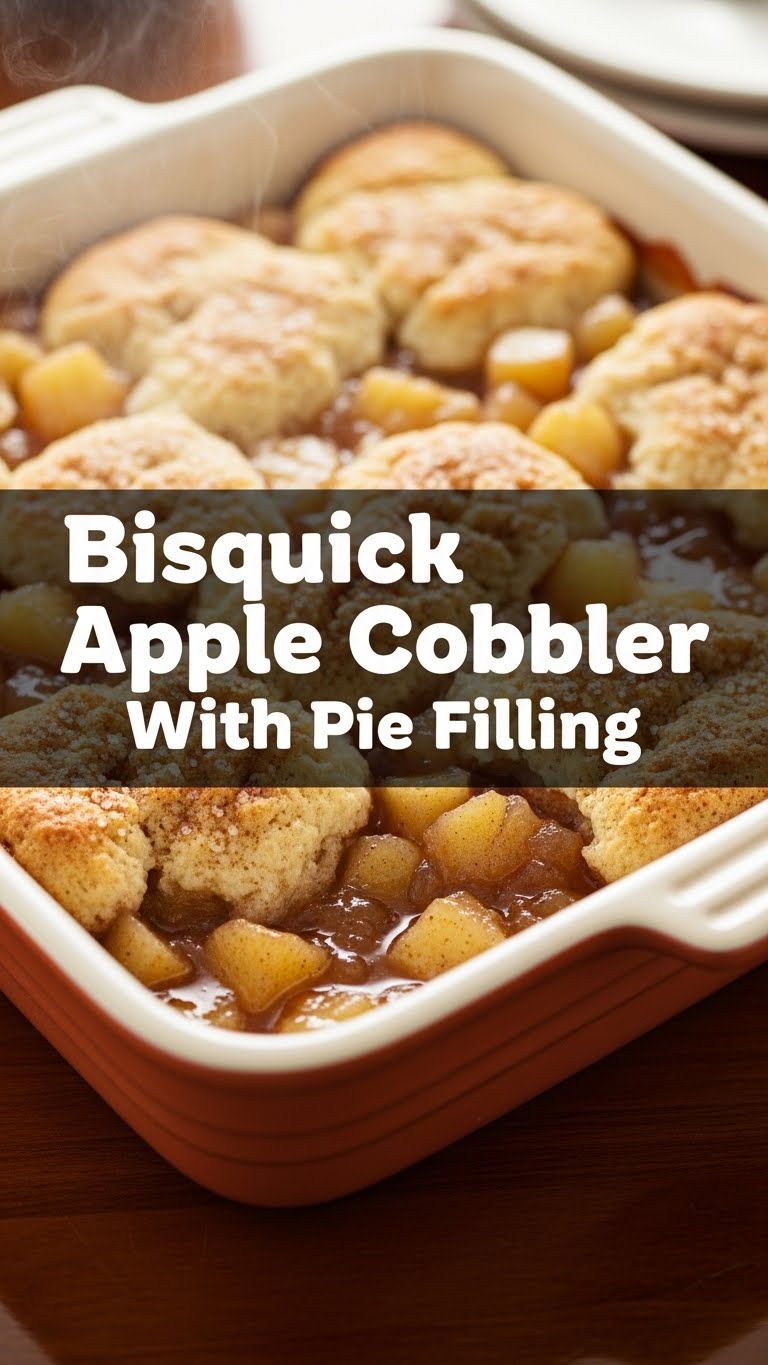
- Bake it till it’s bubbly and golden. Pop the dish back into the preheated oven and bake for 30-40 minutes. You’re looking for a beautiful golden-brown top and bubbling edges. The Bisquick will rise through the apples, creating a delicious cake-like topping.
- Serve warm and enjoy! Let it cool for a few minutes (if you can wait!) and serve. It’s best with a scoop of vanilla ice cream, a dollop of whipped cream, or just a big spoon and zero judgment.
Common Mistakes to Avoid (Because We’re All Human, Sort Of)
Even though this recipe is practically foolproof, there are a few rookie errors that can happen. Don’t be that person!
- Not preheating the oven: This is literally step one for a reason. A properly heated oven ensures even cooking and that delicious golden crust.
- Stirring the layers: I know, it’s tempting. But seriously, the whole point of this magic is that the batter and apples cook into distinct, delicious layers. Stirring ruins the show.
- Overmixing the batter: Just like pancake mix, Bisquick batter gets tough if you go wild with the whisk. Mix until *just* combined. Lumps are your friends here.
- Using cold pie filling: While not a disaster, letting your pie filling come to room temperature can help it bake more evenly. Just a little pro-tip!
- Not sharing: Okay, maybe not a “mistake” in the traditional sense, but seriously, this stuff is good. Share the love (or don’t, I won’t tell).
Alternatives & Substitutions (Get Creative, But Not Too Creative)
Feeling a little rebellious? Here are some ways to switch things up without breaking the cobbler code:
- Other Pie Fillings: Apple is classic, but try cherry, peach, mixed berry, or even blueberry pie filling! They all work beautifully. Cherry is a close second for me, just sayin’.
- Add a Little Crunch: Sprinkle some chopped pecans or walnuts over the top of the apples before baking for added texture.
- Spice It Up: A dash of allspice, pumpkin pie spice, or more cinnamon/nutmeg can elevate the flavor profile.
- Use Margarine: Technically, yes, you *can* use margarine instead of butter. But why hurt your soul like that? Butter just tastes better. Your call, though!
- Generic Baking Mix: Most generic “pancake and baking mixes” will work in place of Bisquick. Just make sure it’s a similar consistency to Bisquick when mixed with milk.
FAQ (Frequently Asked Questions – Because You Probably Have Them)
- Can I use fresh apples instead of pie filling?
Well, bless your heart for asking! Technically yes, but that defeats the “lazy genius” vibe of this recipe. If you go that route, you’ll need to peel, slice, sweeten, and pre-cook them a bit. So, maybe for another day?
- How do I know when my cobbler is perfectly baked?
Look for a beautiful golden-brown top, and the fruit filling should be bubbling around the edges. A toothpick inserted into the Bisquick topping (not the fruit) should come out mostly clean. If it’s still pale, give it a few more minutes!
- Can I make this ahead of time?
It’s definitely best served warm and fresh from the oven, but leftovers are still delicious. Just cover it and refrigerate. Reheat gently in the microwave or oven until warm and gooey again.
- What should I serve with this deliciousness?
Vanilla ice cream is the undisputed champion. Whipped cream is also a fantastic choice. Or, you know, just a spoon. Your house, your rules.
- My cobbler topping is too thin/thick. What happened?
Did you measure correctly? Sometimes small variations in flour/liquid ratios can happen. If it’s too thick, add a tiny bit more milk next time. Too thin? A little more Bisquick. But honestly, it’s usually forgiving.
- Can I halve this recipe?
Absolutely! Just use an 8×8 inch baking dish, halve all the ingredients, and keep an eye on the baking time, as it might be slightly shorter. Perfect for a cozy night in for one (or two, if you’re feeling generous).
Final Thoughts (Go Forth and Conquer!)
See? Told you it was easy. You’ve just unlocked a dessert superpower that will impress everyone (including yourself) with minimal effort. This Bisquick Apple Cobbler isn’t just a treat; it’s a testament to smart baking, embracing shortcuts, and prioritizing deliciousness over unnecessary fuss. So go ahead, whip up a batch. Enjoy the warm, sweet, apple-y goodness. Now go impress someone—or yourself—with your new culinary skills. You’ve earned it!


