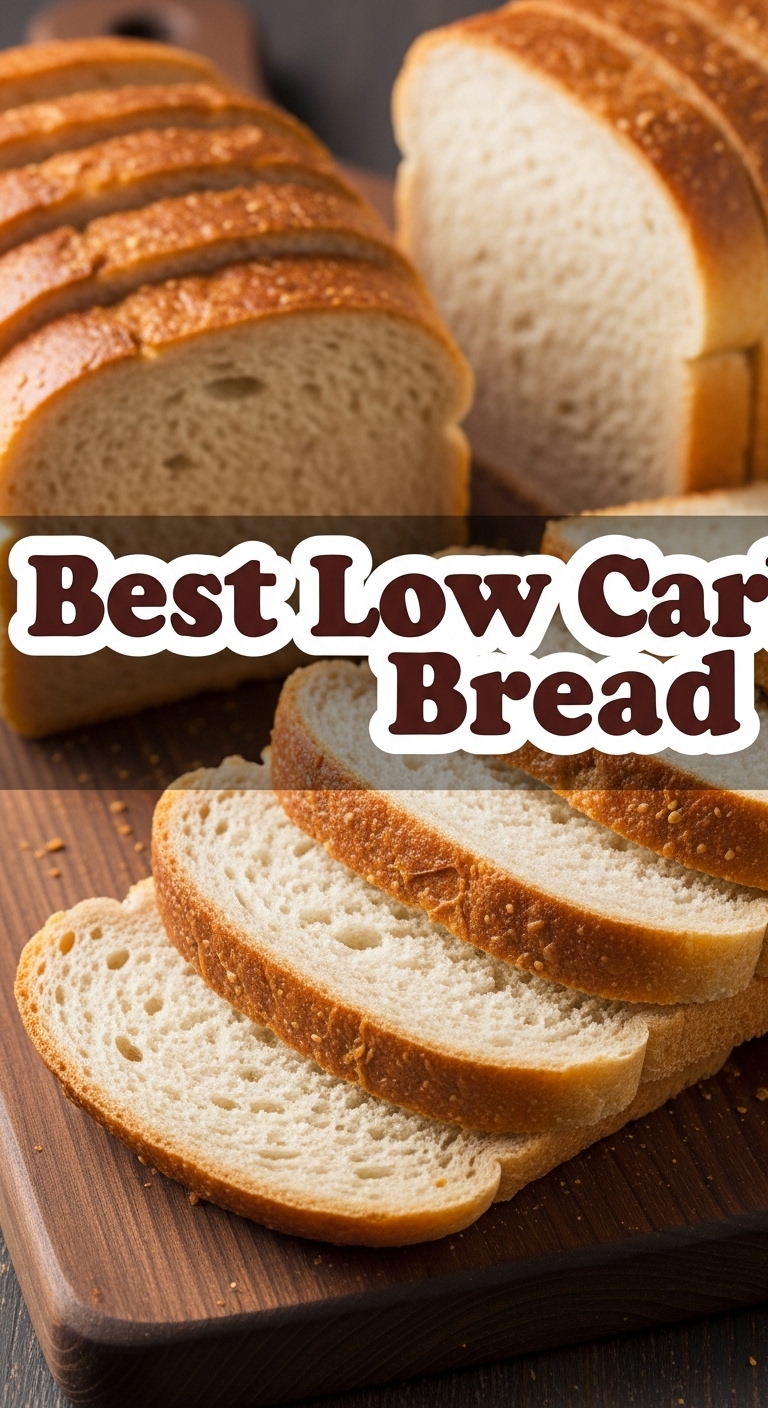
So you’re craving something warm, bready, and comforting, but your low-carb life is screaming “NOOOOOOO!” every time you look at a traditional loaf, huh? Been there, bought the T-shirt, and then promptly stained it with my tears of bread-deprivation. But guess what, my carb-conscious comrade? Your days of sorrow are OVER. We’re about to dive into the best darn low-carb bread recipe that’s so easy, you’ll wonder if you accidentally swapped your chef’s hat for a wizard’s. Spoiler: you didn’t, you’re just that good (with a little help from me, obvs).
Why This Recipe is Awesome
Okay, let’s cut to the chase. Why bother with this recipe when there are, like, a million other low-carb bread recipes floating around? Simple: because this one actually tastes like BREAD. Not an almond-flavored brick, not a coconut-y sponge, but actual, honest-to-goodness bread. It’s got that chewy crust, that soft interior, and it won’t crumble into a sad pile of regrets when you try to slice it. It’s practically idiot-proof. Seriously, even I didn’t mess this one up, and my kitchen is usually a disaster zone post-baking. Plus, it’s super versatile – toast it, sandwich it, slather it with butter, whatever your low-carb heart desires. It’s truly a game-changer, and your toast cravings will thank you.
Ingredients You’ll Need
Gather your magic dust (aka ingredients), my friend! Here’s what we’re rounding up:
- 2 cups Blanched Almond Flour: Don’t even THINK about using almond meal. We’re going for fancy, fine texture here, not gritty disappointment.
- ¼ cup Coconut Flour: This little hero adds structure without making it taste like sunscreen.
- ¼ cup Psyllium Husk Powder: This is our secret weapon for that amazing chewy texture. Don’t skip it unless you want a sad, crumbly mess.
- 2 teaspoons Baking Powder: For lift! We want fluffy, not flat.
- ½ teaspoon Salt: Balances everything out. Trust the salt.
- 6 Large Eggs: Yes, six. They’re the glue that holds our low-carb dreams together.
- ½ cup Melted Butter or Olive Oil: Choose your fat, choose your adventure! Butter for richness, olive oil for a lighter taste.
- 1 cup Warm Water: Not hot, not cold. Just a cozy warm.
- 1 tablespoon Apple Cider Vinegar (ACV): Another secret weapon! It reacts with the baking powder and psyllium for an epic rise. Don’t worry, you won’t taste it.
Step-by-Step Instructions
- Preheat & Prep: Crank that oven to 350°F (175°C). Line a standard loaf pan (around 9×5 inches) with parchment paper, leaving some overhang on the sides. Trust me, this makes life so much easier later.
- Dry Mix Magic: In a big bowl, whisk together your almond flour, coconut flour, psyllium husk powder, baking powder, and salt. Make sure there are no lumpy bits! We’re aiming for smooth sailing.
- Wet Mix Whirlwind: In a separate bowl (or a giant measuring cup), whisk the eggs, melted butter (or oil), warm water, and ACV until everything is happily combined.
- Combine & Conquer: Pour the wet ingredients into the dry ingredients. Now, with a spatula or spoon, mix it all together until just combined. Don’t overmix! It’ll be thick, almost like playdough, and that’s exactly what we want.
- Rest, Little Loaf, Rest: Let the dough sit for 5-10 minutes. This gives the psyllium husk time to absorb the liquid and do its thickening thing. This step is crucial for the perfect texture!
- Shape & Bake: Spoon the thick dough into your prepared loaf pan. Smooth out the top with your spatula. Pop it into your preheated oven and bake for 50-60 minutes, or until the top is golden brown and a toothpick inserted into the center comes out clean.
- Cool Down: Once baked, let the bread cool in the pan for about 15-20 minutes. Then, use the parchment paper overhang to lift the bread out onto a wire rack to cool completely. Seriously, resist the urge to slice it hot! It needs to firm up.
Common Mistakes to Avoid
- Not Sifting Your Flours: Lumps are not your friend here. Give those dry ingredients a good whisk or even a quick sift to prevent surprise flour pockets.
- Ignoring the Psyllium Husk Powder: Rookie mistake! Without it, your bread will be crumbly and sad. It’s the secret sauce for bread-like texture.
- Overmixing the Dough: Just like with regular bread, overworking the dough can lead to a tough texture. Mix until just combined, then back off.
- Slicing Too Soon: I know, the smell is intoxicating. But slicing hot bread will make it gummy and difficult to cut. Patience, young Padawan.
- Using Cold Ingredients: Especially the eggs and water. Room temperature ingredients (or warm water) mix better and rise more evenly.
Alternatives & Substitutions
Feeling a bit adventurous or just missing an ingredient? No worries, I got you!
- Psyllium Husk Powder: This one is tough to substitute directly for the same texture. Some folks use ground flaxseed meal, but the texture will be denser and less “bread-like.” If you omit it, expect a more cake-like or crumbly loaf. So, IMO, just get the psyllium!
- Eggs: Sorry, vegans! This recipe relies heavily on eggs for structure and lift. There isn’t a great egg substitute that will give you the same results for this specific loaf.
- Butter/Oil: Feel free to swap between melted butter, olive oil, or even avocado oil. Each will lend a slightly different flavor profile, so pick your favorite!
- Flavor Boosters: Want to get fancy? Add a teaspoon of garlic powder and dried herbs (like oregano or rosemary) for a savory bread. Or a dash of cinnamon and a low-carb sweetener for a sweeter breakfast bread.
FAQ (Frequently Asked Questions)
- “My bread came out a bit dense. What gives?” Did you let the dough rest after mixing? That 5-10 minute pause is key for the psyllium to activate and help with lift. Also, ensure your baking powder isn’t expired! Old baking powder is a silent killer of fluffy dreams.
- “Can I use almond meal instead of blanched almond flour?” Well, technically yes, but why hurt your soul like that? Almond meal will give you a much denser, grittier bread. Blanched almond flour is worth the extra penny for a superior texture, trust me on this.
- “How long does this low-carb bread last?” Stored in an airtight container at room temp, it’ll last 3-4 days. In the fridge, it’s good for up to a week. For longer storage, slice it up and freeze the slices! Just pop them in the toaster when you’re ready.
- “Does it really taste like ‘real’ bread?” Okay, let’s be real. It’s low-carb, so it’s not going to fool a French baker. BUT, for a low-carb bread, it’s incredibly close! It’s got a great chew, holds together beautifully, and is fantastic toasted. It satisfies that “bread craving” like nothing else.
- “What can I eat this bread with?” Oh, the possibilities! Toast it for avocado toast, use it for sandwiches, make croutons for a salad, dunk it in soup, or just slather it with butter or cream cheese. It’s your new low-carb canvas, my friend!
Final Thoughts
So there you have it, folks! Your new go-to low-carb bread recipe that’s going to change your life (or at least your breakfast routine). It’s simple, it’s delicious, and it proves that “low-carb” doesn’t have to mean “low-flavor.” Now go impress someone—or yourself—with your new culinary skills. You’ve earned it! And don’t forget to share a slice (or five) with anyone who doubts the magic of a good low-carb loaf. Happy baking, you rockstar!
