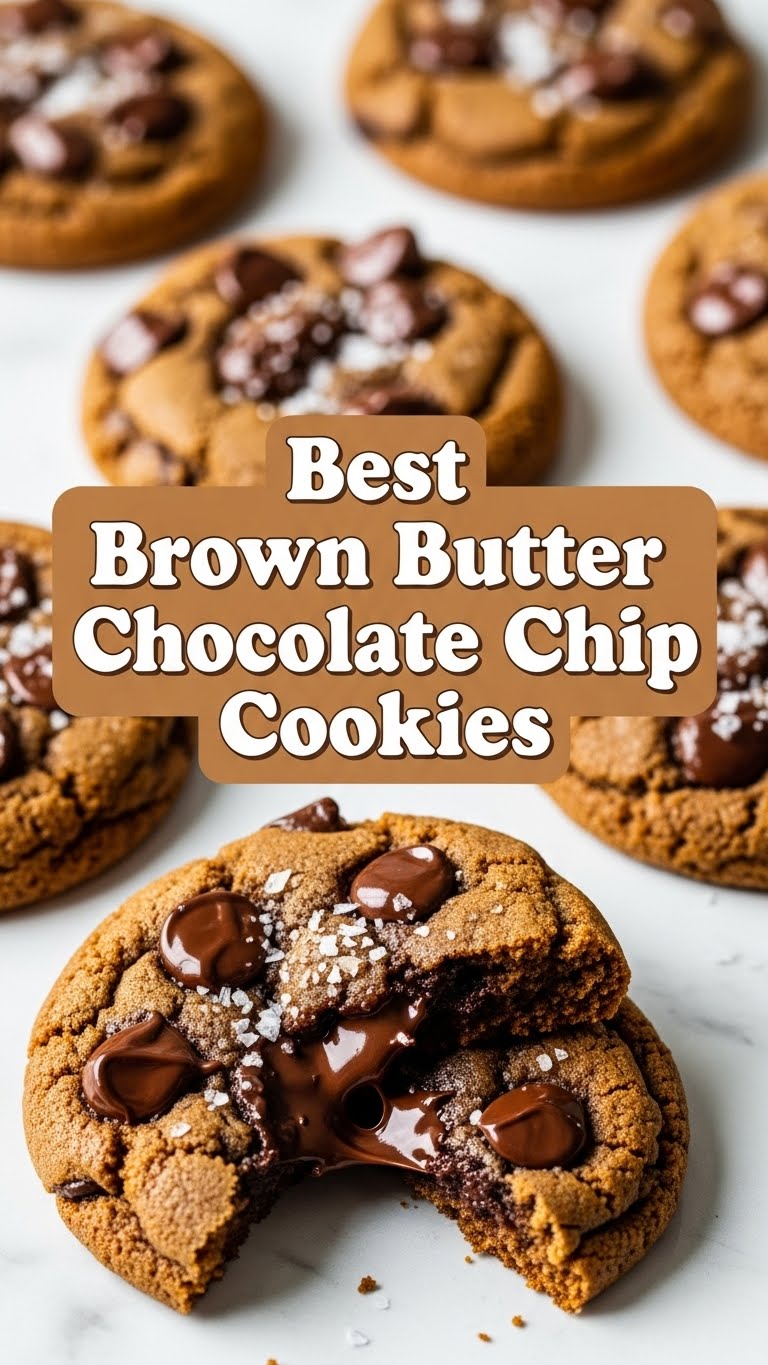
So, you’re scrolling, maybe procrastinating, and suddenly that sweet, sweet craving for a cookie hits like a ton of bricks. But not just any cookie, right? You want *the* cookie. The one that makes you close your eyes and do a little happy dance. And you don’t want to spend all day on it. My friend, you’ve landed in the right place. Forget those overly complicated recipes that demand a PhD in baking; we’re making the **Best Brown Butter Chocolate Chip Cookies** today, and trust me, they’re going to be legendary with minimal fuss. Your tastebuds (and your lazy chef alter-ego) will thank you.
Why This Recipe is Awesome
Okay, let’s be real. There are a million chocolate chip cookie recipes out there. So why *this* one? Because it takes your basic, beloved chocolate chip cookie and sends it on a first-class trip to Flavor Town, courtesy of one magical ingredient: **brown butter**. It adds this nutty, caramel-y depth that’s just… *chef’s kiss*. Plus, it’s pretty much idiot-proof. Seriously, if I can do it without setting off the smoke alarm (most of the time), you’re golden. This recipe is all about maximizing flavor with minimal effort, resulting in chewy centers, slightly crispy edges, and chocolate melty goodness. It’s like therapy, but tastier.
Ingredients You’ll Need
Gather your troops! Here’s what you’ll need to transform into a cookie wizard:
- 1 cup (2 sticks / 226g) Unsalted Butter: This is our star player, ready for its glow-up. Unsalted is key so you control the salt.
- 1 cup (200g) Granulated Sugar: The classic sweet stuff.
- ¾ cup (150g) Packed Light Brown Sugar: For chewiness and that deep molasses flavor. Don’t skimp!
- 2 Large Eggs: Room temp, if you’re feeling fancy, otherwise straight from the fridge is usually fine (don’t tell the pros I said that).
- 2 teaspoons Vanilla Extract: Use the good stuff! It makes a difference.
- 2 ¼ cups (270g) All-Purpose Flour: The structure of our cookie dreams.
- 1 teaspoon Baking Soda: For lift!
- 1 teaspoon Salt: Balances all that sweetness.
- 1 ½ cups (about 250g) Chocolate Chips or Chunks: Your choice! Semisweet is classic, but a mix of dark and milk chocolate is pure genius. Go for quality, please. Your cookies deserve it.
- Flaky Sea Salt (optional, but highly recommended): For sprinkling on top. It’s a game-changer. Trust me.
Step-by-Step Instructions
Alright, apron on (or not, I’m not judging), let’s get baking!
- **Brown the Butter**: Grab a light-colored saucepan. Melt your unsalted butter over medium heat. It’ll melt, then get foamy, then start smelling nutty and delicious, and little brown bits will appear at the bottom. Keep stirring! Once it’s golden brown and smells like heaven, immediately pour it into a heatproof bowl. Let it cool for about 10-15 minutes. We don’t want scrambled eggs for cookies, okay?
- **Cream the Sugars**: In a large bowl, combine the slightly cooled brown butter, granulated sugar, and brown sugar. Beat them together with an electric mixer (or a strong arm) until they’re light and fluffy, about 2-3 minutes.
- **Add Eggs & Vanilla**: Beat in the eggs, one at a time, making sure each is fully incorporated before adding the next. Then stir in that glorious vanilla extract. Scrape down the sides of the bowl to make sure everything’s mixed.
- **Whisk Dry Ingredients**: In a separate medium bowl, whisk together the flour, baking soda, and salt. Make sure there are no lumps.
- **Combine Wet & Dry**: Gradually add the dry ingredients to the wet ingredients, mixing on low speed until *just* combined. Do not overmix! Overmixing leads to tough cookies, and nobody wants a tough cookie.
- **Fold in Chocolate**: Gently fold in your chocolate chips/chunks. If you’re using flaky sea salt, hold off on sprinkling until just before baking.
- **Chill Out**: This is crucial, my friend. Cover the bowl and refrigerate the dough for at least 30 minutes, or up to 24 hours (the longer, the better the flavor develops, IMO). Chilling prevents spreading and deepens the flavor.
- **Preheat & Scoop**: When you’re ready to bake, preheat your oven to 375°F (190°C). Line baking sheets with parchment paper. Scoop about 2 tablespoons of dough per cookie, rolling them into balls. Place them about 2 inches apart on the baking sheets. Now, if you want, sprinkle a little flaky sea salt on top!
- **Bake ’em Up**: Bake for 9-12 minutes, or until the edges are golden brown and the centers are still slightly soft. They’ll firm up as they cool.
- **Cool & Devour**: Let the cookies cool on the baking sheet for 5 minutes before transferring them to a wire rack to cool completely. Or, you know, eat them warm. I won’t tell.
Common Mistakes to Avoid
We’ve all been there. Here are some pitfalls to dodge on your path to cookie glory:
- **Skipping the Brown Butter**: What are you even doing? This is *the* recipe for a reason! Don’t be a hero and skip the browning step. It’s non-negotiable for that epic flavor.
- **Not Chilling the Dough**: I know, I know, instant gratification. But resist! Chilling makes your cookies thicker, chewier, and prevents them from spreading into sad, flat pancakes. Patience, grasshopper.
- **Overmixing the Flour**: This is a classic rookie mistake. Mix until just combined. Seriously. The moment you see no more streaks of flour, stop. Your biceps don’t need the extra workout here.
- **Overbaking**: Unless you’re into hockey pucks, pull those cookies out when the edges are golden and the centers look slightly underdone. They keep cooking on the hot sheet.
- **Using Cheap Chocolate**: Look, I love a bargain, but not for my chocolate chips. Invest in some decent quality chocolate. You (and your tastebuds) deserve it.
Alternatives & Substitutions
Feeling adventurous? Or just missing an ingredient? No worries, we can usually make it work!
- **Chocolate Swap**: Not feeling semi-sweet? Go all dark chocolate (my personal fave!), or mix in some milk chocolate chips for extra sweetness. You can also chop up a good quality chocolate bar for glorious puddles of chocolate. White chocolate? If you must, but don’t tell the purists.
- **Nutty Additions**: Want some crunch? Fold in ½ cup of toasted chopped pecans or walnuts with the chocolate chips. Just toast them first to bring out their flavor.
- **Dairy-Free**: While the brown butter is key, you *can* attempt this with a good quality dairy-free butter alternative. Just be mindful that browning might behave differently. The flavor won’t be *exactly* the same, but you’ll still get a delicious cookie.
- **Gluten-Free**: Swap the all-purpose flour for a 1:1 gluten-free baking blend. Make sure it contains xanthan gum!
FAQ (Frequently Asked Questions)
Got questions? I’ve got (casual) answers!
- **Do I *really* need to brown the butter?** Seriously? Did you even read the title? Yes! This is the whole point! It’s what elevates these from “good” to “OH MY GOSH, ARE YOU KIDDING ME?!”
- **My butter burned! What did I do wrong?** You probably walked away for a minute. Brown butter happens fast. Stay by the stove, stir often, and pull it off the heat the *second* you see those nutty brown bits at the bottom and smell that caramel goodness. Better luck next time, butter whisperer!
- **Can I skip the chilling time for the dough?** You *can*, but your cookies will spread more and won’t have the same chewy texture or deep flavor. Think of chilling as a flavor spa day for your dough. It deserves it.
- **What’s the best kind of chocolate to use?** IMO, a mix of good quality semi-sweet and dark chocolate chunks creates the best melty pockets. But use what you love! Just make sure it’s not waxy discount chocolate.
- **How long do these cookies last?** If you manage to hide them, they’ll stay fresh in an airtight container at room temperature for 3-4 days. But let’s be honest, they rarely last past day one.
- **Can I freeze the dough?** Absolutely! Scoop balls of dough onto a parchment-lined baking sheet, freeze until solid, then transfer to a freezer-safe bag. Bake from frozen, adding a couple of extra minutes to the baking time. Fresh cookies anytime? You’re a genius!
Final Thoughts
And there you have it! The secrets to ridiculously good brown butter chocolate chip cookies, passed from my kitchen (and messy hands) to yours. Go forth and conquer that craving! Whether you’re baking for friends, family, or just for your glorious self (no judgment here, trust me), these cookies are going to be a hit. So grab that apron, put on some tunes, and get baking. You’ve totally got this. Now go impress someone—or yourself—with your new culinary skills. You’ve earned it!

