
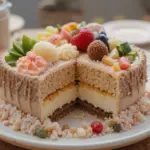
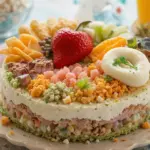
So, you’ve scrolled through your feed, seen those impossibly adorable Bento Cartoon Cakes, and thought, “I could *totally* make one of those… eventually.” Well, my friend, that “eventually” is *now*! Forget complicated patisserie techniques; we’re diving headfirst into the land of cuteness with a recipe so simple, you’ll wonder why you ever hesitated.
Why This Recipe is Awesome
Let’s be real: who has time for a full-on tiered wedding cake when all you want is a personal-sized burst of joy? This Bento Cartoon Cake recipe is basically your cheat code to looking like a baking guru without actually breaking a sweat. It’s perfect for when you want something sweet and visually stunning, but also need to be back on the couch for your next Netflix binge in under an hour.
Here’s the lowdown: it’s quick, it’s cute, and **it’s ridiculously forgiving**. Seriously, even if your artistic skills peak at stick figures (like mine often do!), you can nail this. Plus, it uses mostly store-bought goodies, because we’re all about smart shortcuts here, aren’t we?
Ingredients You’ll Need
- A Small Box of Cake Mix: Pick your fave flavor! Chocolate, vanilla, funfetti – whatever makes your heart sing. We’re not making it from scratch, don’t judge. This is “fun” baking, not “stress” baking.
- Eggs, Oil, Water: Whatever your cake mix box demands, follow those instructions to the letter. Don’t be a rebel here; the box knows best.
- Pre-made Buttercream Frosting (1-2 tubs): Or whip up your own if you’re feeling extra fancy. But honestly, store-bought is our bestie for this adventure. You’ll want a good amount for coloring.
- Food Coloring Gels: Gels, not liquid! We need that vibrant, punchy cartoon color, darling. A few basic colors (red, yellow, blue, black) will get you far.
- Small Cake Pans (4-inch or 6-inch): These are the real MVPs. Mini cakes for maximum cuteness. If you don’t have them, you can bake a larger cake and cut out rounds, but these make life easier.
- Disposable Piping Bags & Basic Piping Tips: Trust me, cleaning reusable piping bags is not on our “fun” list. Grab a few disposables!
- Optional Edible Decor: Sprinkles, edible markers, candy eyes, tiny candies – go wild! This is where your inner child gets to shine.
Step-by-Step Instructions
- Bake Those Babies Up! Preheat your oven according to the cake mix instructions. Grease and flour your small cake pans. Prepare the cake batter as directed on the box, then pour evenly into your pans. Bake until a toothpick inserted into the center comes out clean. **Don’t overbake!**
- Chill Out, Cakes! Once baked, let your cakes cool in the pans for about 10-15 minutes, then carefully invert them onto a wire rack to cool completely. This is crucial! **Warm cake + frosting = sad, sliding mess.**
- Level Up Your Layers. If your cakes have domes (which they probably will), use a serrated knife to carefully level the tops. **Flat tops are your best friends for stable stacking.**
- Crumb Coat Magic. Place one cake layer on your serving plate or a small cardboard cake circle. Add a dollop of frosting and spread it evenly. Top with the second cake layer. Now, apply a very thin layer of frosting all over the cake. This is your “crumb coat” – it traps any loose crumbs. Pop it in the fridge for 15-20 minutes to set.
- Color Your World. While your crumb coat is chilling, divide your remaining buttercream into separate bowls. Add tiny drops of food coloring gel to each bowl, mixing until you achieve your desired cartoon-bright shades. Remember, a little goes a long way with gels!
- Final Frost & Design. Once the crumb coat is firm, apply a thicker, even layer of your base color frosting to the entire cake. Smooth it out with an offset spatula or knife. Now for the fun part! Fill your piping bags with your colored frostings. Pipe on simple cartoon faces, cute characters, stars, hearts, or whatever whimsical design strikes your fancy. **Keep it simple and bold for that cartoon effect!**
- A Little More Chill. For best results and to set your adorable design, pop your finished Bento Cake back into the fridge for another 20-30 minutes.
- Admire and Devour! Take all the photos you want (because, seriously, look what you made!). Then, cut a slice and enjoy your mini masterpiece.
Common Mistakes to Avoid
- Under-baking the Cake: A gooey center is for lava cakes, not bento cakes. **Always check with a toothpick!**
- Not Cooling Cakes Completely: I know, I said it before, but it’s *that* important. Warm cake + frosting = an absolute disaster. Patience, young grasshopper.
- Forgetting the Crumb Coat: Skipping this step is a rookie mistake. It’s your invisible shield against crumbly frosting nightmares. Don’t do it!
- Using Liquid Food Coloring: It thins your frosting and gives dull colors. **Stick to gel colors for vibrant results.**
- Overthinking the Design: It’s a cartoon cake! Imperfections often add to the charm. Don’t stress about perfect lines; embrace the playful vibe.
Alternatives & Substitutions
Feeling a bit experimental, or missing an ingredient? No worries, we’ve got options!
- Cake Base: While box mix is our champion for ease, if you have a go-to scratch recipe for a dense, moist cake, absolutely use it! Just make sure it bakes well in small pans.
- Frosting: Cream cheese frosting can work beautifully too, but make sure it’s firm enough to hold its shape for piping. You might need to add a touch more powdered sugar.
- Flavor Boosts: Want to add some extra oomph? Stir a teaspoon of vanilla extract, almond extract, or even a citrus zest into your store-bought frosting before coloring. Yum!
- No Piping Bags? In a pinch, a sturdy Ziploc bag with a tiny corner snipped off will do the trick. It’s a bit messier, IMO, but gets the job done.
- Edible Markers: If piping feels too intimidating, frost your cake smoothly and use edible markers for drawing faces and details directly onto the set frosting. It’s like coloring, but on a cake!
FAQ (Frequently Asked Questions)
Got questions? I’ve got (casual) answers!
- Can I use regular liquid food coloring? You *can*, but why hurt your soul like that? Liquid coloring can thin your frosting, making it hard to pipe, and the colors won’t be as bright. **Gel colors are truly your best friend for vibrant cartoon cakes.**
- How long do these cute cakes last? If kept refrigerated, about 3-4 days. But let’s be real, they rarely make it past day one, do they?
- What if I don’t have small cake pans? You could bake a regular 8 or 9-inch cake and use a round cookie cutter to cut out mini circles. It’s a bit more wasteful, but totally doable if you’re in a pinch!
- My frosting is too stiff/runny, help! Too stiff? Add a tiny splash of milk or cream, a *teaspoon* at a time, until it’s pipeable. Too runny? Add more powdered sugar until it thickens, or chill it in the fridge for a bit.
- Can I freeze these cakes? Absolutely! Undecorated cake layers freeze beautifully for up to a month. Wrap them tightly in plastic wrap and then foil. You can also freeze a fully decorated cake, but allow it to freeze uncovered for an hour first so the decorations set, then wrap it gently.
- Do I *have* to chill the cake after decorating? For the best, most stable results, yes! It helps the frosting set and keeps your adorable masterpiece from getting smudged. Think of it as its beauty sleep.
Final Thoughts
See? I told you it wasn’t rocket science! You just whipped up a tiny, adorable masterpiece that’s almost too cute to eat (almost!). Now go impress someone – or just yourself – with your new culinary skills. Snap some pics, share the joy, and then (the best part) demolish it with a happy sigh. You’ve earned it!
You’re basically a professional mini-cake artist now. What’s next? A whole bento *box* of cakes? Don’t tempt me… or maybe, do. 😉
