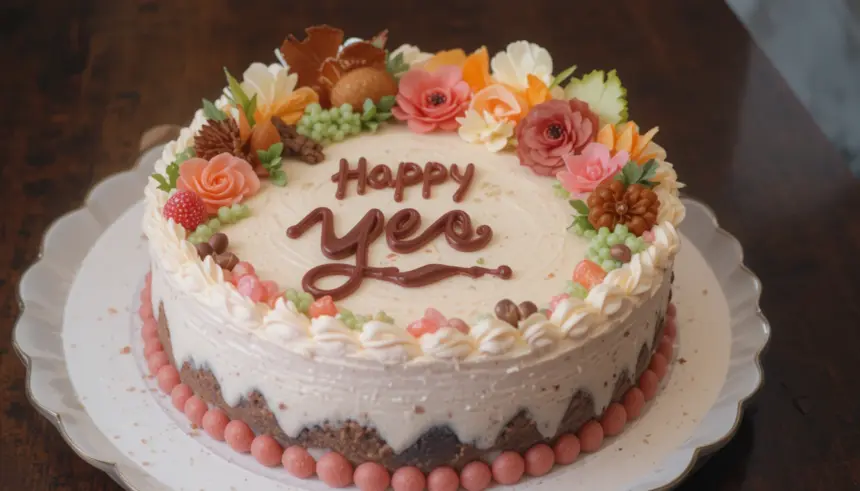
So, your bestie just dropped a bomb (the good kind!) and said YES, or maybe you’re about to pop a question of your own and need a sweet little something to seal the deal. You need a cake that screams ‘celebration!’ but doesn’t require a five-day commitment in the kitchen, right? Girl, same. We’re talking about a Bento Cake – tiny, mighty, and utterly adorable. It’s basically a personalized edible billboard for all things happy. Let’s get baking!
Why This Recipe is Awesome
Okay, buckle up, because this isn’t just any cake recipe. This is the “I-look-like-a-pro-baker-but-I-actually-just-used-my-secret-powers-of-laziness” cake. Seriously. It’s super customizable, so you can tailor it for literally any “YES!” moment – be it a proposal, a new job, or just finally saying yes to that overdue Netflix binge. It’s also perfectly sized, meaning no awkward leftover slices hanging around judging you from the fridge. Plus, it’s pretty much **idiot-proof**; even I didn’t mess it up, and that’s saying something!
Ingredients You’ll Need
Get ready for some kitchen magic! Here’s what you’ll need to whip up your little box of joy. Don’t worry, nothing too wild here.
For the Mini Vanilla Cake:
- 1 ½ cups All-Purpose Flour: The foundational goodness for our tiny masterpiece.
- 1 ½ teaspoons Baking Powder: Our little lift-off dust. Don’t skip it!
- ½ teaspoon Salt: Just a pinch to make all the sweet stuff pop.
- ½ cup (1 stick) Unsalted Butter: Softened, please! The creamy dream maker.
- 1 cup Granulated Sugar: Sweetness, obviously.
- 2 Large Eggs: Room temperature, if you can remember. They’re the binders of our bento cake dreams.
- 1 teaspoon Vanilla Extract: Because boring cakes are a no-go. Don’t be shy with the good stuff.
- ½ cup Milk: Any kind works, but whole milk makes it extra lush. Our moisture maestro!
For the Fluffy Vanilla Buttercream:
- 1 cup (2 sticks) Unsalted Butter: Softened. More butter, because why not?
- 3-4 cups Powdered Sugar: Sifted! Nobody likes lumpy frosting. This is our fluffy cloud dust.
- 1-2 tablespoons Milk or Heavy Cream: To get that perfect, swooshy consistency.
- 1 teaspoon Vanilla Extract: Flavor supremacy, once more!
- Pinch of Salt: To balance the sweetness.
- Gel Food Coloring (optional): For those ‘pop the question’ vibes or just a pretty color splash.
For Decor (Optional but highly encouraged!):
- Sprinkles: Because confetti is always a good idea, even on a cake.
- Edible Glitter: For extra sparkle, darling.
- Small Candies or Chocolates: For personalized touches or just because you can.
- Small Piping Bags and Tips: For writing your “YES!” message.
Step-by-Step Instructions
Alright, apron on, game face ready! Let’s turn these simple ingredients into a “YES!”-worthy masterpiece.
- Preheat & Prep: First things first, crank that oven to 350°F (175°C). Grease and flour two 4-inch or 6-inch round cake pans, or line your bento boxes with parchment if you’re going super authentic.
- Dry Mix Magic: In a medium bowl, whisk together the flour, baking powder, and salt. Set it aside for a sec.
- Creamy Dream Base: In a larger bowl, using an electric mixer, beat the softened butter and granulated sugar together until it’s light and fluffy – about 2-3 minutes.
- Egg-cellent Addition: Add the eggs one at a time, beating well after each addition. Then, stir in that glorious vanilla extract. Scrape down the sides of the bowl, you don’t want to miss any goodness!
- Alternate Wet & Dry: Now, slowly add your dry ingredients to the wet ingredients, alternating with the milk. Start and end with the flour mixture. **Don’t overmix!** Mix until just combined. A few lumps are okay, tough cake is not.
- Bake It Up: Divide the batter evenly between your prepared pans. Bake for 20-25 minutes, or until a toothpick inserted into the center comes out clean. Let them cool in the pans for about 10 minutes, then turn them out onto a wire rack to cool completely. This is crucial!
- Whip the Buttercream: While your cakes are cooling, get frosting! Beat the softened butter in a large bowl until it’s super fluffy. Gradually add the sifted powdered sugar, alternating with the milk/cream and vanilla extract, until smooth and creamy. Add a pinch of salt to balance the sweetness. If using, mix in your gel food coloring now.
- Assemble Your Masterpiece: Once the cakes are completely cool (I mean it, completely!), level them if needed. Spread a thin layer of buttercream on one cake, then top with the second. Apply a thin “crumb coat” of frosting all over the cake – this traps any loose crumbs. Chill for 15-20 minutes.
- Final Frost & Decorate: Now for the fun part! Apply your final, thicker layer of buttercream. Use a small offset spatula or butter knife to get it smooth. Transfer some frosting to a piping bag with a small round tip and pipe your “YES!” message on top. Get creative with sprinkles, edible glitter, or small candies.
Common Mistakes to Avoid
Nobody’s perfect, but we can avoid some major baking faux pas. Learn from my mistakes, people!
- Frothing Before Cooling: Thinking you can frost a warm cake? Rookie mistake. You’ll end up with a frosting landslide, not a bento cake. **Patience is key!**
- Overmixing the Batter: I know, it’s tempting to keep going, but overmixing develops the gluten too much, leading to a tough, dense cake. Nobody wants that.
- Not Sifting Powdered Sugar: Lumpy frosting is a betrayal. Take the extra minute to sift. Your taste buds (and eyes) will thank you.
- Skimping on the Crumb Coat: This thin layer of frosting seals in all the crumbs, giving you a smooth canvas for your final frosting. Skipping it is like trying to paint without primer – messy and frustrating.
- Forgetting to Preheat the Oven: Yeah, yeah, time flies, but ovens need their preheating time to ensure even baking. Don’t throw a cold cake into a cold oven; it’ll mess with the texture.
Alternatives & Substitutions
Life happens, and sometimes you don’t have exactly what the recipe calls for. No stress!
- Cake Mix Magic: In a pinch, a good quality box cake mix is your best friend. **IMO**, nobody needs to know. Just follow the package directions and maybe add an extra egg or a splash of milk for a richer taste.
- Butter Swaps: If you’re out of unsalted butter, salted works – just reduce the salt in the recipe. For a dairy-free option, use plant-based butter sticks (like Miyoko’s or Earth Balance) and a dairy-free milk.
- Frosting Flavors: Not a vanilla fan? Swap the vanilla extract for almond extract, peppermint extract, or even a citrus zest. Cream cheese frosting is also a fantastic alternative for a tangy kick.
- Decorating Simplicity: No fancy piping skills? No problem! Fresh berries, edible flowers, or a simple dusting of cocoa powder or powdered sugar can look just as stunning. Or just go wild with sprinkles – you can’t go wrong with sprinkles.
- Gluten-Free & Dairy-Free: For a GF cake, swap out the all-purpose flour for a 1:1 gluten-free baking blend. For dairy-free, use plant-based milk and butter subs as mentioned above. Easy peasy!
FAQ (Frequently Asked Questions)
Got questions? I’ve got (casual and hopefully helpful) answers!
- “Can I make this cake ahead of time?” Absolutely! The cake layers can be baked, cooled, wrapped tightly, and stored in the fridge for a couple of days or even frozen for up to a month. Make the buttercream a day or two ahead and store it in the fridge; just bring it to room temp and re-whip before frosting.
- “What size pans should I use for a bento cake?” Think tiny! Usually, 4-inch or 6-inch round pans are perfect. If you don’t have them, you can bake in a standard 8×8 inch pan and use a round cutter, but you’ll have some cake scraps (hello, snack!).
- “My frosting is too thin/thick, help!” This is a common frosting dilemma! If it’s too thin, slowly add more sifted powdered sugar until it thickens up. Too thick? Add a tiny splash of milk or cream, a teaspoon at a time, until it’s perfect.
- “What if I mess up the ‘YES!’ piping?” Relax, it’s not brain surgery! Chill the cake in the fridge for about 10-15 minutes, then gently scrape off the offending letters with a thin knife or spatula. Smooth the area, and try again. Practice makes perfect, or at least less-imperfect! **FYI**, piping on parchment first helps.
- “Can I make this dairy-free or gluten-free?” Yep, as mentioned above! Just use plant-based milk and butter for dairy-free, and a 1:1 gluten-free baking blend for GF. It’s totally doable!
- “How do I transport my bento cake?” A small cake box or even a sturdy takeout container with a flat bottom works wonders. If it’s warm out, keep it cool during transport – a small cooler bag can be your best friend. A stable, flat surface in your car is **key**!
Final Thoughts
See? You’re practically a pastry chef now, aren’t you? This bento cake isn’t just dessert; it’s a tiny, edible declaration of awesomeness. It’s proof that you don’t need to spend hours stressing to create something beautiful and meaningful.
Go forth and spread the joy (and the cake!). Whether it’s for a proposal, a big life decision, or just a Tuesday treat to celebrate making it through the week, this little cake is here for it. Now go impress someone—or yourself—with your new culinary skills. You’ve earned it!
