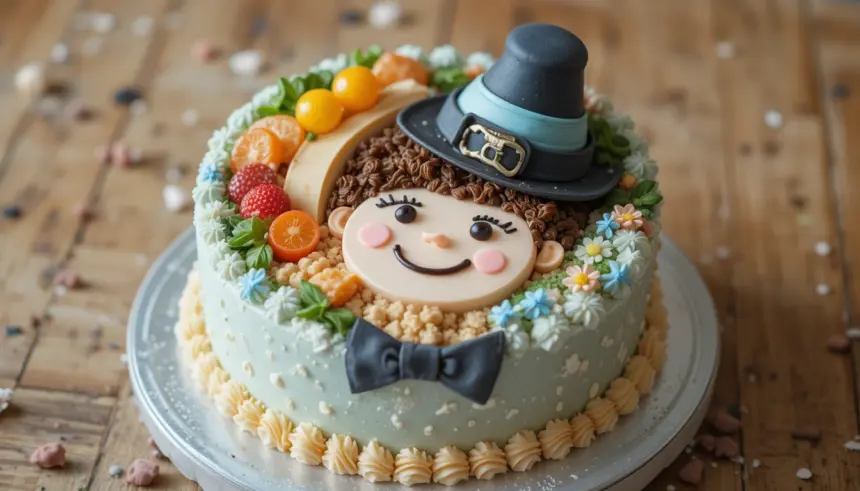
So, you’ve got a birthday boy on your hands and you’re dreaming of something cute, personal, and totally Instagram-worthy, but also, like, *easy*? And probably not enough to feed a small army? Girl, I hear you. We’re talking about a Bento Cake, specifically one designed for our little (or big!) dude. Think all the charm of a full-sized cake, but in a adorable, single-serving (or maybe two-serving, if you’re feeling generous) package. It’s basically the culinary equivalent of a tiny puppy: irresistible and surprisingly easy to handle. Let’s make some magic, shall we?
Why This Recipe is Awesome
First off, this isn’t just *a* cake; it’s *the* cake for when you want to make a big impression without needing a catering license. It’s perfectly sized for intimate celebrations, small family gatherings, or just, you know, a Tuesday when you feel like celebrating your own existence. Plus, it’s **idiot-proof**. And if I didn’t mess it up, you definitely won’t. Seriously, we’re talking about a quick bake, a simple frost, and then the fun part: making it look super cool for your birthday boy. No massive layers, no gravity-defying structures, just pure, unadulterated, manageable cake joy. It’s also incredibly customizable, so you can tailor it exactly to your boy’s favorite colors, themes, or even his latest obsession (dinosaurs? spaceships? gaming controllers? You got it!).
Ingredients You’ll Need
Alright, let’s gather our weapons of deliciousness! Nothing too wild here, just the good stuff.
- For the Cake (makes two small bento cakes, because sharing is caring… or for seconds!):
- 1 ½ cups all-purpose flour (the basic stuff, don’t get fancy)
- 1 ½ teaspoons baking powder (our little lift-off agent)
- ½ teaspoon salt (brings out all the good flavors)
- ¾ cup unsalted butter, softened (room temp is key, trust me)
- 1 ½ cups granulated sugar (sweetness central)
- 2 large eggs (our binding buddies)
- 1 teaspoon vanilla extract (because everything is better with vanilla)
- 1 cup milk (any kind works, whole milk gives it that extra richness)
- For the Buttercream Frosting (the yummy, pipe-able dream):
- 1 cup unsalted butter, softened (again, room temp!)
- 3-4 cups powdered sugar (sifted, unless you like lumps, you weirdo)
- 1-2 tablespoons milk or heavy cream (for creaminess, add gradually)
- 1 teaspoon vanilla extract (more vanilla, because why not?)
- Pinch of salt (balances the sweet)
- Gel food coloring (blue, green, yellow, whatever floats his birthday boat!)
- For Decoration (this is where the “Birthday Boy” magic happens!):
- Sprinkles (boy-themed, like stars, little cars, or just blue/green/silver ones)
- Small chocolate candies or edible pearls (for accents)
- Piping bags and nozzles (a round tip and a star tip are your best friends)
- Small birthday candle or cute cake topper (optional, but highly recommended)
Step-by-Step Instructions
Let’s get baking! Don’t overthink it; this is fun, remember?
- **Prep for Success:** Preheat your oven to 350°F (175°C). Lightly grease and flour two 4-inch round cake pans or line a muffin tin with paper liners (you’ll use about 4-6 depending on size and how thick you want them). We’re going for mini cakes here, so don’t grab your giant springform pan!
- **Dry Mix It Up:** In a medium bowl, whisk together your flour, baking powder, and salt. Set it aside.
- **Wet Mix Wonder:** In a large bowl, cream together the softened butter and sugar until it’s light and fluffy. This usually takes about 3-5 minutes with an electric mixer. **Don’t skimp on this step!**
- **Egg-cellent Addition:** Beat in the eggs one at a time, making sure each is fully incorporated before adding the next. Stir in the vanilla extract.
- **Alternate & Combine:** Now, gradually add your dry ingredients to the wet, alternating with the milk. Start and end with the flour mixture. Mix until *just* combined. **Overmixing is the enemy of a tender cake!**
- **Bake Baby Bake:** Divide the batter evenly among your prepared pans/liners. Bake for 20-25 minutes, or until a toothpick inserted into the center comes out clean.
- **Chill Out:** Let the cakes cool in their pans for about 10 minutes before carefully turning them out onto a wire rack to cool completely. **Patience is a virtue here; warm cakes + frosting = melty mess.**
- **Buttercream Blitz:** While your cakes are chilling, make the frosting! Beat the softened butter until creamy. Gradually add the powdered sugar, a cup at a time, mixing well after each addition. Add milk/cream and vanilla. Beat until light and fluffy. If it’s too thick, add more milk; too thin, add more sugar. Now, divide your frosting and color portions with gel food coloring for your design! Blues, greens, yellows are great for boys.
- **Stack & Frost:** Once the cakes are completely cool, level them if needed. Put a dollop of frosting on your serving plate or bento box, then place one cake layer on top. Frost the top of that layer, then add your second cake layer. Frost the top and sides of the entire cake smoothly. This is your canvas!
- **Design Time!:** Now for the fun part! Use your colored frosting and piping bags to create a “Birthday Boy” theme. Think simple swirls, stars, borders, or even try to pipe a little initial or number. Add sprinkles, small candies, or a cute candle. **Don’t be afraid to get creative! It doesn’t have to be perfect; handmade charm is awesome.**
Common Mistakes to Avoid
We’ve all been there, trust me. Here are a few traps to sidestep:
- **Not Preheating the Oven:** Rookie mistake! Your cake won’t rise properly if it doesn’t hit that hot air immediately. Always preheat.
- **Using Cold Butter/Eggs:** If your butter and eggs aren’t at room temperature, your batter will be lumpy, and your cake won’t have that lovely, even texture. Plan ahead, peeps!
- **Overmixing the Batter:** This activates too much gluten, leading to a tough, dry cake. Mix until *just* combined and then step away from the mixer.
- **Frosting a Warm Cake:** I know, the urge is strong. But a warm cake will melt your beautiful buttercream into a sad, greasy puddle. Be patient, my friend.
- **Comparing Yours to Pinterest:** Stop it. Seriously. Your cake is made with love, and that makes it perfect. Enjoy the process!
Alternatives & Substitutions
Feeling a little rebellious? Go for it!
- **Cake Mix Enthusiasts:** If you’re short on time (or just, you know, want to be extra lazy), a good quality box cake mix totally works! Just follow the package directions for the cake part. No judgment here, **IMO, convenience is king sometimes.**
- **Flavor Swap:** Instead of vanilla, try almond extract for a different vibe, or add some lemon zest to the batter for a bright, citrusy twist. For chocolate lovers, swap out 1/4 cup of flour for cocoa powder and add a bit more milk if needed.
- **Cream Cheese Frosting:** Not a fan of buttercream? A cream cheese frosting is divine! Just make sure your cream cheese is softened, and use less milk in the recipe above. It’s a little softer to work with, but oh-so-tangy and delicious.
- **Dairy-Free:** You can easily swap out dairy milk for your favorite plant-based milk (almond, oat, soy). For butter, a good quality plant-based butter substitute works well in both the cake and frosting.
FAQ (Frequently Asked Questions)
- **Can I make the cake ahead of time?** Absolutely! You can bake the cake layers up to 2 days in advance. Just wrap them tightly in plastic wrap once completely cooled and store them at room temperature (or freeze for longer storage). Then frost on the day you need it.
- **My buttercream is too stiff/runny, help!** Ah, the age-old frosting dilemma! If it’s too stiff, add milk/cream a teaspoon at a time until it’s perfect. Too runny? Add more powdered sugar, a tablespoon at a time, until it firms up. It’s all about finding that sweet spot.
- **What if I don’t have small cake pans?** No problem! You can use a muffin tin. Fill about 4-6 liners and bake until a toothpick comes out clean. You might need to trim the tops to make them flat for stacking.
- **Can I use oil instead of butter in the cake?** Technically yes, it will give you a very moist cake. But butter adds a richer flavor and a different texture that’s harder to beat, especially in a classic vanilla cake. **If you can, stick with butter for this one.**
- **How do I store the finished bento cake?** If it has buttercream, it’s fine at room temperature for a day or two in an airtight container. If you used cream cheese frosting or it’s super hot outside, pop it in the fridge. Bring it to room temp for 30 minutes before serving for the best flavor and texture.
Final Thoughts
See? That wasn’t so bad, was it? You just whipped up an adorable, personalized Bento Cake for your birthday boy! Whether it’s for your son, nephew, or even a super cool adult who appreciates tiny things, this cake is guaranteed to bring smiles. Plus, you got to play with sprinkles, which is basically therapy. Now go impress someone—or yourself—with your new culinary skills. You’ve totally earned it, you baking rockstar!

