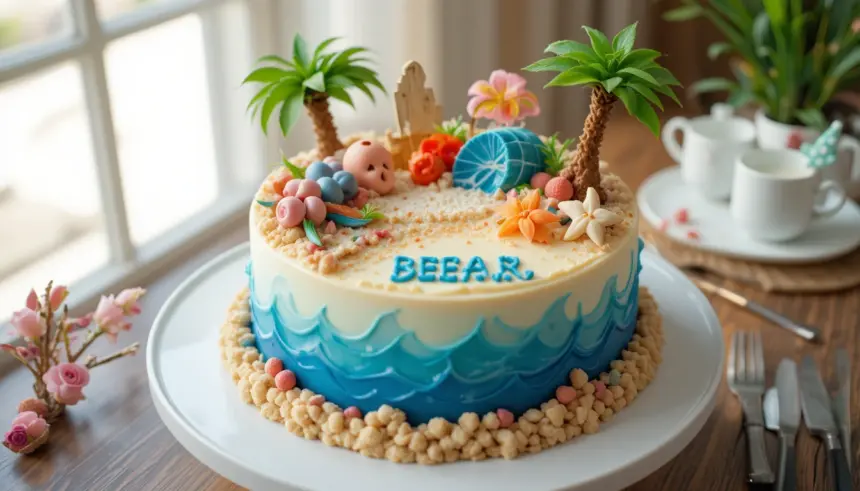
Ever wish you could just escape to a beach right now? Me too. But since my boss probably won’t approve that ‘mental health’ leave to a tropical island, how about we bake a beach instead? A tiny, adorable, edible beach! We’re diving into the ridiculously fun world of a **Bento Cake Beach Design**, because who says you can’t have a mini-vacation on a plate?
Why This Recipe is Awesome
This isn’t your grandma’s three-tier wedding cake, bless her heart. This is a bento cake, which means it’s small enough to pretend you’re on a diet (no judgment!), cute enough to make all your friends jealous on Instagram, and ridiculously fun to decorate. Seriously, it’s like therapy, but tastier. Plus, it’s individual, so no awkward cake-slicing moments. You get your own personal slice of paradise, literally. It’s **idiot-proof**, even I didn’t mess it up, so you’re golden!
Ingredients You’ll Need
Gather your edible treasures, my friend. Here’s what you’ll need to create your sandy shores and blue waters:
- For the Cake (makes about two 4-inch cakes):
- 1 cup all-purpose flour (the one that always delivers)
- ½ tsp baking powder (our little lift ticket to deliciousness)
- ¼ tsp salt (because balance, right?)
- ½ cup unsalted butter, softened (your best friend for fluffy cakes)
- ½ cup granulated sugar (for that sweet, sweet life)
- 1 large egg (the glue that holds our dreams together)
- 1 tsp vanilla extract (liquid gold)
- ½ cup milk (any kind works, your preference)
- For the Buttercream Frosting:
- 1 cup unsalted butter, softened (more butter, more happiness)
- 3 cups powdered sugar (the finer, the better, no lumpy frosting!)
- 1-2 tbsp milk or heavy cream (to get that perfect, spreadable consistency)
- 1 tsp vanilla extract (because vanilla is life)
- Pinch of salt (to cut the sweetness, trust me)
- Blue food coloring (gel works best for vibrant hues!)
- For the Beach Decor:
- 4-5 Graham crackers, crushed (our glorious sand!)
- Optional: Mini edible pearls, white chocolate shells, or gummy sharks (for extra beachy vibes!)
Step-by-Step Instructions
Let’s get baking! Don’t overthink it; this is supposed to be fun.
- Get That Oven Ready: Preheat your oven to 350°F (175°C). Grease and flour two 4-inch round cake pans. Line the bottoms with parchment paper if you want to be extra fancy (and avoid sticking!).
- Mix the Dry Stuff: In a medium bowl, whisk together the flour, baking powder, and salt. Set it aside.
- Cream the Wet Stuff: In a larger bowl, using an electric mixer (or a strong arm!), cream together the softened butter and granulated sugar until it’s light and fluffy. This usually takes about 2-3 minutes.
- Add the Egg & Vanilla: Beat in the egg until just combined, then stir in the vanilla extract. Don’t overmix!
- Alternate Dry & Wet: Gradually add the dry ingredients to the wet ingredients, alternating with the milk. Start and end with the dry ingredients. Mix on low speed until *just* combined. **Pro Tip:** Stop mixing as soon as you don’t see any dry streaks. Overmixing is the enemy of tender cake!
- Bake Those Babies! Divide the batter evenly between your prepared cake pans. Bake for 20-25 minutes, or until a toothpick inserted into the center comes out clean. Let them cool in the pans for about 10 minutes before transferring them to a wire rack to cool completely. This is crucial!
- Whip Up That Dreamy Buttercream: While the cakes are cooling, beat the softened butter in a large bowl until creamy. Gradually add the powdered sugar, mixing on low speed until combined, then crank it up to medium-high for a few minutes until it’s light and fluffy. Add the vanilla, salt, and 1 tbsp of milk/cream, mixing until smooth. Add more milk/cream a teaspoon at a time if you need a thinner consistency.
- Crumb Coat & Chill: Once the cakes are *completely* cool, level them if needed. Stack your two cake layers with a dollop of buttercream in between. Apply a thin layer of buttercream all over the cake – this is your “crumb coat” and it traps all those pesky crumbs. Pop the cake in the fridge for 15-20 minutes to set.
- Final Frosting Fun: Take the cake out of the fridge and apply a thicker, smooth layer of buttercream to the top and sides. Aim for a nice, clean finish.
- Time for the Beach Design!
- **The Sand:** Take your crushed graham crackers and gently press them onto one side of the cake, covering about two-thirds of the cake top and down the side. This is your sandy beach!
- **The Ocean:** Take about 1/3 of your remaining buttercream and tint it blue with food coloring. Mix until you get your desired ocean shade. Using an offset spatula or a small knife, spread the blue frosting on the remaining third of the cake top, right next to your “sand.” You can gently swirl it to create a water effect.
- **The Waves:** If you’re feeling fancy, put a little more blue frosting (or even a tiny bit of white frosting) into a piping bag with a small round tip (or just snip the corner off a Ziploc bag) and pipe some small waves where the blue meets the sand. You can also use a spoon to gently flick up some “waves.”
- **Final Touches:** Add your edible pearls, white chocolate shells, or gummy sharks to really bring your beach to life!
Common Mistakes to Avoid
Listen, we’ve all been there. Learn from my past kitchen catastrophes!
- **Overmixing the batter:** It’s a cake, not a marathon. Stop once just combined, unless you like hockey pucks for cake. Nobody wants that.
- **Frosting a warm cake:** Unless you’re going for a ‘melted ice cream cone on a hot day’ vibe (which, honestly, isn’t terrible, but not what we’re going for here), **let that cake chill. Completely.** Trust me, warm cake + buttercream = sliding mess.
- **Not leveling your cake:** If your cake has a dome, level it with a serrated knife. It makes stacking and frosting SO much easier and prettier.
- **Too much food coloring:** Start with a tiny drop of gel food coloring for the blue. A little goes a long way, especially if you want a subtle, clear blue ocean, not a murky deep sea abyss.
- **Rushing the decorating:** This is the fun part! Put on some chill music, grab a drink, and enjoy turning your cake into a tiny masterpiece.
Alternatives & Substitutions
No stress if you don’t have everything! We’re flexible here.
- **Cake Mix Cheats:** Look, I get it. If you’re short on time (or patience), a good quality vanilla cake mix is your bestie. Just follow the box instructions for baking, then pick up at the frosting step. No judgment here, we’re all busy!
- **Different Crumb for Sand:** No graham crackers? No problem! Crushed vanilla wafers, shortbread cookies, or even finely ground toasted coconut can work wonders for your sandy beach.
- Cream Cheese Frosting: If you’re not a fan of classic buttercream, a delicious cream cheese frosting would also be amazing. Just make sure it’s firm enough to hold its shape!
- **Vegan Options:** You can totally make this vegan! Use plant-based butter, egg replacer, and non-dairy milk for the cake. For the buttercream, swap regular butter for a vegan butter alternative and use plant-based milk.
- **Other Decorations:** Get creative! Mini edible seashells, candy rocks, or even a tiny toy umbrella could make your beach scene unique.
FAQ (Frequently Asked Questions)
Got questions? I’ve got (casual) answers!
- Can I make this cake ahead of time? Absolutely! You can bake the cake layers a day or two in advance, wrap them tightly, and store them at room temperature or in the fridge. The frosted cake can also chill in the fridge for 3-4 days. Just bring it to room temp for about 30 minutes before serving for the best flavor and texture.
- My frosting is too thin/thick! Help! Chill! Just like life, sometimes you need to adjust. Too thin? Add more powdered sugar, a tablespoon at a time. Too thick? A tiny splash more milk or cream, a teaspoon at a time. It’s all about finding that perfect balance.
- What if I don’t have blue food coloring? No worries! You can either skip the blue “water” and just make an all-sand beach, or use a tiny bit of spirulina powder (it gives a green-blue hue), or even some matcha powder for a very green pond look if you’re feeling adventurous!
- Can I use a different cake flavor? Heck yeah! Lemon cake would be amazing for a beach theme, or even a simple chocolate cake for a darker “sand.” It’s your edible canvas!
- How do I get my frosting super smooth? A good crumb coat is key! After that, use an offset spatula dipped in hot water (and wiped dry) to smooth out your final layer of frosting. Keep practicing, you’ll get there!
- How many does a bento cake serve? A bento cake is usually meant for 1-2 people, max 4 if you’re feeling generous with tiny slices. It’s the perfect portion for a personal treat or a cute gift!
Final Thoughts
You just made a masterpiece! Seriously, take a moment to admire your handiwork. You literally brought a beach to life, albeit a very small, delicious one. Now, go impress someone—or better yet, treat yourself—with your new culinary skills. You’ve earned it! And maybe take a bite and pretend you’re actually on that beach, waves crashing, sun shining. You deserve that mini-vacation, even if it’s just in cake form. 😉 Happy baking, my friend!
