So, someone’s birthday is coming up, and you *promised* cake, but now you’re staring at your kitchen like it’s a foreign planet? Been there, my friend. Many times. Fear not, because today we’re tackling the Everest of desserts – the Birthday Chocolate Cake – but making it so utterly easy and ridiculously delicious, you’ll wonder why you ever bought one from a store. Let’s make some magic (and a glorious mess)!
Why This Recipe is Awesome
Okay, let’s be real: this isn’t just *any* chocolate cake. This is THE chocolate cake. It’s so moist it practically melts in your mouth, so chocolatey it’ll make you question all other chocolate cakes, and so simple to make, it’s practically idiot-proof. Seriously, even I, a person who once set off a smoke alarm while making toast, can nail this one. Plus, it looks super impressive, making you seem like a culinary genius without, you know, actually having to *be* one. It’s the perfect secret weapon for birthdays, or any day ending in ‘y’ when you just need cake.
Ingredients You’ll Need
Gather your troops! Here’s what you’ll need to assemble this chocolate masterpiece. Don’t worry, nothing too exotic here.
- For the Cake:
- 2 cups All-Purpose Flour: The backbone of our cake. No fancy stuff needed.
- 2 cups Granulated Sugar: For that sweet, sweet magic. Because, cake!
- ¾ cup Unsweetened Cocoa Powder: The star of our show. Make sure it’s good quality; it makes a difference!
- 2 tsp Baking Soda: Our lift-off crew for that perfect rise.
- 1 tsp Baking Powder: Baking soda’s trusty sidekick, ensuring maximum fluff.
- 1 tsp Salt: Just a pinch, to make all those chocolatey flavors pop.
- 1 cup Whole Milk: Or buttermilk, if you’re feeling fancy. Room temperature is best, science says so!
- ½ cup Vegetable Oil: For that super moist, tender crumb. Don’t skip this!
- 2 Large Eggs: Also at room temperature. They bind everything together.
- 2 tsp Vanilla Extract: Don’t skimp. It’s like perfume for your cake.
- 1 cup Boiling Water (or Hot Coffee): The secret weapon for extra deep chocolate flavor and moisture. Trust me on this one!
- For the Chocolate Buttercream Frosting:
- 1 cup (2 sticks) Unsalted Butter: Softened, because no one likes lumpy frosting.
- 3-4 cups Powdered Sugar: Sifted, unless you like powdery explosions.
- ¾ cup Unsweetened Cocoa Powder: More chocolate! Are you surprised?
- ½ cup Whole Milk (or cream): Just enough to get that perfect consistency.
- 1 tsp Vanilla Extract: Because everything needs vanilla.
Step-by-Step Instructions
Alright, apron on, game face ready! Let’s bake this beauty.
- Preheat & Prep: Get that oven fired up to 180°C (350°F). Grab two 9-inch round cake pans. Grease and flour them meticulously, or line with parchment paper. **Don’t skip this step!** No one likes a stuck cake.
- Dry Mix Magic: In a large bowl, whisk together your flour, sugar, cocoa powder, baking soda, baking powder, and salt. Make sure there are no lumps.
- Wet Wonders: In another medium bowl, whisk the milk, oil, eggs, and vanilla extract until well combined.
- Combine Forces: Pour the wet ingredients into the dry ingredients. Mix on low speed with an electric mixer (or by hand) until just combined. Don’t overmix!
- The Hot Secret: Carefully, and slowly, pour in the boiling water (or hot coffee) while mixing on low speed. The batter will be thin – don’t panic! It’s supposed to be like that. This is your moist-cake insurance policy.
- Bake Time: Divide the batter evenly between your two prepared cake pans. Pop them in the preheated oven and bake for 30-35 minutes, or until a wooden skewer inserted into the center comes out clean.
- Cool Down: Let the cakes cool in their pans for about 10-15 minutes on a wire rack. Then, carefully invert them onto the wire rack to cool completely. **They must be completely cool before frosting!**
- Frosting Frenzy: While the cakes cool, let’s make the frosting. In a large bowl, beat the softened butter until creamy. Gradually add the sifted powdered sugar and cocoa powder, alternating with splashes of milk, until smooth and fluffy. Stir in the vanilla extract. If it’s too thick, add a tiny bit more milk; too thin, add more powdered sugar.
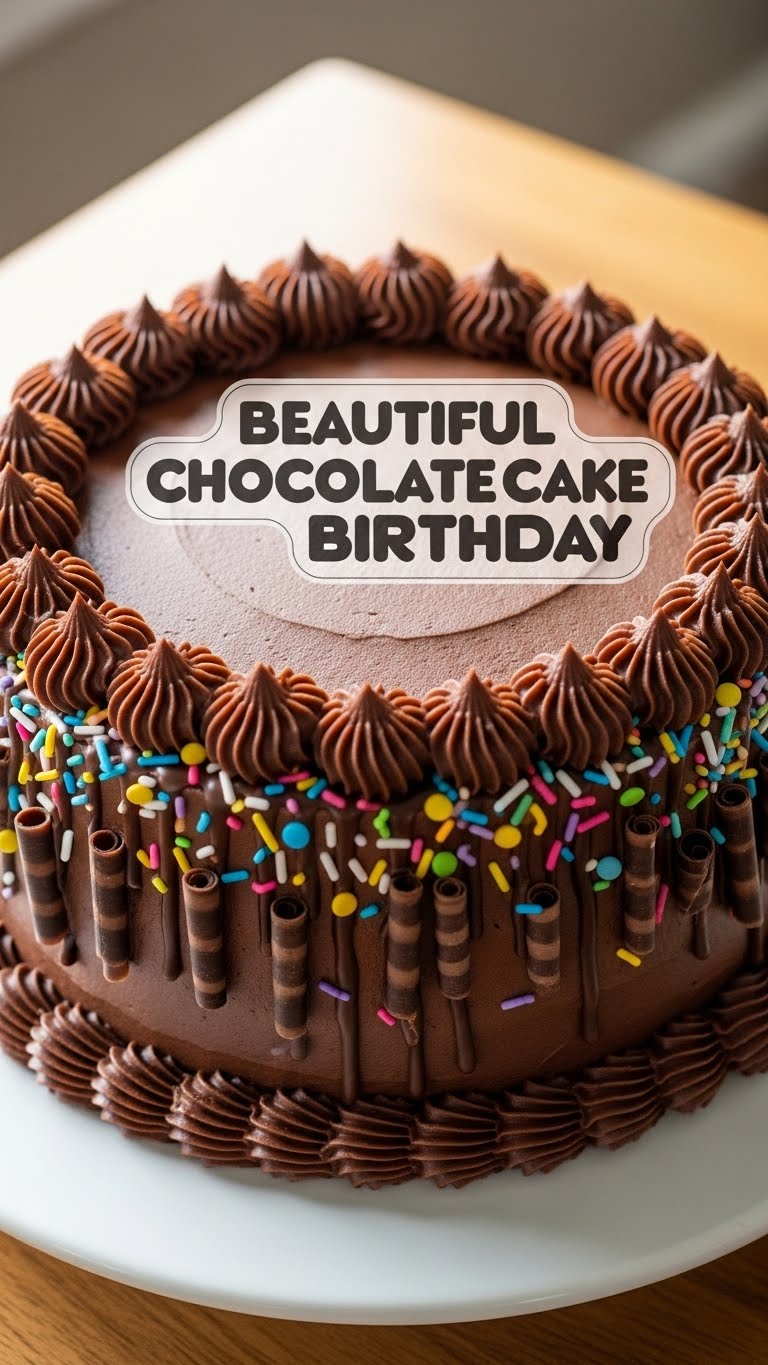
- Assemble & Admire: Once your cakes are fully chilled (seriously, wait!), place one layer on your serving plate. Spread a generous amount of frosting on top. Place the second cake layer on top, then frost the entire cake, sides and all. Decorate as desired – sprinkles are always a good idea for birthdays!
Common Mistakes to Avoid
We’ve all been there, trust me. Here are a few rookie errors to sidestep:
- Not Greasing Your Pans Properly: The absolute worst. Ever had half a cake stuck to the bottom? Precisely. **Grease and flour (or parchment) like your life depends on it!**
- Overmixing the Batter: This is a big no-no. You want a tender, fluffy cake, not a dense brick. Mix just until the ingredients are combined, then stop.
- Opening the Oven Door Too Early: Resist the urge to peek! Opening the door lets cold air in, which can make your cake sink. Let it bake in peace, okay?
- Frosting a Warm Cake: Unless you’re aiming for a melty, runny, sad frosting situation, let those cake layers cool down. Fully. As in, completely room temperature, maybe even a quick chill in the fridge if you’re impatient.
Alternatives & Substitutions
Life happens, ingredients run out. Here are some quick fixes:
- No Whole Milk? If you only have skim, that’s fine. For buttermilk, if you don’t have it, just add 1 tablespoon of white vinegar or lemon juice to 1 cup of regular milk and let it sit for 5 minutes. Boom, buttermilk.
- Boiling Water vs. Hot Coffee: If you’re not a coffee person, just use boiling water. But if you want to elevate that chocolate flavor to another dimension, **IMO**, hot brewed coffee is the absolute best. It doesn’t make the cake taste like coffee, just super chocolatey!
- Gluten-Free Flour: You can absolutely use a 1:1 gluten-free flour blend. Just note that the texture might be slightly different, but it’ll still be delicious.
- Dairy-Free: Swap out the milk for your favorite plant-based milk (almond, soy, oat). Use dairy-free butter and shortening for the frosting.
FAQ (Frequently Asked Questions)
Got questions? I’ve got answers (mostly humorous ones).
- Can I make this cake ahead of time? Absolutely! The unfrosted cake layers can be wrapped tightly in plastic wrap and kept at room temperature for a day or two, or frozen for up to a month. Just make sure they’re completely cool before wrapping.
- Why is my cake dry? Oh no! Did you overbake it? Or maybe measure your flour like a maniac, packing it in? **Always spoon and level your flour, not scoop it!** Overbaking is the main culprit though.
- My frosting is too thin/thick, help! Don’t panic! Too thin? Add more sifted powdered sugar, a tablespoon at a time. Too thick? Add a tiny splash of milk or cream, also a tablespoon at a time, until you get that perfect dreamy consistency.
- Can I use a different kind of frosting? Of course! A cream cheese frosting, ganache, or even a simple whipped cream would be divine. But for a birthday, this classic buttercream really shines.
- Is it really *that* beautiful? Darling, with a little love, some strategic frosting, and a sprinkle of magic (or actual sprinkles), yes. Yes, it is. It’s a showstopper, **FYI**.
Final Thoughts
So there you have it, your ticket to chocolate birthday cake glory. You’ve conquered the chocolate mountain, and honestly, you deserve a medal. Or at least the first slice. This cake isn’t just a dessert; it’s an experience, a moment of pure chocolate bliss. Now go forth and impress someone—or yourself—with your new culinary skills. You’ve earned it!

