Feeling that nagging craving for something sweet, comforting, and utterly delicious, but the idea of a complex recipe makes you want to crawl back into bed? Been there, done that, bought the T-shirt. Good news: I’ve got your back with a recipe so easy, it practically bakes itself. Well, almost.
Why This Recipe is Awesome
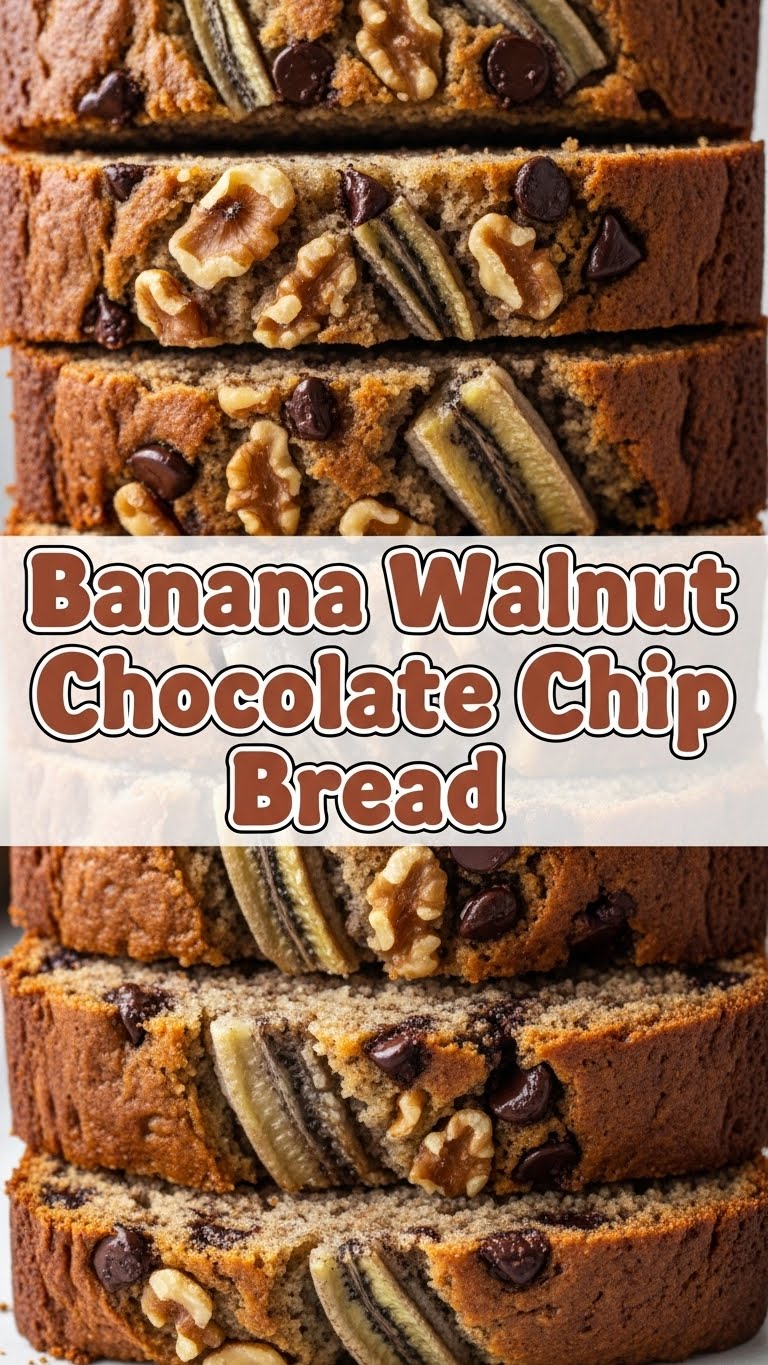
Listen, if you’re looking for a recipe that’s complicated, requires exotic ingredients, and makes you question all your life choices, you’re in the wrong place. This Banana Walnut Chocolate Chip Bread recipe is the exact opposite. It’s:
- Ridiculously simple. Seriously, if I can make this without setting off the smoke detector, anyone can.
- Uses ingredients you probably already have lurking in your pantry (especially those sad, forgotten bananas).
- Transforms said sad, forgotten bananas into pure, unadulterated joy. It’s like a magic trick, but tastier.
- Makes your entire house smell like a warm, cozy hug. Major bonus points here.
- It’s the perfect treat for breakfast, snack time, dessert, or a midnight raid on the kitchen. No judgment.
Ingredients You’ll Need
Gather ’round, my friends. Here’s what you’ll need for this masterpiece. Nothing too wild, I promise!
- 3 very ripe bananas: We’re talking brown, spotty, almost-black bananas. The uglier, the better. Don’t be shy; they hold the key to moist, flavorful bread.
- 1/3 cup (75g) unsalted butter: Melted. Because everything’s better with butter, right?
- 1/2 cup (100g) granulated sugar: For that sweet, sweet magic.
- 1 large egg: Lightly beaten. Happy chickens make happy bread.
- 1 teaspoon vanilla extract: A splash for sophistication.
- 1 1/2 cups (180g) all-purpose flour: Because we’re not fancy bakers here.
- 1 teaspoon baking soda: Our fluffy secret weapon. Don’t skip this, it’s clutch!
- 1/4 teaspoon salt: Just a pinch, because balance.
- 1/2 cup (60g) chopped walnuts: For that satisfying crunch. Unless you hate them, then skip ’em, you rebel.
- 1/2 cup (90g) chocolate chips: Because, well, it’s chocolate. Duh. Semi-sweet or milk, your call.
Step-by-Step Instructions
Alright, let’s get down to business! Follow these simple steps, and you’ll be a banana bread guru in no time.
- Prep Time! First things first, preheat your oven to 350°F (175°C). Grab a standard loaf pan (around 9×5 inches), and grease it like you mean it. A little flour dust is a good idea too, to prevent sticking.
- Mash ‘Em Up: In a large mixing bowl, get to mashing those beautiful, brown bananas. You can use a fork, a potato masher, or even your hands if you’re feeling primal. Don’t go crazy; a few lumps are totally fine (and even encouraged!).
- Wet Ingredients Unite: To your mashed bananas, add the melted butter, granulated sugar, beaten egg, and vanilla extract. Stir everything together until it’s just combined. We’re not aiming for perfection here, just harmony.
- Dry Ingredients Party: In a separate, medium-sized bowl, whisk together the flour, baking soda, and salt. Make sure it’s all mixed evenly so your bread rises beautifully.
- Combine Forces: Now, gently fold the dry ingredients into the wet banana mixture. Important: Don’t overmix! Stir just until the flour streaks disappear. A few lumps of batter are still our friends. Overmixing leads to tough bread, and we want soft, tender bread, right?
- Add the Good Stuff: Carefully fold in your chopped walnuts and chocolate chips. Make sure they’re evenly distributed so every slice gets some nutty, chocolatey goodness.
- Into the Pan! Pour your glorious batter into the prepared loaf pan. Smooth the top with a spatula if you’re feeling fancy.
- Bake It Baby: Pop that pan into your preheated oven. Bake for 50-60 minutes. You’ll know it’s ready when a wooden skewer or toothpick inserted into the center comes out clean. If it’s getting too brown on top, you can loosely tent it with foil.
- Cool Down: Once baked, take the pan out of the oven and let it cool in the pan for about 10 minutes. This helps it firm up. Then, carefully transfer it to a wire rack to cool completely. (Or just slice into it warm because, honestly, who can resist? No judgment here!)
Common Mistakes to Avoid
Nobody’s perfect, but we can definitely avoid some rookie errors. Trust me, I’ve made them all so you don’t have to!
- Overmixing the batter: I said it once, I’ll say it again: STOP M-I-X-I-N-G! Overmixing develops the gluten in the flour too much, resulting in dense, tough bread. We want light and fluffy!
- Using underripe bananas: Don’t even try it. Green bananas mean sad, flavorless, and less moist bread. Patience, young padawan, wait for those brown spots.
- Not greasing your pan properly: Unless you’re into the idea of chiseling your bread out with a butter knife, grease that pan generously. A little flour dusting on top of the grease is an extra layer of protection.
- Cutting it too soon: It’s tempting, I know! The smell is intoxicating. But letting it cool allows the starches to set, preventing a crumbly mess. If you want perfect slices, wait a bit. If you just want to devour it, go for it!
- Forgetting to preheat the oven: Rookie mistake! Your oven needs to be at the correct temperature from the start for proper rising and even baking.
Alternatives & Substitutions
Feeling creative? Or maybe you just ran out of something? No worries, we’ve got options!
- Nuts: No walnuts? Pecans are a fantastic stand-in. Or, if you’re a nut-hater (gasp!), just leave ’em out. Your bread, your rules.
- Chocolate: White chocolate chips? Dark chocolate chunks? Mini M&Ms? Swirl in some Nutella? Get wild! Or skip it if you’re feeling minimalist (but seriously, why?!).
- Spices: A pinch of cinnamon or nutmeg can add a cozy, autumnal twist. Highly recommend if you’re feeling adventurous. Cardamom is also surprisingly good!
- Dairy-free: Swap the butter for coconut oil or a dairy-free butter alternative. Easy peasy lemon squeezy.
- Gluten-free: You can absolutely use a 1:1 gluten-free flour blend for this recipe. Just make sure it contains xanthan gum.
FAQ (Frequently Asked Questions)
Got questions? I’ve got answers (and maybe a little sass)!
- My bananas aren’t brown enough, can I still make this? Well, technically yes, but your bread won’t be as sweet or moist. **Pro tip:** You can ripen them faster by baking them unpeeled on a baking sheet at 300°F (150°C) for 15-30 mins until they’re black and squishy. Genius, right?
- Can I use frozen bananas? Absolutely! Just thaw them completely and drain any excess liquid before mashing. They’ll be extra mushy, which is perfect for this recipe.
- How long does this bread last? HA! Good one. If it survives past day two, you’re doing better than me. Seriously, about 3-4 days at room temp, or a week in the fridge. Freezes beautifully too, if you actually manage to have leftovers.
- Can I make muffins instead? Oh, you fancy, huh? Yes! Fill muffin tins about 2/3 full and bake for 20-25 minutes, or until a toothpick comes out clean. Keep an eye on them; baking times vary.
- Is this healthy? Honey, it has bananas in it, so it’s practically a health food… right? Kidding! It’s a treat. Enjoy it. Life’s too short for calorie counting when banana bread is involved.
- What if I don’t have baking soda? Unfortunately, baking soda is key for that lovely rise and reacts with the acidity of the bananas. Baking powder isn’t a direct substitute for the same chemical reaction. **Don’t skip it!**
- Can I reduce the sugar? You can, but you’ll lose some moisture and tenderness. If your bananas are extra ripe, you could probably get away with reducing it by a couple of tablespoons without too much impact.
Final Thoughts
There you have it, folks! A fool-proof recipe for banana walnut chocolate chip bread that’ll make your kitchen smell like a dream and your taste buds sing. Go on, channel your inner baking superstar. Whip up a loaf, grab a coffee (or wine, no judgment), and savor every delicious bite. You totally crushed it. Now go impress someone—or yourself—with your new culinary skills. You’ve earned it!
