
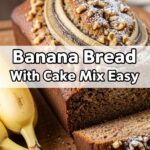
So you’re craving something warm, comforting, and utterly delicious but also, like, too lazy to spend forever in the kitchen, huh? Same, friend, same. You’re in luck because today we’re tackling the legendary Banana Walnut Bread. It’s the kind of recipe that screams “I’m a domestic goddess/god!” but actually only requires minimal effort. Trust me, if I can do it without setting off the smoke detector, you totally can too.
Why This Recipe is Awesome
Let’s be real, most recipes promise the world and deliver a crumbly mess. But this one? This one’s different. It’s practically **idiot-proof**. Seriously, even my cat could probably supervise this one without things going sideways. It’s perfect for those overripe bananas staring sadly at you from the fruit bowl, practically begging for a purpose. Plus, the smell that fills your kitchen while this bakes? Pure, unadulterated bliss. It’s like a warm hug, but in edible form, and way less awkward.
Another win? You don’t need fancy equipment. A bowl, a fork, and an oven are pretty much your main tools. It’s a low-stress, high-reward situation, and who doesn’t love that?
Ingredients You’ll Need
Gather your troops! Here’s what you’ll need to make this magic happen:
- The Bananas: 3 large, very ripe bananas. We’re talking brown, spotty, almost-ready-for-the-bin bananas. The browner, the better – that’s where all the sweetness lives!
- All-Purpose Flour: 1 ½ cups. Just your standard white flour, nothing fancy.
- Granulated Sugar: ¾ cup. Sweet, sweet joy.
- Egg: 1 large. Just one, to bind all that deliciousness together.
- Melted Butter: ¼ cup (½ stick). Because everything is better with butter. Melted, cooled slightly.
- Baking Soda: 1 teaspoon. Our trusty leavening agent. Don’t skip this unless you want a banana pancake.
- Salt: ½ teaspoon. A pinch to wake up all the other flavors.
- Vanilla Extract: 1 teaspoon. For that extra “oomph” of deliciousness.
- Walnuts: ½ cup, chopped. The crunchy bits! Totally optional, but highly recommended for that classic crunch.
Step-by-Step Instructions
- Preheat & Prep: First things first, get that oven fired up to **350°F (175°C)**. Then, grab a 9×5 inch loaf pan. Grease it up and flour it, or line it with parchment paper. Trust me, you don’t want your beautiful bread stuck to the pan.
- Mash the Bananas: In a medium bowl, take your super ripe bananas and mash them up with a fork until they’re mostly smooth with a few small lumps. Lumps are good, FYI, they add character.
- Wet Ingredients Party: In a separate, larger bowl, whisk together the melted butter and sugar until well combined. Then, beat in the egg and vanilla extract. It should look creamy and happy.
- Combine the Wet: Now, add your mashed bananas to the wet ingredient mix. Stir it all together until just combined. Don’t overmix!
- Dry Ingredients Unite: In a small bowl, whisk together the flour, baking soda, and salt. Make sure it’s all evenly distributed.
- Marry Wet & Dry: Gradually add the dry ingredients to the wet ingredients. Mix just until everything is moistened. **A few lumps are totally fine here – overmixing is the enemy of tender banana bread!**
- Fold in Walnuts (or not!): Gently fold in your chopped walnuts. If you’re not a nut fan, skip ’em. If you’re a chocolate fan, toss in some chocolate chips instead!
- Bake Away! Pour the batter into your prepared loaf pan. Pop it into the preheated oven and bake for **50-60 minutes**. How do you know it’s done? A wooden skewer or toothpick inserted into the center should come out clean.
- Cool Down: Once baked, let the bread cool in the pan for about 10 minutes. Then, carefully remove it from the pan and let it cool completely on a wire rack. Or, if you’re impatient like me, slice into it while it’s still warm. Your house will smell divine!
Common Mistakes to Avoid
Nobody’s perfect, but we can avoid some classic banana bread blunders:
- **Using Underripe Bananas:** Seriously, those firm, yellow bananas? They’re for smoothies, not for this bread. You need the brown, mushy ones for maximum sweetness and moisture. **This is key!**
- **Overmixing the Batter:** Once you add the flour, mix just until the ingredients are combined. Mixing too much develops the gluten, leading to a tough, dry bread. We want tender and moist!
- **Not Greasing Your Pan Properly:** There’s nothing sadder than a perfect loaf stuck to its pan. Grease it, flour it, or parchment-paper it. Your choice, just do it.
- **Opening the Oven Door Constantly:** Resist the urge to peek every five minutes. Let your bread bake in peace. Opening the door lets out heat and can make your bread sink.
Alternatives & Substitutions
Feeling adventurous? Here are some ways to shake things up a bit:
- Chocolate Chips: Swap the walnuts for ½ cup of chocolate chips, or go wild and use both! Dark chocolate, milk chocolate, white chocolate – you do you.
- Brown Sugar: For a deeper, more molasses-y flavor, use brown sugar instead of granulated sugar, or a mix of both.
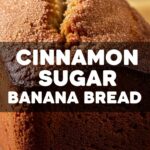
- Spices: Add 1 teaspoon of ground cinnamon or a pinch of nutmeg to the dry ingredients for an extra layer of warmth.
- Dairy-Free: Use a plant-based butter substitute or a neutral oil (like vegetable or canola oil) instead of regular butter.
- Gluten-Free: A 1:1 gluten-free baking flour blend works pretty well in this recipe, though texture might vary slightly.
FAQ (Frequently Asked Questions)
Got questions? I’ve got (casual) answers!
Q: My bananas aren’t ripe enough! What do I do?
A: Ah, the age-old dilemma. You can try baking them on a sheet pan at 300°F (150°C) for 15-30 minutes until their skins are black and shiny. Let them cool before mashing. Or, you know, just wait a day or two. Patience is a virtue, especially for banana bread.
Q: Can I use margarine instead of butter?
A: Well, technically yes, but why hurt your soul (and your bread’s flavor) like that? Butter just makes everything taste better, IMO. If you must use margarine, choose one that’s high in fat for better results.
Q: How long does banana bread last?
A: On the counter, wrapped tightly, about 3-4 days. In the fridge, it can last up to a week. If it makes it that long, you have more self-control than I do.
Q: Can I freeze banana bread?
A: Absolutely! Wrap the cooled loaf (or individual slices) tightly in plastic wrap, then foil. It’ll keep in the freezer for up to 3 months. Thaw on the counter when you’re ready for a treat.
Q: My bread sunk in the middle! What went wrong?
A: A few culprits here: oven door opened too soon, underbaked, too much leavening agent, or even using too many bananas. Make sure your oven temp is accurate!
Q: Is this considered breakfast or dessert?
A: My friend, it’s a “choose your own adventure” situation. It’s perfectly acceptable for both. Or as a midnight snack. We don’t judge here.
Final Thoughts
There you have it! Your ticket to warm, comforting, and ridiculously easy banana walnut bread. Go forth and conquer those sad, spotty bananas! This recipe is proof that delicious doesn’t have to mean difficult. Now go impress someone—or just yourself—with your new culinary skills. You’ve earned it!
