So, you’re looking for that sweet, creamy hug only a dessert can give, but you’re operating on ‘minimal effort, maximum deliciousness’ mode, right? My kind of person! We’ve all been there – staring into the fridge, dreaming of something epic, but the thought of preheating an oven makes us want to nap. Well, friend, dust off your spoon because today we’re tackling the legendary Banana Pudding with Vanilla Wafers. And guess what? It’s SO easy, you’ll wonder why you ever bothered with complicated recipes. Get ready to impress yourself (and anyone lucky enough to share a bite).
Why This Recipe is Awesome
Let’s be real, this isn’t just a dessert; it’s a nostalgia trip in a bowl. And the best part? It’s practically **idiot-proof**. Seriously, if you can whisk and layer, you’re golden. No baking required, which means more time for… well, whatever you do when you’re not baking (binge-watching, probably). It’s quick to assemble, a total crowd-pleaser, and frankly, it tastes like pure sunshine and happiness. Plus, it’s pretty forgiving. Mess up a layer? Who cares! It all tastes amazing blended together. It’s the ultimate “I tried (but not really)” dessert.
Ingredients You’ll Need
Gather ’round, my sweet-toothed companions! Here’s your shopping list for instant gratification:
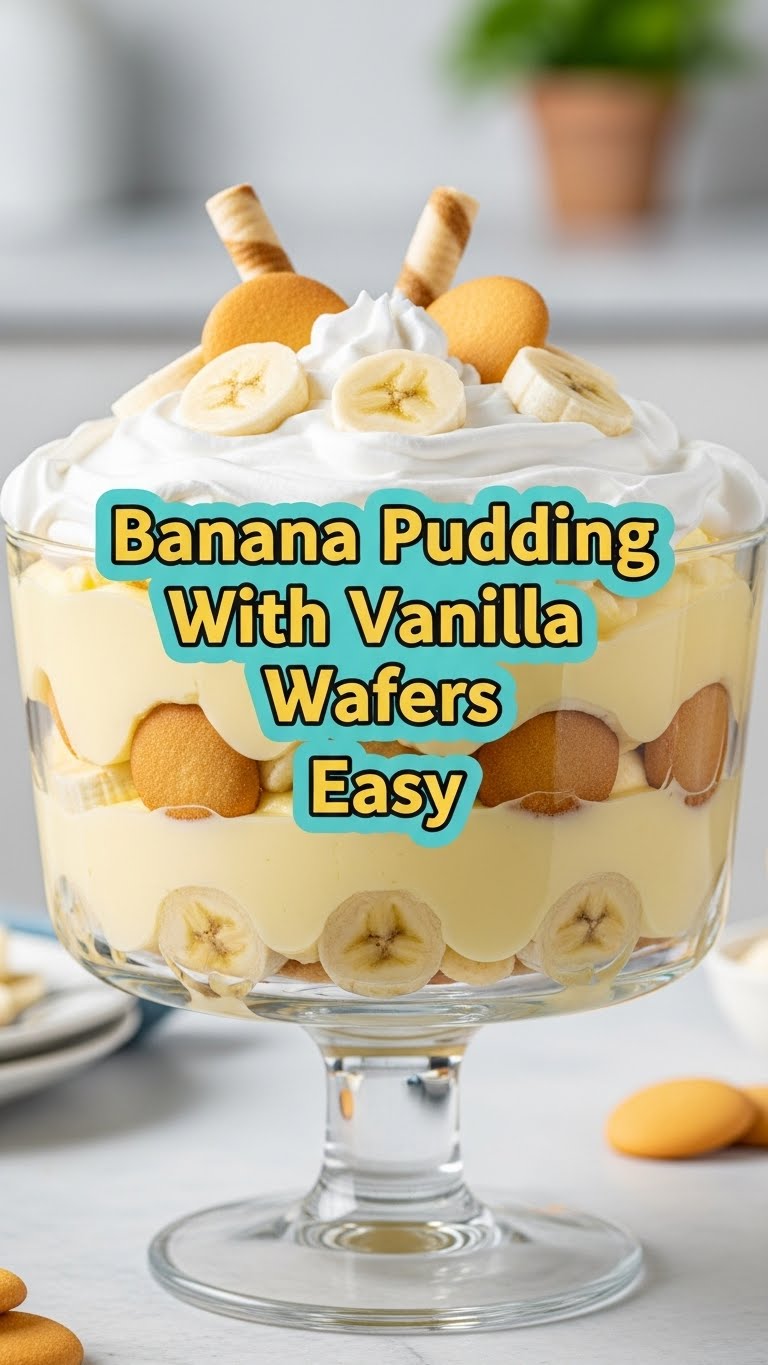
- 1 box (11 oz) Nilla Wafers: The OG, the MVP, the crunchy foundation of our masterpiece. Grab an extra box for snacking, you know you want to.
- 5-6 ripe (but not mushy!) bananas: Sliced and ready to be the star. We’re going for sweet, not “banana bread gone wrong” mush.
- 2 boxes (3.4 oz each) instant vanilla pudding mix: Your secret weapon for speed. Don’t judge, it’s a shortcut to happiness!
- 4 cups cold milk: Whole milk is highly recommended for maximum creaminess, but use what you have. Just make sure it’s cold, okay?
- 1 tub (8 oz) whipped topping (like Cool Whip), thawed: Or, if you’re feeling extra fancy, make some fresh whipped cream. No judgment either way!
- Optional: 1 can (14 oz) sweetened condensed milk: For that extra rich, dreamy custard factor. Trust me, it’s a game-changer if you want next-level goodness.
Step-by-Step Instructions
- Whisk Away! In a large bowl, combine the instant vanilla pudding mixes and the 4 cups of cold milk. Whisk it like you’re trying to win an Olympic medal for about 2 minutes until it starts to thicken. Don’t under-whisk, or it’ll be soupy!
- Sweeten the Deal (Optional). If you’re using sweetened condensed milk, now’s the time! Gently fold it into your pudding mixture. This adds a divine richness and sweetness that takes it from good to “OMG, I need more!”
- Chill Out. Pop that pudding mixture into the fridge for at least 5-10 minutes. This gives it time to firm up a bit more, making for better layers. **Patience, young grasshopper!**
- Banana Prep. While the pudding is chilling, slice your bananas into nice, even rounds. Not too thick, not too thin. Goldilocks style.
- Layer Up! Grab your prettiest (or biggest) serving dish. Start with a single layer of Nilla Wafers on the bottom.
- Banana Time. Next, arrange a layer of your sliced bananas over the wafers. Don’t be shy; cover that whole wafer layer.
- Pudding Party. Spoon about half of your now-chilled pudding mixture over the bananas. Spread it gently so everything is covered in creamy goodness.
- Repeat Performance. Do it again! Another layer of wafers, then bananas, then the rest of your pudding.
- Top it Off. Finally, spread the thawed whipped topping generously over the final layer of pudding. You can make it smooth or create fun little peaks with your spoon.
- The Grand Chill. Cover your masterpiece with plastic wrap and pop it back into the fridge. Let it chill for at least 4 hours, or ideally, overnight. This is crucial! It allows the wafers to soften and the flavors to really meld.
- Serve and Devour! Scoop it out and bask in the glory of your effortless creation. Enjoy!
Common Mistakes to Avoid
Even though this recipe is super easy, there are a few banana peels you can trip on. Learn from my past (minor) culinary misadventures:
- Using Unripe Bananas: Don’t do it! Hard, bland bananas are a sad affair. You want sweet, slightly spotty ones. Too green, and your pudding will taste like disappointment.
- Skipping the Chill Time: Impatience is a virtue sometimes, but not here. If you don’t chill the pudding properly, you’ll end up with a watery, unset mess. **Seriously, chill it!**
- Not Enough Wafers: You might think one box is enough. You’d be wrong. Always have extra. For layering, for snacking, for emotional support.
- Overmixing the Pudding: Whisk until it’s thick, then stop. Keep whisking, and you might actually thin it out again. We’re aiming for creamy, not soupy.
- Assembling Too Far Ahead: While it needs a good chill, don’t make it three days in advance unless you *really* love super mushy wafers. 12-24 hours is usually the sweet spot.
Alternatives & Substitutions
Feeling rebellious? Want to put your own spin on it? I like your style! Here are a few ideas:
- Wafer Swap: Chocolate wafers for a chocolate-banana twist, shortbread cookies, or even graham crackers can work in a pinch. **IMO**, Nilla Wafers are king, but live your truth.
- Pudding Playground: Try butterscotch pudding for a different flavor profile, or even banana cream pudding mix for an extra banana punch.
- Whipped Topping Upgrade: Freshly whipped cream is always a winner if you have the time. You can even add a touch of vanilla extract to it for extra oomph.
- Mix-Ins & Toppings: A sprinkle of cinnamon, a drizzle of caramel, toasted coconut flakes, or a few chocolate shavings on top can elevate your pudding. Get wild!
- Make it Boozy: A splash of rum or banana liqueur in the pudding mixture? Now we’re talking.
FAQ (Frequently Asked Questions)
- Can I use regular pudding, not instant? Well, technically yes, but why add extra steps to an “easy” recipe? For convenience and speed, instant is your best friend here.
- How long does this masterpiece last? In my house? About 30 minutes. Realistically, it’s best eaten within 2-3 days when stored covered in the fridge. After that, the wafers start getting *really* soft, which some people love, but others find a bit much.
- What if my bananas are too ripe? They’ll be softer and might mash a bit more into the pudding, making it a bit gooier. Not necessarily bad, just a different texture. Embrace the mush, if you must!
- Can I make it ahead of time for a party? **FYI**, yes! It actually tastes better after it’s had at least 4-6 hours to chill and let all those glorious flavors get to know each other. Overnight is perfect.
- Can I use low-fat milk? You *can*, but for the creamiest, dreamiest banana pudding experience, whole milk is king. The fat content just gives it a richer mouthfeel.
- Do I *have* to chill it? Yes, yes, a thousand times yes! Unless you want a warm, soupy, disappointing mess. The chilling time is essential for the pudding to set and for the wafers to soften to that perfect cake-like consistency.
- How do I prevent bananas from browning? A little spritz of lemon juice or fruit fresh can help, but honestly, once they’re covered in pudding, you won’t really notice. They’re going to get eaten too fast to worry about browning!
Final Thoughts
So there you have it, folks! Your new go-to dessert for when you want to impress without breaking a sweat, or just satisfy that deep-seated craving for something sweet and comforting. This easy banana pudding with vanilla wafers is pure joy in a bowl. Now go forth and conquer those cravings. You’re basically a dessert wizard now! Don’t forget to send me a slice (or five)! Happy spooning!


