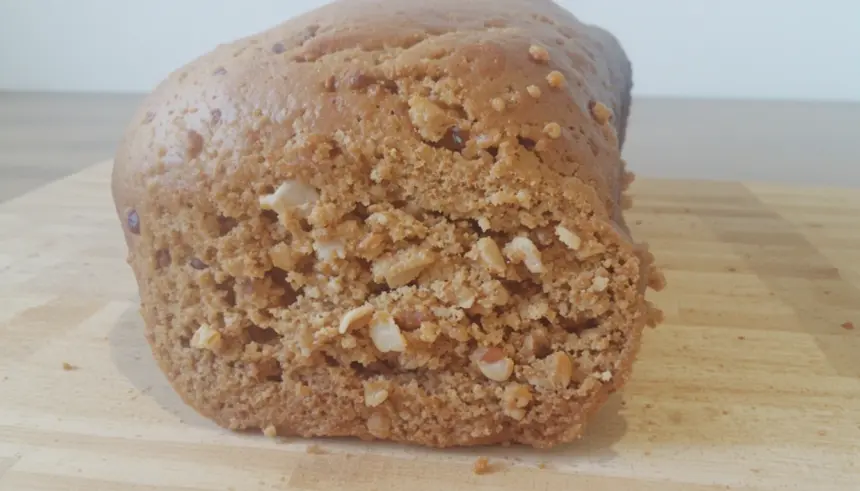
So you’ve been staring at those sadly spotted bananas on your counter for days, promising yourself you’ll “do something” with them, but then life happens, right? And maybe you’re also trying to sneak a little extra protein into your day without resorting to another chalky shake? My friend, welcome to your new favorite obsession: Banana Nut Protein Bread. It’s the perfect blend of cozy comfort and “I’m-kind-of-healthy-ish” smugness.
Why This Recipe is Awesome
First off, let’s be real: this isn’t just *any* banana bread. This is the unicorn of banana breads. It’s moist, flavorful, packed with actual goodness (hello, protein!), and yet somehow feels like a decadent treat. It’s also practically **idiot-proof**. Seriously, if I can make it without setting off the smoke detector, you’re golden. No fancy equipment needed, just a bowl, a whisk, and a healthy dose of enthusiasm (or at least, a craving).
Plus, it’s versatile. Breakfast, snack, post-workout fuel, or a cheeky midnight bite – it fits every occasion. And the best part? Your kitchen will smell like a bakery exploded in the best possible way. Prepare for compliments, because this bread is a showstopper, even if your only audience is your Netflix queue.
Ingredients You’ll Need
Gather ’round, pantry warriors! Here’s your shopping list for deliciousness:
- 3 Ripe Bananas: And I mean *ripe*. We’re talking brown spots, practically bruised. The browner they are, the sweeter and more flavorful your bread will be. Don’t be shy; embrace the mush!
- 2 Scoops Vanilla Protein Powder: This is our secret weapon for that protein punch. Whey, casein, plant-based – whatever floats your boat. Vanilla is a safe bet, but feel free to experiment with a subtle caramel or even unflavored for a more classic taste.
- 1 ½ cups All-Purpose Flour: Or whole wheat if you’re feeling extra virtuous. Gluten-free 1:1 blend works great too!
- 2 Large Eggs: Our trusty binders, bringing all the ingredients together in a harmonious union.
- ½ cup Maple Syrup or Honey: Or your favorite liquid sweetener. Adjust to your sweetness preference, but remember those bananas bring their own sugar party.
- ¼ cup Melted Coconut Oil or Unsalted Butter: Just a touch for moisture and richness. If you’re using butter, make sure it’s cooled a bit after melting.
- 1 tsp Baking Soda: The magic fluffy-maker!
- ½ tsp Salt: Don’t skip this! It balances out the sweetness and makes all the flavors pop.
- 1 tsp Cinnamon: Because what’s banana bread without that warm, cozy spice?
- ½ cup Chopped Walnuts or Pecans: For that essential crunch and nutty flavor. Totally optional if you’re not a nut person (or have allergies!), but IMO, they elevate the experience.
- Optional: A splash of vanilla extract (because vanilla makes everything better) or a handful of chocolate chips (because… chocolate).
Step-by-Step Instructions
Alright, apron on (or not, we’re casual here!), let’s get baking!
- Preheat & Prep: First things first, crank up your oven to **350°F (175°C)**. Grease and flour a standard loaf pan (9×5 inches). You can also line it with parchment paper for easy removal.
- Mash ‘Em Up: In a large bowl, take those gloriously ripe bananas and mash them with a fork until they’re mostly smooth with a few small chunks – a bit of texture is nice!
- Wet Ingredients Unite: To the mashed bananas, add the eggs, maple syrup (or honey), melted oil/butter, and vanilla extract (if using). Whisk everything together until well combined. Don’t overmix, just get it blended.
- Dry Goods Party: In a separate medium bowl, whisk together the flour, protein powder, baking soda, salt, and cinnamon. Make sure there are no lumpy bits of protein powder!
- Combine & Fold: Pour the dry ingredients into the wet ingredients. With a spatula or wooden spoon, gently mix until just combined. **Do not overmix!** A few streaks of flour are totally fine; overmixing will lead to tough bread.
- Nutty Finish: Gently fold in your chopped walnuts or pecans (and chocolate chips, if you’re feeling extra sassy).
- Into the Pan: Pour the batter into your prepared loaf pan and spread it evenly. You can sprinkle a few extra nuts on top for visual appeal, if you like.
- Bake It ‘Til Golden: Pop it in the preheated oven and bake for **45-60 minutes**. The baking time can vary, so start checking around 45. You’ll know it’s done when a toothpick inserted into the center comes out clean or with a few moist crumbs attached.
- Cool Down: Once baked, let the bread cool in the pan for about 10-15 minutes before transferring it to a wire rack to cool completely. This is the hardest part, FYI, because the smell is intoxicating!
Common Mistakes to Avoid
Even the pros make blunders, but with these tips, you’ll sail smoothly to banana bread glory!
- Under-ripe Bananas: Using green or yellow bananas is a cardinal sin. They won’t provide the sweetness or moisture needed. Embrace the brown!
- Overmixing the Batter: This is a big one. Mixing too much develops the gluten in the flour, resulting in a tough, chewy loaf instead of a tender, moist one. Mix until just combined, then stop!
- Skipping the Cool Down: Patience, young padawan! Cutting into hot bread can make it crumbly and difficult to slice. Let it chill out a bit; it’s worth the wait.
- Forgetting to Grease the Pan: Unless you love a challenge (and scraping bread out of a pan), a properly greased and floured pan is your best friend. Parchment paper is an even *better* friend.
Alternatives & Substitutions
Feeling adventurous? Or just working with what you’ve got? Here are some fun tweaks:
- Flour Power: Not into all-purpose? Try whole wheat pastry flour for a slightly denser, nuttier loaf, or a 1:1 gluten-free baking blend.
- Sweetener Swap: Agave, brown sugar, or even a sugar-free substitute like erythritol can work in place of maple syrup/honey. Just adjust to taste.
- Nut-Free Zone: If nuts aren’t your jam (or you have allergies), simply omit them! Or swap for seeds like pumpkin seeds or sunflower seeds for a different crunch.
- Protein Punch-Up: Feeling a different protein powder flavor? Chocolate protein powder makes a surprisingly delicious, slightly darker bread. Just be mindful of how strong the flavor is.
- Add-ins Galore: Get creative! Shredded coconut, dried cranberries, a swirl of peanut butter, or even a cream cheese frosting drizzle once cooled. The world is your banana bread oyster!
FAQ (Frequently Asked Questions)
- Can I use fresh, firm bananas?
Oh, bless your heart. Technically you *could*, but you’d be missing out on all the natural sweetness and moisture that super-ripe bananas provide. It’d be bland and dry. Don’t do it to yourself (or the bread).
- What if I don’t have protein powder?
No worries! You can just omit it. The texture might be slightly different, a bit less dense, but it’ll still be delicious banana bread. You might want to add an extra tablespoon or two of flour if the batter seems too wet.
- How long does this bread last?
In my house, about 24 hours, if I’m lucky! Kidding (mostly). Stored in an airtight container at room temperature, it’s good for 3-4 days. In the fridge, it’ll last up to a week. You can also slice it and freeze individual pieces for quick grab-and-go snacks!
- Can I make muffins instead of a loaf?
Absolutely! Divide the batter into a greased muffin tin. Bake for about 20-25 minutes, or until a toothpick comes out clean. Perfect for portion control (or for eating three without guilt).
- Is there a dairy-free option?
You bet! Just use coconut oil (or another plant-based oil) instead of butter, and ensure your protein powder is dairy-free. Many plant-based protein powders work wonderfully!
- My bread is dense and gummy, what happened?
Sounds like you might have overmixed the batter, buddy. Remember, gentle folding is key! Or perhaps your oven temp was off, or your bananas weren’t quite ripe enough. Live and learn, right?
Final Thoughts
So there you have it, folks! Your new go-to recipe for when you’re craving something comforting, delicious, and secretly good for you. This Banana Nut Protein Bread is a total winner, perfect for fueling your day or simply treating yourself because, frankly, you deserve it.
Now go forth, bake up a storm, and impress your taste buds (and maybe a few friends, if you’re feeling generous enough to share). You’ve earned those bragging rights, chef! Enjoy!
